Basic Major Arpeggio Theory
Like major chords, the major arpeggio is made up of three key ingredients...
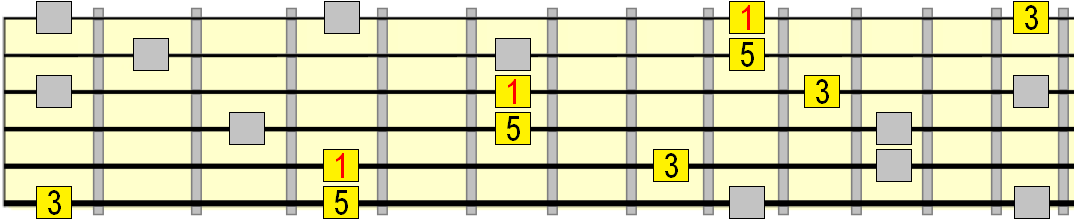
The root (1) - this is the note we use to name the chord/arpeggio (e.g. E major has an E root. C major has a C root).
The major 3rd (3) - this is the interval that gives the chord/arp its major sound.
The perfect 5th (5) - a more neutral sounding interval that is a part of every major chord.
Even if you're unsure what these interval names/numbers mean, you'll see how they can be used to form repeating, movable patterns on the fretboard.
This means you don't have to know the individual notes of every arpeggio you play (e.g. C major is C, E, G). Instead, you can memorise a few patterns and simply move them to the appropriate root for the chord you're playing over.
In other words, spatial awareness of how one note relates to another, in any key and over any chord, is a more efficient use of your practice time than trying to memorise each individual note of every chord/arpeggio.
Major Arpeggio Patterns
Let's start by building our patterns in the same way we would with scales.
Each pattern has its own root position(s), which will tell you where to position the pattern for the chord you're playing over.
Use a metronome to build your speed and timing accuracy. I recommend increments of 5 BPM, only increasing the tempo when you're 100% confident with playing at the current tempo.
Tip: You don't always have to play the entire pattern, from the lowest to highest string (and vice versa). Try also isolating the top, middle and bottom part of the pattern.


A Note On "Rolling"
Some of the above patterns look challenging. And they are! But as demonstrated in the video, you can use a technique called rolling to negotiate those "two/three strings, same fret" sequential movements.

If we were moving up from 2nd to 1st string, fret the 2nd string as normal, with the tip of your finger.

Collapse back the same finger until the 2nd string lifts off the fret and the pad of your finger tip frets the 1st string.
Reverse the above sequence for moving down the strings.
Rolling is an advanced technique that takes some time to master. Keep persevering with it and have patience.
Practice moving between just two strings like this, with each finger, until you get it. It's a hugely valuable skill to have under your fingers!
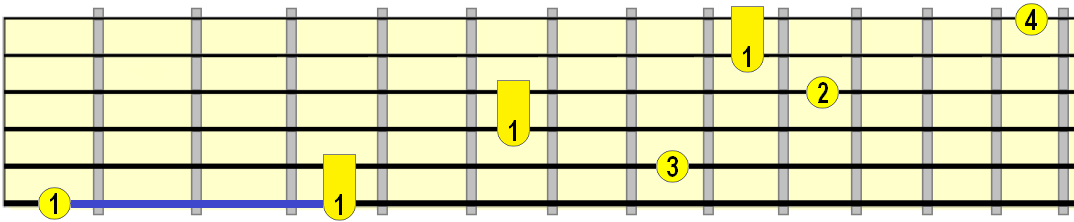
The Major Arpeggio Roadmap
Here, we string together the patterns from above to create one large neck-wide pattern. Remember, the sequence of patterns remains exactly the same for any chord. The only difference is where we position the root of the patterns in relation to the chord we're playing over.
A few examples coming up. See if you can spot the earlier "box" patterns sequenced within the larger roadmap...
C Major
So all the roots (1) are on the note C.

A Major
All the roots are on A.

E Major
All the roots are on... yep, E!

So this sequence of patterns is like a "conveyor belt" that moves with the root of the chord you're playing over.
Try and continue the sequence beyond the 12th fret.
Tip: you can also see how the arpeggio forms on each individual string. Sometimes you might want to play them like this (e.g. for pedal notes).
Connecting The Patterns
Often you'll just play arpeggios in their box patterns from earlier. But we can also use the connection of these patterns, through the roadmaps above, to span larger areas of the neck.
This is useful if you want to jump between positions freely and create smoother, seamless phrases up and down the neck. This will be especially useful when we come to combining arpeggios with scales further down the line.
As demonstrated in the video, you'll need to use slides in some situations, in order to correctly position yourself at the next fret. But this has a welcome side-effect of giving your movements more fluidity and feeling.
In other situations, you'll be challenged to make large fret jumps. This is valuable practice for targeting the correct fret accurately and cleanly.
In other words, these kinds of movements give you more freedom to go where you want on the neck, rather than being constrained within a 5 or 6 fret radius, as so many players get stuck in.
Connected Pattern 1


Connected Pattern 2
Keep Practicing
When you have the individual patterns memorised, continue to practice linking them together in different ways. Challenge yourself! You can use my blank fretboard diagrams to mark on your own sequences.
Eventually, the roadmap (the sequence of arpeggio patterns) will become internalised, which means you'll be able to keep your bearings no matter where you are on the fretboard.
Later, we'll learn how to connect these arpeggio patterns with related scales. To have these three important tones covered (1, 3, 5), means you'll find it far easier to form melodic phrases across the neck.
