The Basic Sliding Technique
Some slides will span just one or two frets. Others will span more of the neck. We should be confident with using both short and long slides to accurately target a fret position.
Sliding Into a Note
Let's begin with a simple exercise.
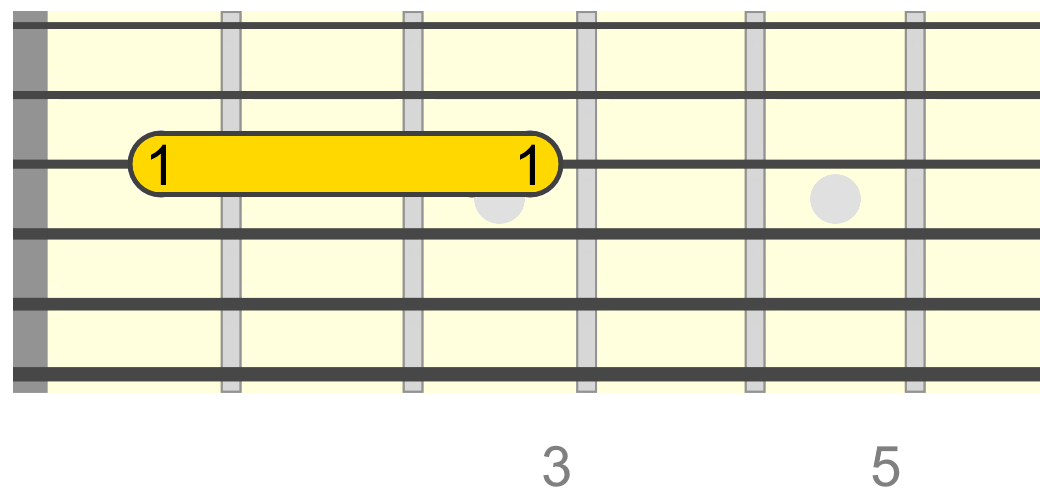
Fret the 3rd string at the 1st fret using your index finger. This will be our starting position/note for the slide.
Next, choose a target note. This is the note we want the slide to end on. Often the starting note won't register as much because in many cases we'll be sliding out of it immediately, i.e. as soon as it's picked. So it's often the target note that really matters, with the slide becoming a kind of "after thought" in the overall sequence.
Here we're going to target the 2nd fret (same string!), which means our slide spans only one fret (i.e. a half step or semitone).

So, pick your starting note as usual and, keeping the string pressed, immediately slide to the 2nd fret. Once you reach that 2nd fret target note, hold your finger there as if you're accenting the note as normal...
Listen to that held target note. It should resonate cleanly and clearly, just as it would if you'd picked it. The only difference is we've "slurred" into it.
To make sure it resonates cleanly, the slide needs to be a quick and smooth movement, with a consistent pressure on the fretboard.
Try not to press down harder or softer as you slide. Keep your fingers and hand relaxed and just let the finger tip glide across the string to its destination.
Make sure your finger comes to rest in the same position it would if you were fretting the target note as normal - just behind the fret wire. This will maximise the resonance of the target note.
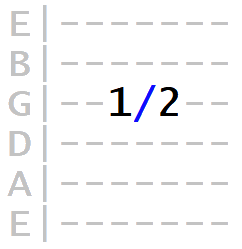
Here's how the above would be presented in basic tab form.
We use a / forward slash to represent sliding up the fretboard and a \ back slash for sliding down.
So 1 / 2 means "slide up from the 1st to 2nd fret".
Next, try a whole step slide. That's the equivalent of two frets. So, starting in the same position (1st fret), this time we're sliding up to the 3rd fret...
We don't have to move off the starting note that quickly, however. We could hold the starting note a bit longer and still use a slide to the target note...
Exactly the same pointers from before apply to longer slides. Quick, smooth and constant pressure.
You can probably guess where this exercise is heading!
Increase the distance of your slides by one fret at a time, until you reach the octave of the starting note (13th fret in this case)...

Now, most of these are unusually large slides and unlikely to be used in a solo. But what this exercise does is train you to slide to any given target note accurately. This is about training our hand-eye co-ordination.
Once you can do this comfortably, without mistakes, try the same exercise using your other fingers, as there'll be times when you need to slide using your middle, ring and even your pinky finger (though it's possible to avoid the pinky slide in most cases).
You should also try the same exercise on the other strings. The slide will feel different on the thicker/wound vs thinner strings.
We can also slide down the neck into a target note.
This time, our target note will be at the 7th fret.
Similar to the process before, try sliding down to that note from one, two, three, four etc. frets above it...
Remember, try both sliding as soon as you've picked the starting note and holding the starting note before you slide.
Sliding Out of a Note
This is less about a specific target note, but it gives our solos a little extra "punctuation" - kind of more like an exclamation mark than a period/stop.
Start higher up the fretboard for this exercise. For example, the 12th fret will do. Any string.
Pick the note as usual. Hold it for a second or two (add a vibrato if you want) and then slide down the fretboard towards the headstock...
It's up to you how long you make this downward slide, but try taking it down to the open position (or 1st fret).
You'll most often want to mute the string once you reach the end of the slide out. To do this, simply touch the string with any part of your pick hand. You'll need to time the mute as soon as you reach the point at which the slide ends.
However, if you want to give your slide out a new target note, slide down to that fret (again, just before the fret wire) and hold your finger in that position. The note, again, should sound cleanly.
Sequencing & Timing Slides
Of course, we'll want to be able to sequence our slides within regular picked phrases and patterns. There are many types of slide we can use to embellish our phrases and move across different neck areas. But the most important first step is to ensure you can time your slides accurately within a sequence.
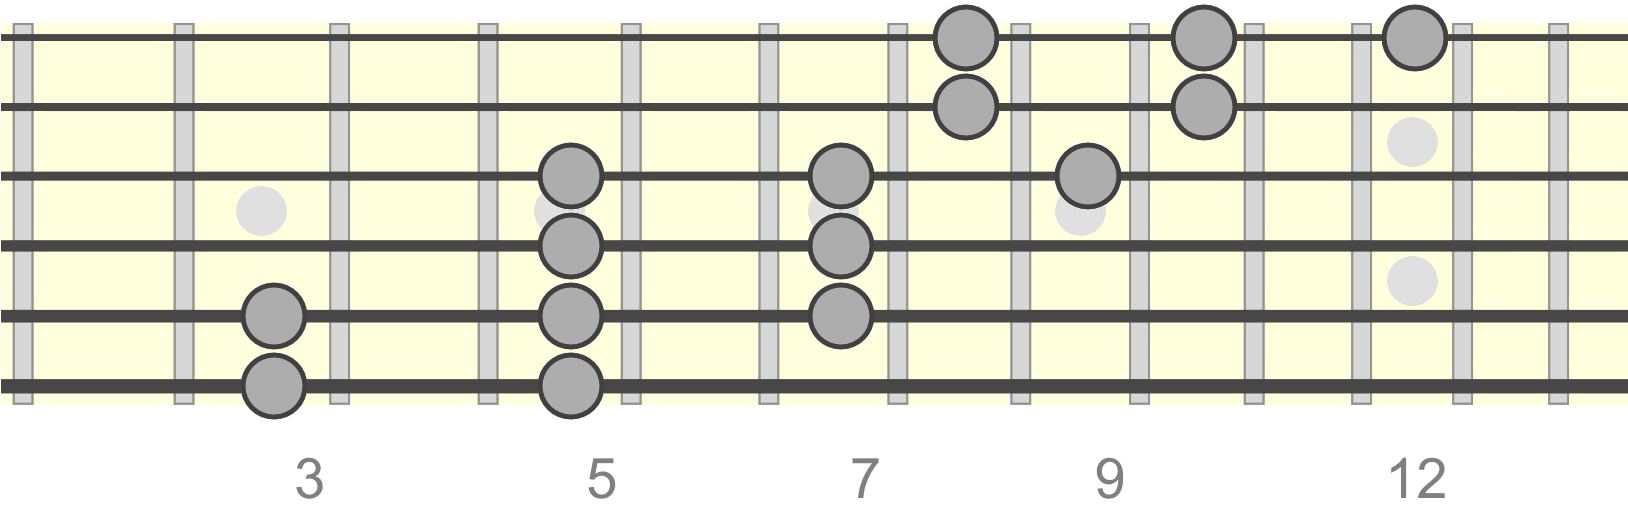
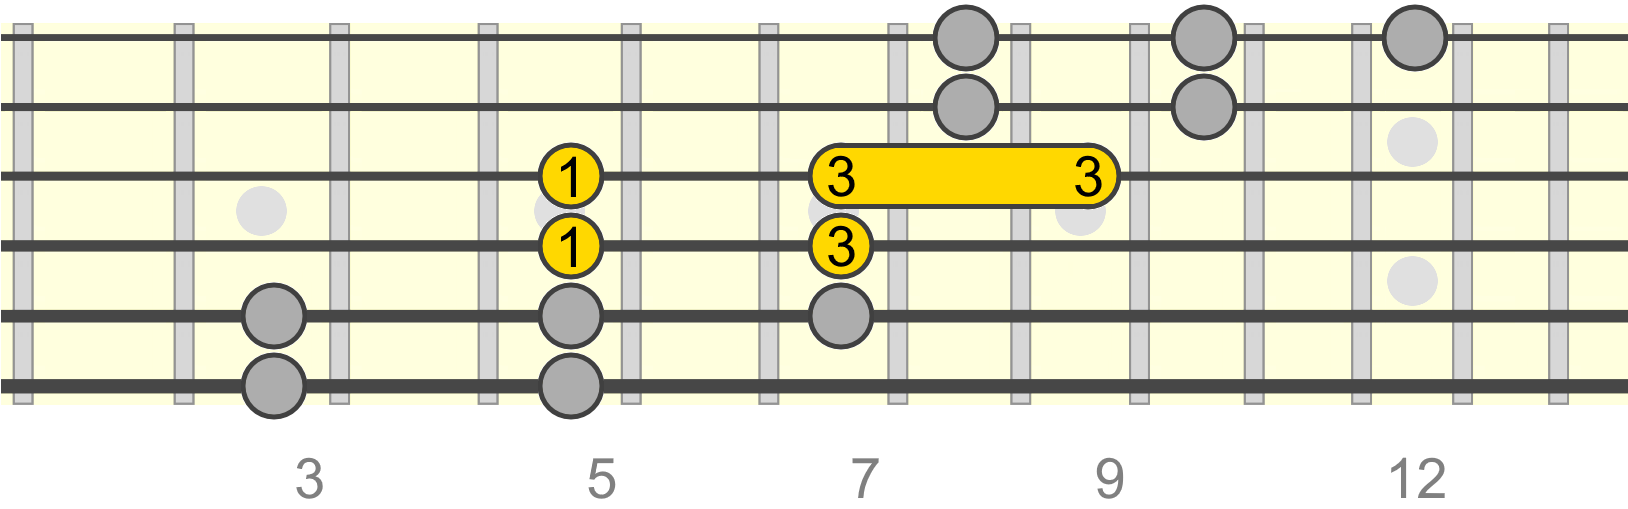
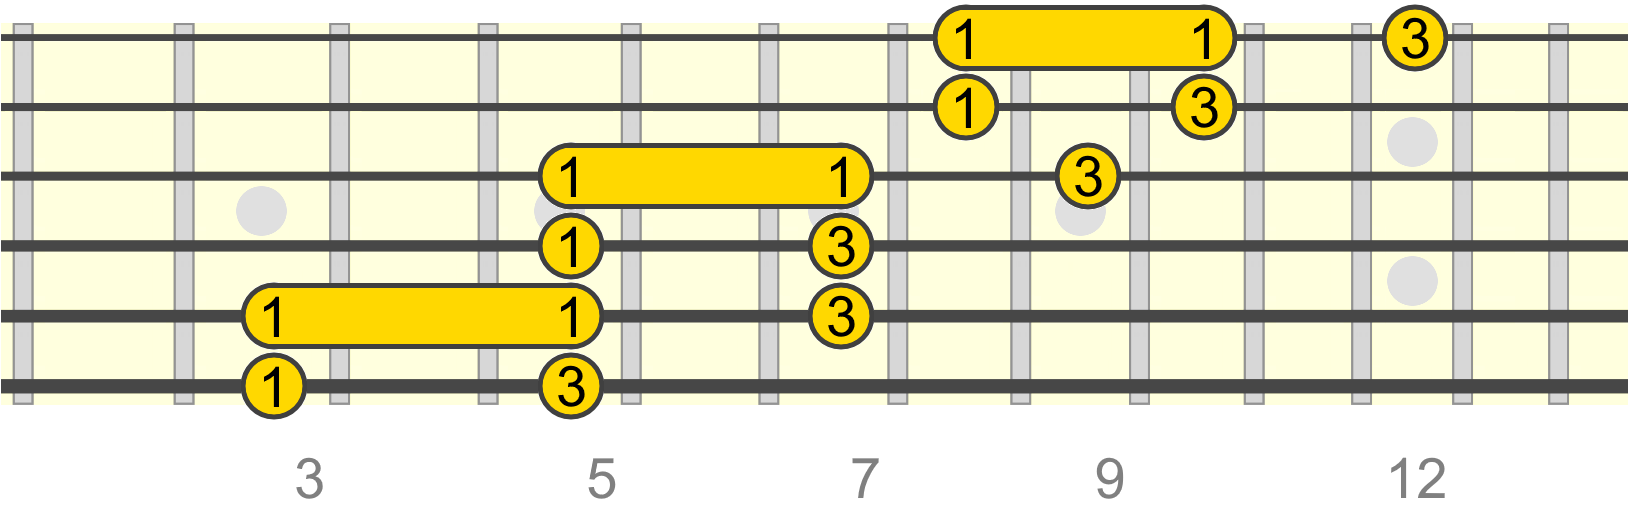
Below is an extended pentatonic pattern (A minor or its relative C major) that you may be familiar with...
Now we're going to take the lowest segment of this pattern and ascend it, adding a slide between the 4th and 5th tones with the 3rd finger as indicated below...
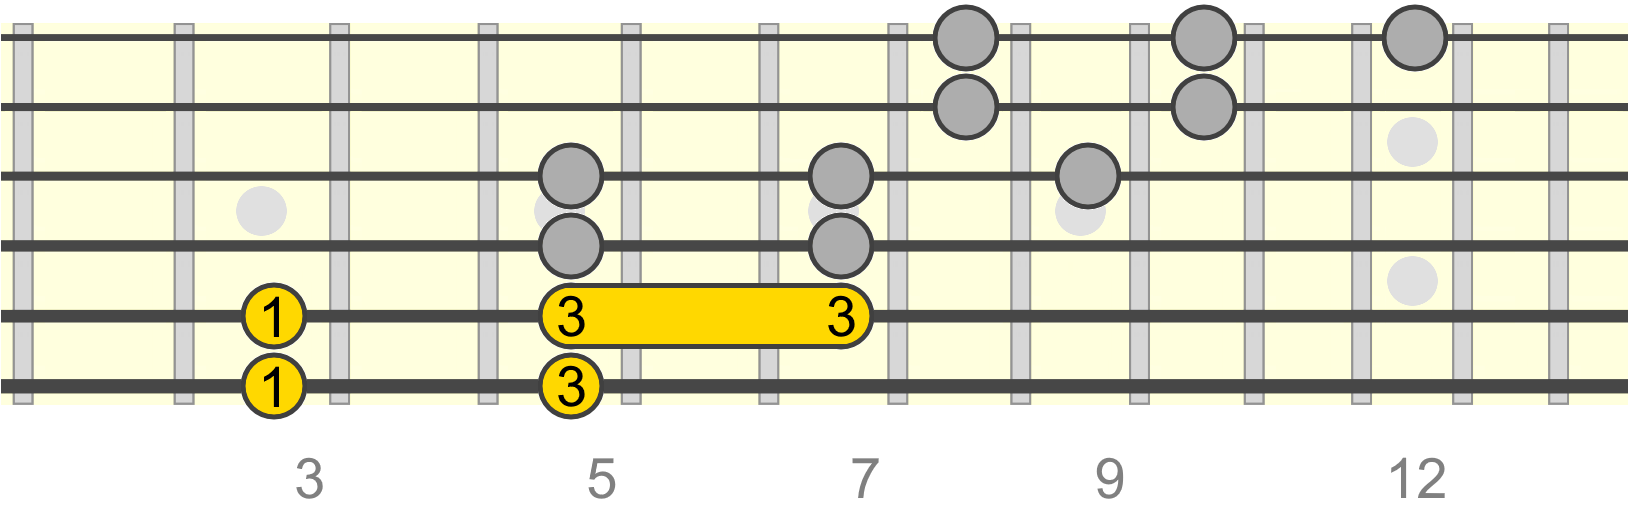
So there we have four picked tones, followed by a slide up to the 5th tone in the sequence. For now, try and keep the timing between each tone equal, including the slide between the 4th and 5th tone. Take a listen...
Similar thing moving to the middle segment of the pattern...
And finally the upper segment...
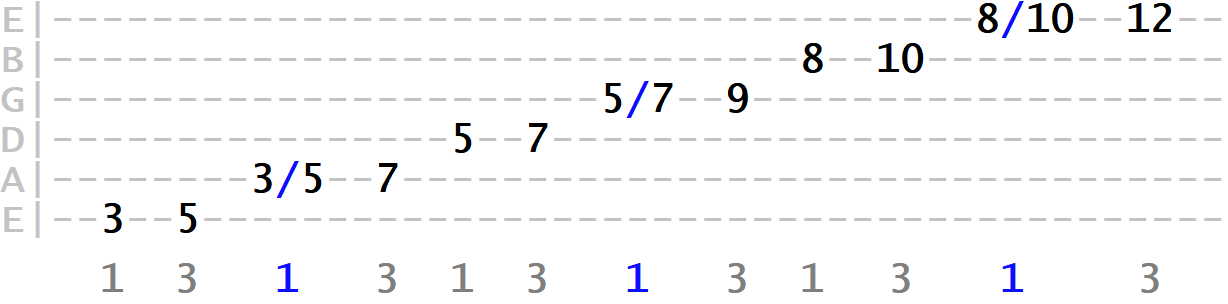
We can now try stringing the three segments together into one, smooth sequence (finger numbers below the tab)...
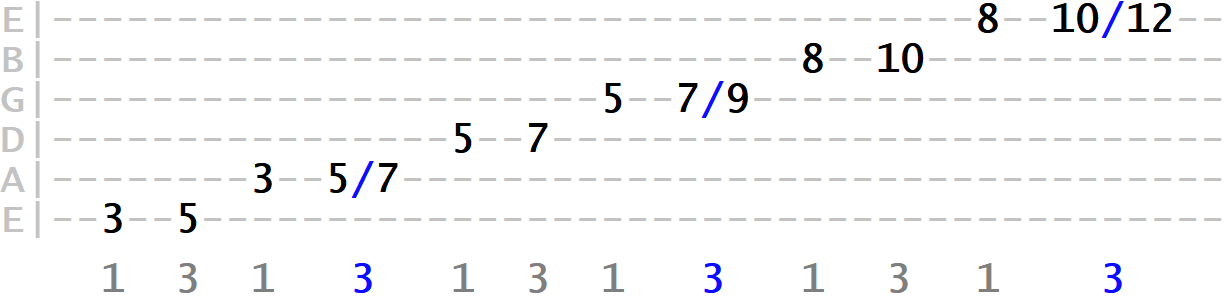
A lot of our lead playing will involve a mixture of short sequences and small segments of the neck and longer sequences connecting different segments of the neck. So it's useful to be comfortable incorporating slides into both.
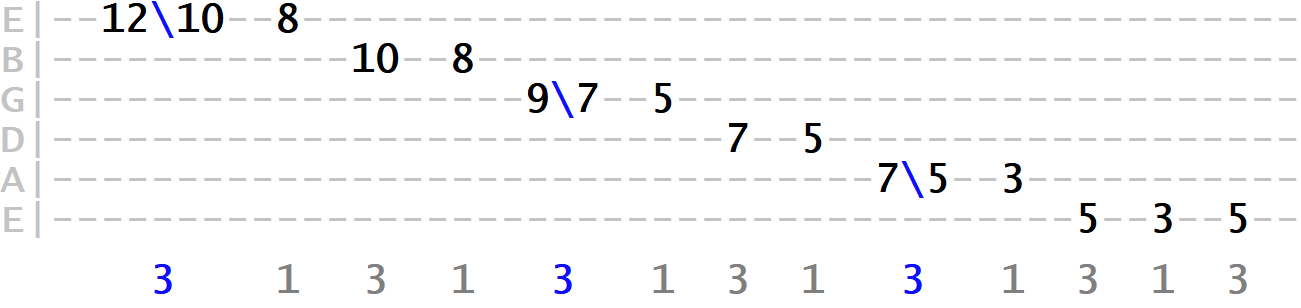
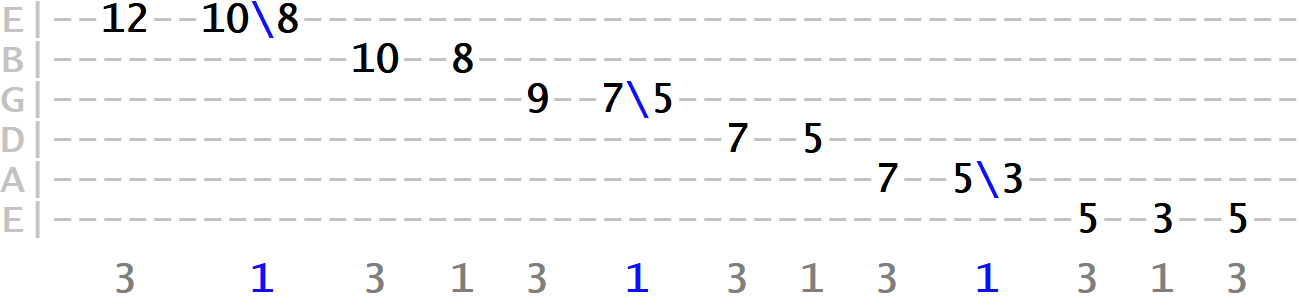
Now let's try descending the pattern, essentially reversing the above sequence (so still sliding with our 3rd finger, only this time down sliding)...
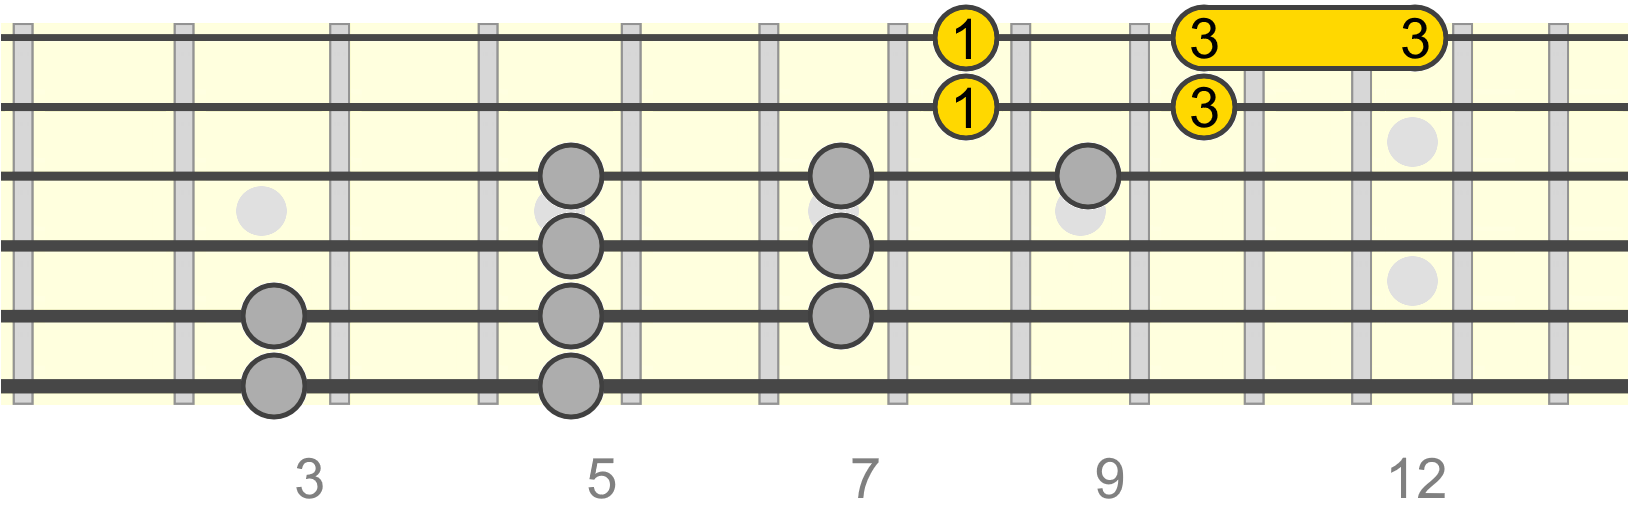
Same sequence, but this time we're going to slide our index finger as follows...
First, segment it like we did initially with the previous example, followed by connecting the segments into an unbroken sequence...
And descending...
What this simple exercise does is sharpen our timing when combining slides with a regular picked sequence. The slides also allow us to span wider neck areas in a more "slurred" way - a different feel than straight picking three-notes-per-string. As we'll see in a later part, slides can help us to "feel" our way across the neck in a fluid way, even using just two or three strings. It encourages a particular type of exploration of the neck, in other words.
That's not to say slides are supposed to always replace straight picking sequences. Rather, the specific sound/feel/freedom they offer is available to us at any given moment, should we wish to utilise it.
Once you're confident with the basics covered in this lesson, we can move on to looking at the different variations of the sliding technique in more detail, before bringing everything together.
