Metronomes
A metronome is an essential tool for any musician serious about improving their timing and building speed.
There are now a few ways to get access to a metronome. There's the traditional "tick tock" mechanical metronomes such as the Cherub WSM-330, which has a certain ornamental charm!
Then there's the battery operated, digital kind, which offer additional functionality such as tap tempo, click samples and tuner, e.g. the Korg TM50.
If you own a smart phone or tablet, you can get metronome apps for your device by searching your app store.
And of course, many free online metronomes exist, which you can find with a simple web search.
I personally stick with the app and online metronome as I like to keep as much on a single device as possible.
Beats & Measures
In the video, we started with 4/4 or "common" time. This is the time signature used in most pop and rock.
In this time signature, four beats make up our measure or bar - that's what the first 4 indicates (we'll come to the second 4 in a bit). So we have four beats per measure, repeating every four. You should therefore count your metronome clicks as follows...
1 2 3 4 1 2 3 4 1 2 3 4 1 2 3 4 etc.
The strongest beats are 1 and 3. In a basic 4/4 rock beat, the bass drum will be kicked on these beats (although often there will be additional kicks around these beats). Chord changes and changes between verse and chorus will most often occur on the 1st beat.
The weakest beats are 2 and 4. The snare drum tends to be hit on these beats (again, typically with some additional flourishes).
Make sure this basic strong/weak beat positioning is firmly in your mind. Counting the beats at first will help to internalise it.
Drum Tracks
As well as a metronome, you should also practice timing your lead to a drum beat. So as promised in the video, below I've provided 4/4 drum tracks at various tempos for you to download. Remember, the bass drum is on beats 1 and 3, snare on 2 and 4.
40 BPM
50 BPM
60 BPM
70 BPM
80 BPM
90 BPM
100 BPM
110 BPM
120 BPM
130 BPM
140 BPM
Basic Note Values
Note values are simply a way of measuring and communicating the duration of notes in a piece of music.
In a given solo or riff, we have notes of varying lengths. Some are held through several beats. Others are played in quick succession. By studying note values, you'll become more aware of how notes can be timed to/around a beat, to help you express yourself articulately and intuitively.
The core note values you'll use in your lead playing are as follows...
Whole Note
In 4/4 time, a whole note lasts the duration of the whole measure. For example, if we started the note on the 1st beat...

Remember, we won't always be starting the whole note on the 1st beat. But the length of the note, even if started on the 2nd beat, for example, will always span the same duration. So a whole note starting on the 2nd beat would end just before the 2nd beat of the following measure. A whole started on the 3rd beat would end just before the 3rd beat of the following measure.
Half Note
As the name implies, a half note lasts half the duration of a whole note, or, in 4/4 time, the equivalent of half the measure...

Quarter Note
Quarter the duration of a whole note/measure...
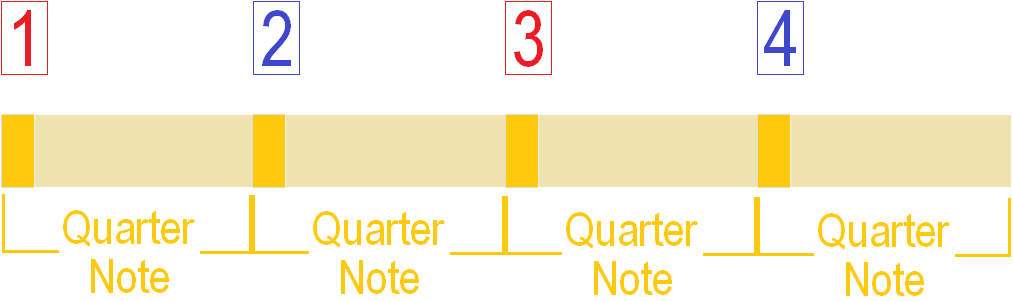
This is where the second "4" in 4/4 comes in. The first 4 tells us there are four beats in the measure. The second 4 indicates that quarter notes represent the note value of each beat.
In other words, four beats, spaced a quarter note apart, make up a measure in 4/4 time.
Eighth Note
Lasts an eighth of the duration of a whole note/measure. We can use an "&" to fill in the gaps between beats...

Eighth notes will likely be your most commonly used note value, and when alternate picking becomes beneficial for pick-hand economy.
Sixteenth Note
For faster note runs. Sixteenth notes will be your most challenging as the tempo increases. Musicians often use "e" and "a" to symbolise the 16th note gaps (between the numbered beats and eighth note "&") in a measure...

Getting Up To Speed
When practicing the note values above, or any scale, lick or riff for that matter, you should first try increments of 5-10 BPM on the metronome, only increasing the tempo when you can play flawlessly at the current tempo. I did a lesson that goes into depth with the process of getting up to speed (without the frustration) here.
Many find 10 BPM jumps to be fine at lower tempos, but then need to make the increments smaller as they get passed 100 BPM.
It's up to you what BPM you start at. I think 60 BPM is a good starting point when 8th notes are the highest note values you'll be using.
However, if you're going to be playing 16th notes, try starting at 40 BPM and go from there.
By using 5-10 BPM increments, the change will be subtle enough that your fingers and brain won't find the increase too much of a jump, but enough that you'll soon get up to the desired speed.
Obviously, 16th notes will be the most challenging at higher tempos. Relish the challenge! You will get there if you have discipline with the metronome and remember to only increase the tempo when you're 100% confident with the current tempo.
Combining Note Values
Once you're confident with differentiating the individual note values, it's time to practice combining them through a sequence of measures.
Try the exercises below. Each one spans four measures. It's not so important what you play at this stage, just find a scale pattern, lick or riff to cycle through, ensuring you can transition between the different note values seamlessly and in time to the metronome or drum track.
Again, use the 5-10 BPM increment rule to speed up gradually.
Exercise 1

Exercise 2

Exercise 3

Of course, you should try and come up with your own timing exercises using the core note values we've learned.
In the next part, we'll look at how to make our lead timing more dynamic and interesting, using techniques such as starting and ending "off the beat", giving our lead lines a driving momentum.
Until then, thanks for your time and patience!
