In the previous guitar intervals lesson we learned how intervals are the building blocks of music, specifying the relative distance between pitches.
Now it's time to transfer this knowledge to the fretboard and make some serious progress.
By working on the interval charts in this lesson, you'll be able to visualize any interval across the entire fretboard, no matter where your starting note may be. It's another step towards organizing the fretboard into identifiable patterns.
This translates into free flowing, intuitive improvisation skills and an ability to connect different musical elements (e.g. chords, scales and arpeggios). It
also means you won't get lost on the neck! So although it's not the
most exciting stuff to learn, put in the time now and I promise you'll
never look back.
Guitar Interval Charts to Aid Fretboard Memorization
In the previous part we laid out the intervals of the chromatic scale
along a single string. This was our first step in visualizing intervals
on the fretboard...

But we also need to know where intervals lie on other strings, no matter where our starting note is.
How to Break It Down
Study one interval every day for around 10-20 minutes (or as much as you can) for around one week, then move on to the next interval. Break it up like this, mix it with your regular practice/noodling, and it won't fry your brain as much!
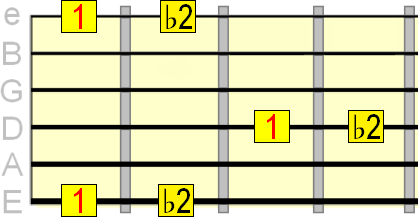
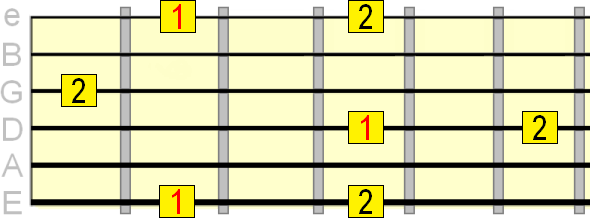
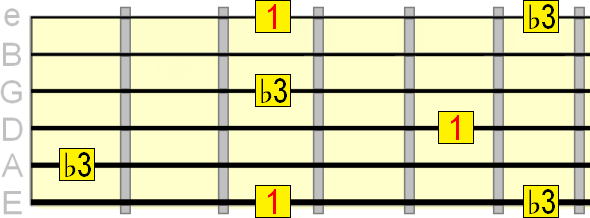
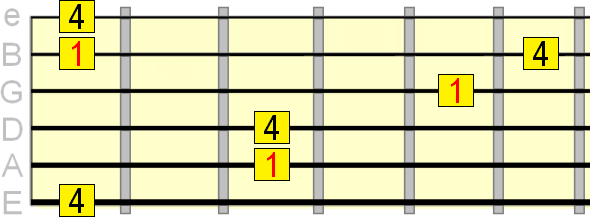
You'll notice the charts show multiple positions for a given interval. Look at the interval numbers - you'll see that intervals appear in multiple places in close proximity to a starting note (1).
The note patterns we learned in a previous lesson become even more significant when learning intervals. The below charts essentially combine the two elements.
In short, these interval patterns are movable and represent the same notes on
different strings. If in doubt, pick a spot on the fretboard and play
through the notes shown in the diagram from the lowest to highest
string (or vice versa). You'll hear they are different octaves of the same interval.
Minor 2nd Interval
Starting
on the 1st, 4th and 6th strings
Starting
on the 2nd, 3rd and 5th strings
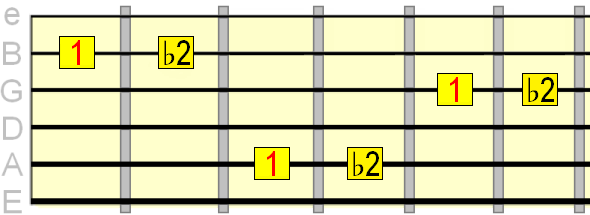
Tip: As
you probably know from previous lessons, if you identify a note on one
of the E strings, you'll find the same note on the other E string at
the same fret.
Major 2nd Interval
Starting
on the 1st, 4th and 6th strings
Starting
on the 2nd, 3rd and 5th strings

Tip: Make sure you play around these patterns so you internalise the sound of the
interval, as well as its spatial relationship.
Minor 3rd Interval
Starting
on the 1st, 4th and 6th strings
Starting
on the 2nd, 3rd and 5th strings
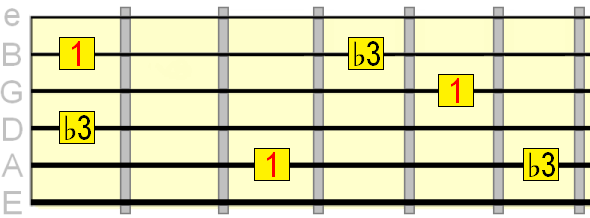
Tip: The minor 3rd is what gives minor chords and scales their minor sound. Try playing 1 and ♭3 together to hear it.
Major 3rd Interval
Starting
on the 1st, 4th and 6th strings
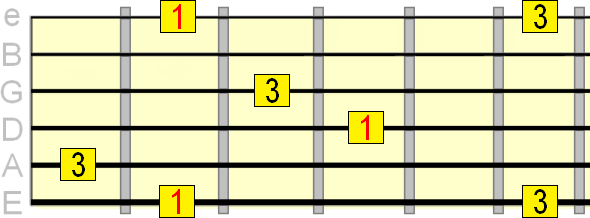
Starting
on the 2nd, 3rd and 5th strings
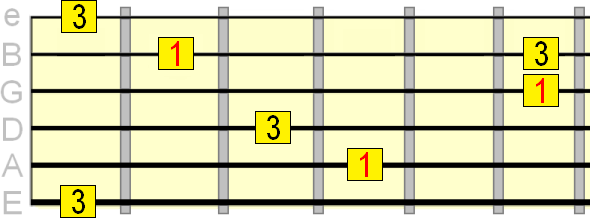
Tip: The major 3rd is what gives major chords and scales their major sound. Try playing 1 and 3 together to hear it.
Perfect 4th Interval
Starting
on the 1st, 4th and 6th strings
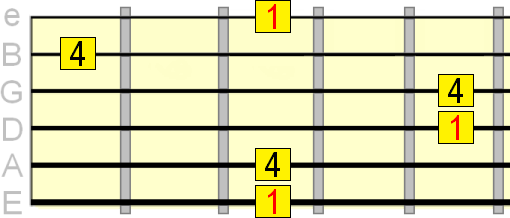
Starting
on the 2nd, 3rd and 5th strings
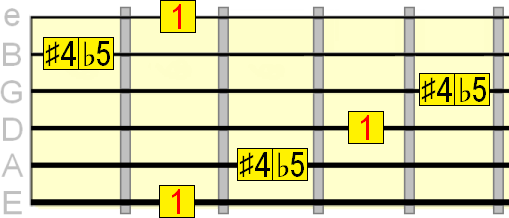
Augmented 4th / Diminished 5th Interval
Starting
on the 1st, 4th and 6th strings
Starting
on the 2nd, 3rd and 5th strings
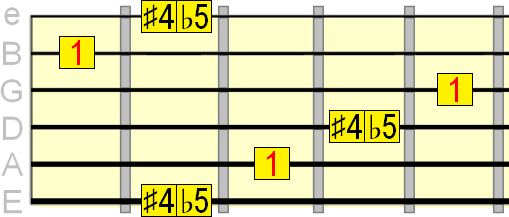
Tip: The ♯4 is also known as the tritone - three consecutive whole tones (W W W). This gives it what is known as symmetry - the distance between 1 and ♯4 is the same as between ♯4 and the octave 1. That's why the two diagrams look inverted.
Perfect 5th Interval
Starting
on the 1st, 4th and 6th strings
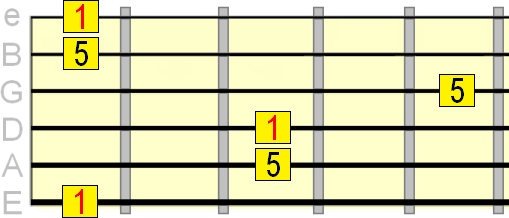
Starting
on the 2nd, 3rd and 5th strings
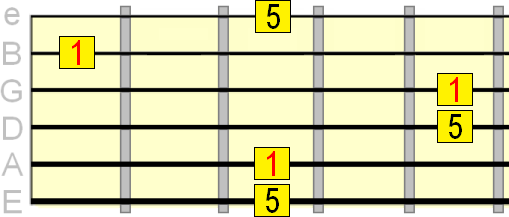
Tip: Play the 1 and 5 together to get the famous power chord used in a lot of rock and metal. It's called "perfect" because of its high degree of consonance (a feeling of unity when played together).
Augmented 5th / Minor 6th Interval
Starting
on the 1st, 4th and 6th strings
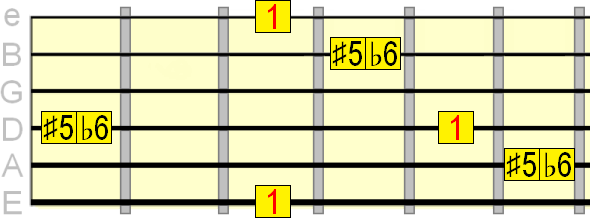
Starting
on the 2nd, 3rd and 5th strings
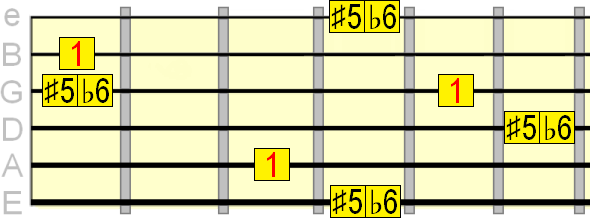
Tip: Intervals aren't just about movements between single notes. If we build a minor chord on the 1 and move to a major chord on the ♭6, you get a common minor key movement. So chord movements can also be considered in terms of intervals.
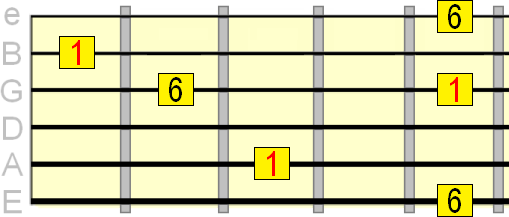
Major 6th Interval
Starting
on the 1st, 4th and 6th strings
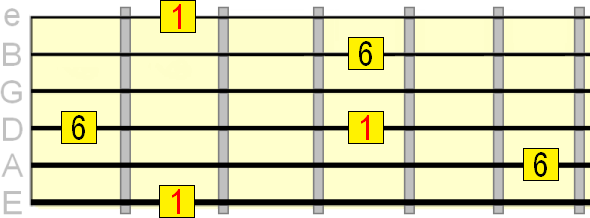
Starting
on the 2nd, 3rd and 5th strings
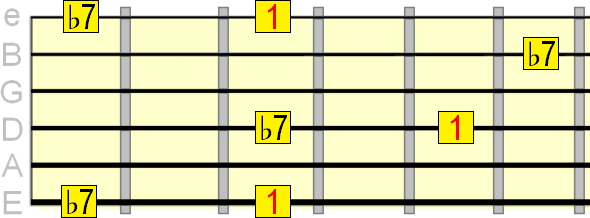
Minor 7th Interval
Starting
on the 1st, 4th and 6th strings
Starting
on the 2nd, 3rd and 5th strings
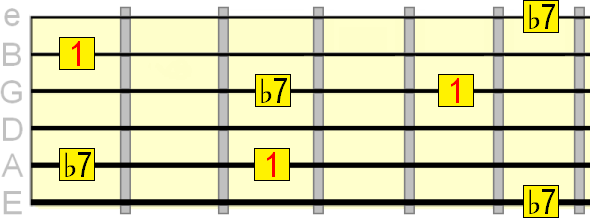
Tip: The ♭7 can also be seen as one whole step below a given root.
Major 7th Interval
Starting
on the 1st, 4th and 6th strings
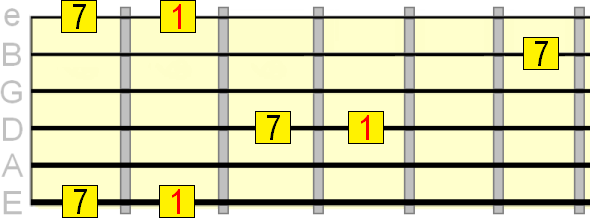
Starting
on the 2nd, 3rd and 5th strings
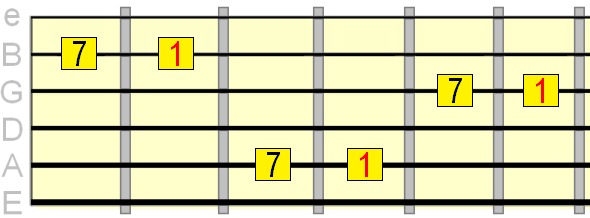
Tip:
The 7 can also be seen as one half step below a
given root.
Test Yourself
After memorising these interval units, you should be able to play at least one octave per interval. For example, with the major 3rd interval, if 8 is the octave, you should be able to play 1 - 3 - 8, without hesitation.
If you know the notes on the fretboard, you should be able to see which notes you're playing as you move through these interval relationships. For example, 1 - 3 - 8 starting on C would be C - E - c (small c for the octave!). I personally don't feel this is as important as being able to see relative intervals, but the more you can get from this, the less work will be required later on.
You can also test your interval knowledge using this great training app.
You may not realise this yet, but when you play through these interval sequences, you're actually building the solid ground work for playing arpeggios, chords and scales. Much of the work will already be done when you come to learn these elements in any depth.
As soon as you move on to the arpeggio, chord theory and scale lessons, you'll likely experience a "eureka" moment. It'll all suddenly come together.
This is when your playing really starts to move to the next level.
But we're not quite done with intervals yet! In the next and final intervals lesson, we'll cement this knowledge further by creating sequences of two and more intervals (e.g. 1 - 3 - 4 - 8). This will help you see intervals not only in relation to a starting note, but also neighbouring intervals related to that same root.
Thanks for your time and patience and your faith in the rewards that will come from this.
