Home  ›  Fretboard  ›  Memorization

Spatial Fretboard Memorization Exercises - 5 Steps

Fluid and intuitive guitar playing requires both physical and mental confidence in co-ordinating your movements between frets and strings. It requires an awareness of how what you're playing relates to the entire fretboard.

While there are many fretboard memorization exercises out there, few of them focus on the benefits of spatial memorization, beyond merely being able to name a note at a particular fret. The mind naturally looks for patterns and relationships and, by creating exercises around related patterns and note positions, we can feed our visual memory and learn the fretboard in a much more functional, intuitive way.

Watch the video below for a quick overview and then see further down for all the good stuff...


Step 1: Root Patterns

This exercise challenges you to identify and play a given note sequentially on all strings - a skill that will ensure you can move between neck positions without hesitation.

While many guitarists successfully learn the note positions on each string, purely by parrot fashion, when you're playing in the moment it's often difficult to find your bearings. By seeing notes in the form of patterns, you'll create more of a relative, spatial memorization of these note positions and find it much easier to jump between them without having to think about it too much.

Let's use the note A as our example. As you know, this note (like all notes) exists in several positions across the neck...

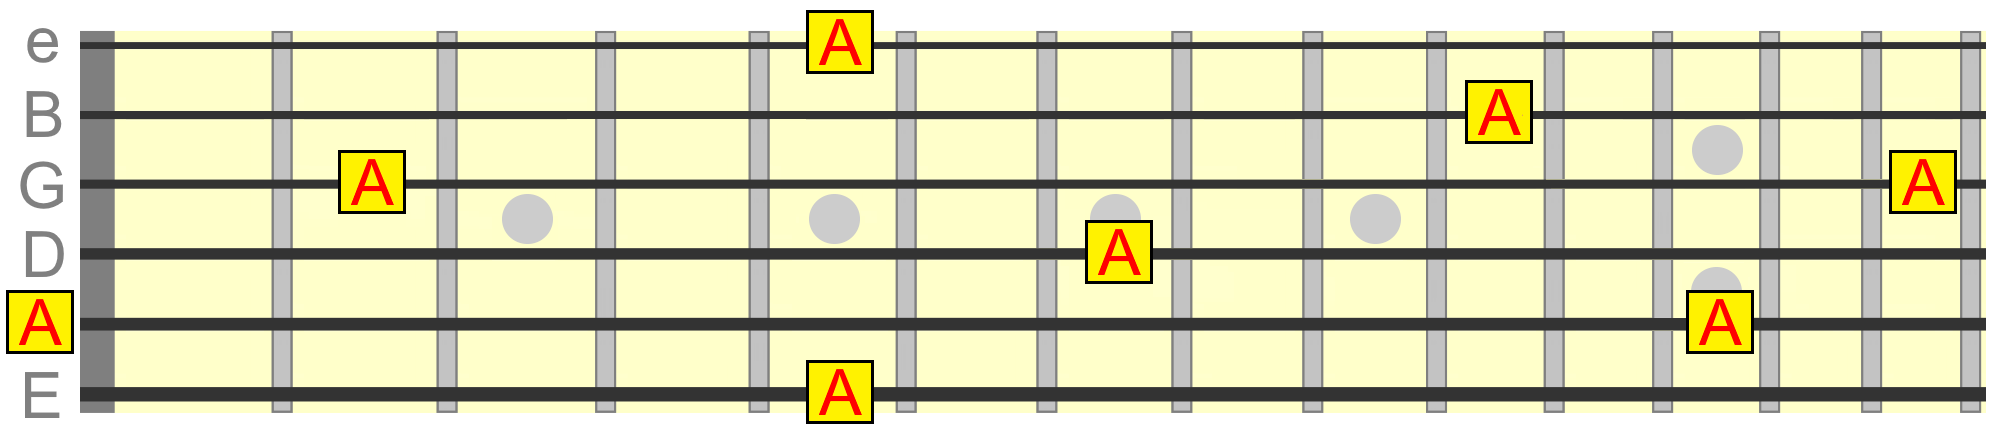
The aim is to be able to pick any starting position and know where that same note exists in close proximity.

We can memorize some patterns to help with this. Note that these patterns are movable (i.e. relative to the note you're playing) and so work for any note...

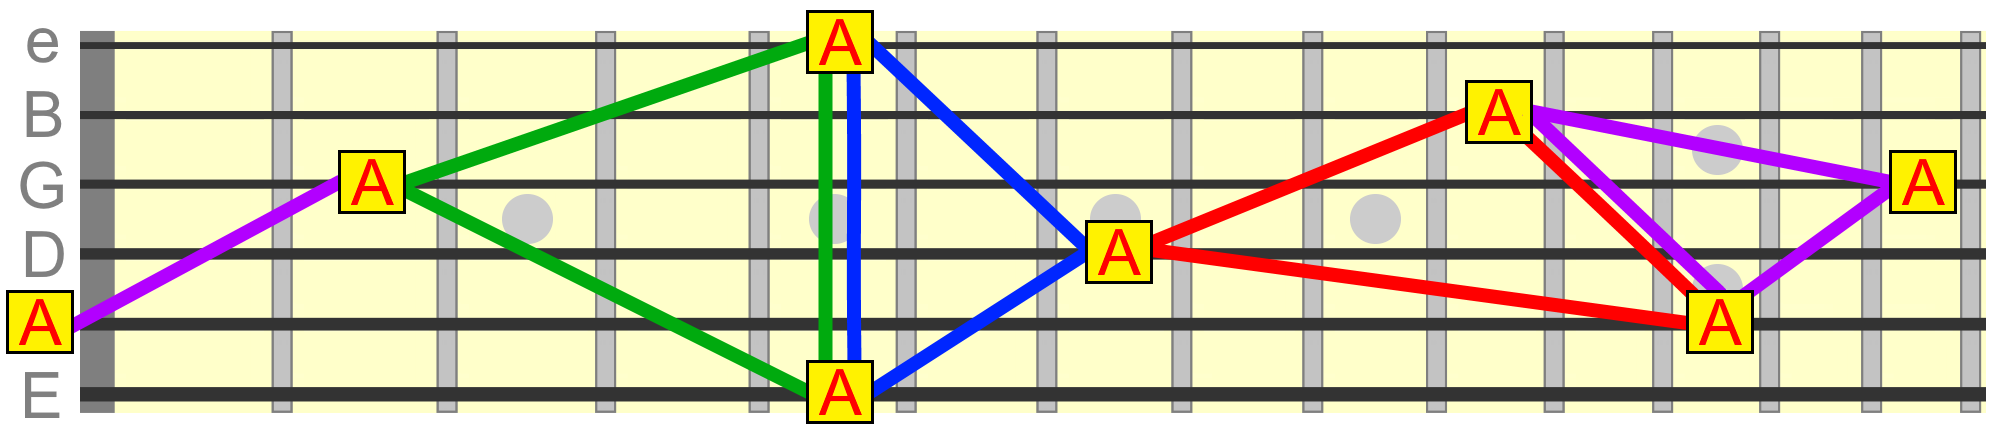
All we're doing here is creating a spatial awareness of how the same note exists in close proximity.

For example, if you find a note on the 4th string, the same note lies three frets higher on the 2nd string.

If you find a note on the 5th string, the same note lies two frets higher on the 3rd string, or two frets lower on the 2nd string.

We can also see that the 1st and 6th strings create the same note at the same fret.

See if you can form similar string/fret relationships in your mind by using these note patterns.

To help, we can break these "clusters" down as follows....

root patterns

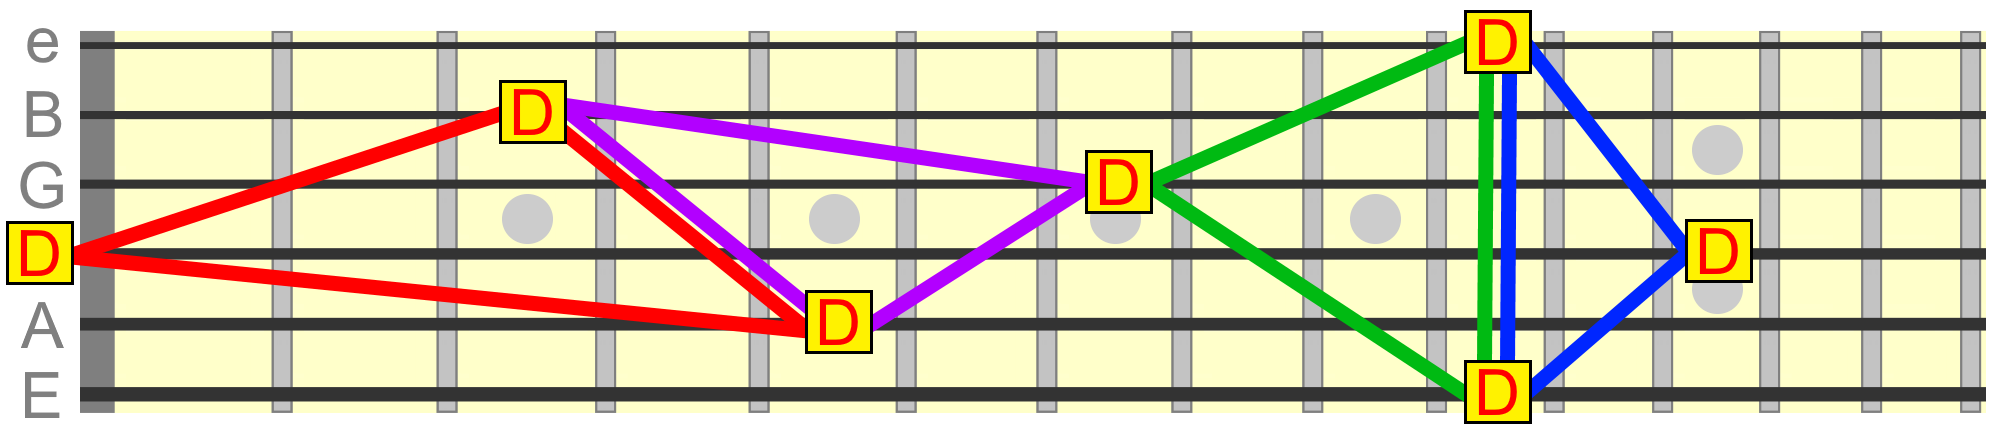
Let's apply the same root patterns to the note D....

So no matter which fret/string you start on, once you've learned these patterns you'll know where the same note exists near by on other strings. As you learn chords and scales, these root patterns will help you to identify where a particular note exists throughout the pattern or shape, which will help you to find/keep your bearings.

This kind of spatial awareness will start to work in the background the more you internalise it.

Test yourself by picking random notes and playing between the note positions at regular timing intervals. The less hesitation, the better!

Make sure you also take this exercise beyond the 12th fret, playing the octave positions of the note.

To really test yourself (no pressure!), try this timed fretboard memorization game.

Step 2: Intervals

Here, we simply add an interval note to the root positions. Intervals are the building blocks of chords, arpeggios and scales, so knowing your intervals will help you connect these elements spatially and auditorily.

Minor 3rd

Let's take a minor 3rd (3) interval, again on the root of A, as our example...

minor 3rd interval on A across the neck

Notice how the interval note can also be visualized using the same patterns we learned earlier, but obviously using a different note...

minor 3rd interval pattern

Again, try playing between related positions, playing both the root and interval and just the root or interval. While you're playing between the root and interval, really listen to how the interval sounds - how the movement sounds the same no matter which position you use, albeit higher or lower in pitch. Different positions for the same musical expression...

Test your ability to move smoothly between the positions (although it doesn't have to be in a specific order)...

minor 3rd exercise tab

To further test yourself, choose other starting notes and intervals and follow the same process. Some other intervals to try...

Major 3rd

major 3rd on A across the fretboard

As well as moving from root to interval (e.g. 1 - 3) you should also explore how the relationship appears moving from interval up to root (or root down to interval, whichever way you look at it, e.g. 3 - 1).

moving from 3rd to root

Perfect 5th

perfect 5th on A

Tip: you can also use these perfect 5th relationships to build power chords all over the neck.

Step 3: Note Sequences

The next logical stage is to start adding notes around your root/interval positions, creating small four/five note sequences. What this does is help you develop the ability to visualize sequences in several positions, which further helps to develop your spatial co-ordination. It's also a great workout for your fingers!

You can either borrow sequences from scales you know or simply pick out a sequence of four or five notes you like the sound of in your chosen starting position. It helps if you keep a root in mind as you do this, as this will become your reference note as you move between positions. However, you don't have to start the sequence on the root.

Here are some examples built around A to help you get started. You can repeat the sequence on each position a few times before moving to a the next position if you like...

A minor sequence across the neck

A major sequence around A...

A major sequence across the fretboard

Step 4. Arpeggios

Arpeggios are a sequence of intervals that make up a chord. They can also be seen as the skeleton of most scales you'll play. So they're very useful to be familiar with.

Like any other sequence, they can be played in several positions, again using a root as our position "marker".

Major Arpeggio

Here's an A major arpeggio (1 - 3 - 5) across the neck...

A major arpeggio full pattern

Again, we're looking for memorable patterns and spatial relationships between the notes and positions. For example, notice how the 5th is always three frets higher than the 3rd on the same string.

relationship between 3 and 5 in major arpeggio

In most cases, the 3rd lies one fret down from the root on the next string up, with the exception of when the root is on the G string (because of a different tuning interval between G and B), in which case the 3rd is on the same fret.

relationship between 1 and 3 in major arpeggio

One slightly awkward thing about guitar is the tuning between the G and B strings changes the visual relationship of notes by one fret. So you have to adjust to that.

There are countless ways of visualising the relationship between notes, both across single strings and multiple strings.

Anyway, back to the main exercise which is to be able to move between the positions smoothly and timely (although here I've not used every single position)...

A major arpgeggio exercise

Minor Arpeggio

Try and play through the positions similar to the exercise above...

A minor arpeggio across the fretboard

Step 5. Chords

We can use the note position method learned earlier to find other positions for our chord shapes. Let's refer back to the A major arpeggio diagram from earlier...

A major arpeggio full pattern

An A major arpeggio shares the same intervals as a major triad (three note chord), just as a minor arp shares the same intervals as a minor triad. The difference between playing an arpeggio pattern and a chord shape is that we need three (or optionally more) strings for the chord so each note can ring simultaneously. So using that pattern above, can you pick out the positions we can play a three-string triad (1 3 5 although it doesn't have to be in that order)?

Amaj triad exercise tab

I probably missed a couple out there, but you get the idea!

As you play through the positions, try to memorise the spatial relationship between them, referring to those root positions as marker points. This may prove difficult at first, but the more you do it, the more it sinks in. It's a bit like developing muscle memory for your mind! You can then try the same exercise on a different root using the same relative positions.

Now try and pick out the minor chord shapes (1 ♭3 5) in this minor triad pattern...

A minor arpeggio across the fretboard

How These Exercises Will Help You

Developing good visual, spatial co-ordination of the fretboard is a huge part of becoming a competent, confident guitarist. Whether you're writing songs on your own, in a band setting or improvising on stage, the fruits of doing the exercises in this lesson (making sure to practice them using different roots) will be working "in the background" to ensure you are always aware of your relative place on the neck.

This concept of being able to visualise different positions for notes and note sequences/patterns will translate into many areas of learning and playing, many of which you may be yet to learn.

Overall, it will ensure you never feel stranded in one position on the neck. It'll give you multiple starting points and light up the marker points to help you find your bearings and connect your harmonies and melodies spatially as well as auditorily.

If you would like to keep pushing your fretboard knowledge to the next level, try my Chord Connections course. It will help you to connect your visual recognition of notes and patterns (including scales) on the neck with specific musical "colours" and expressions. Think of it as a marriage between visual training and ear training.

Did This Help You?

Please consider donating to fretjam and support the free lessons...

 Learn how you can support fretjam here

Stay Updated & Learn More

Uncommon Chords Book

Subscribe for updates and extras.

Plus, grab your free Uncommon Chords book and get personal help from me when you need it.

 Subscribe here

Share Your Thoughts...

Have any questions, thoughts or ideas about this lesson? Let us know using the comments form below.

Where Next?

This was the final lesson in the Fretboard Foundations series. Congratulations!

Either head back to that section to go over the lessons again or see what else you can learn here.