Legato Slide Exercises
Our predominant sliding fingers will be our index (1) and ring (3) fingers. However, we'll also want to get comfortable with sliding using our other fret-hand fingers. Depending on our playing situation, we might find the middle or pinky finger is the most accessible for a slide.
To get us started, below I've picked out some phrases that focus on each individual finger for sliding, featuring some of the techniques covered further down (suggested fingering beneath the tab)...
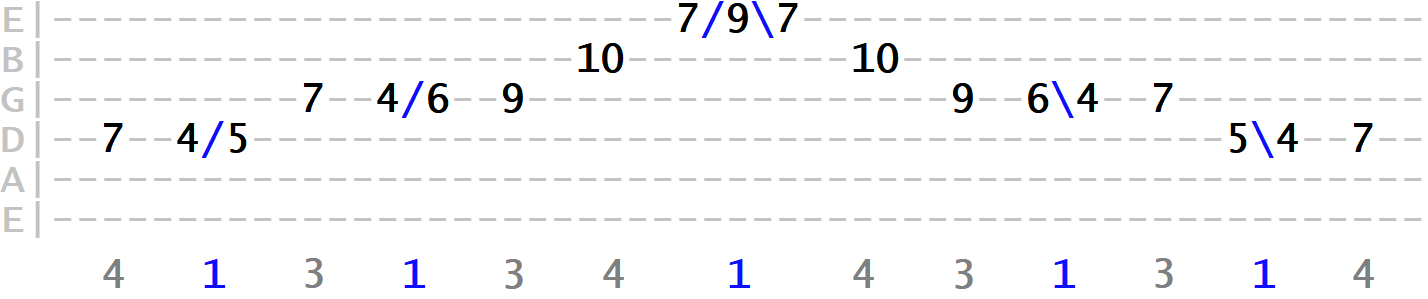
Index Finger Slide
One challenge with this sequence involves a double slide at its peak (7 slide to 9 slide back to 7)...
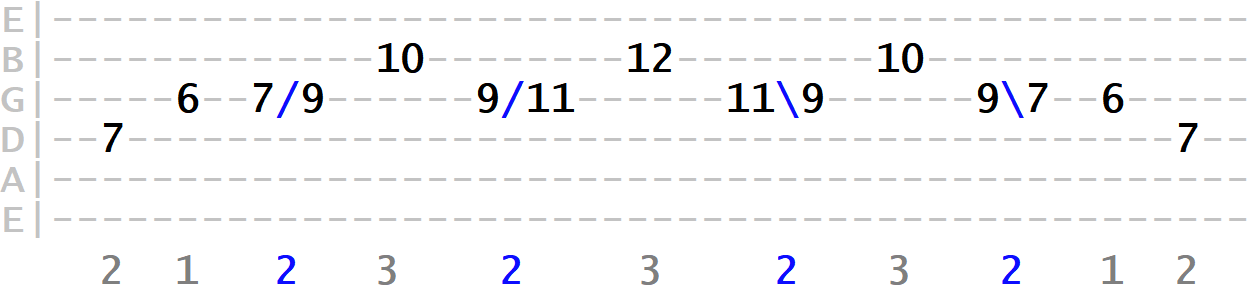
Middle Finger Slide
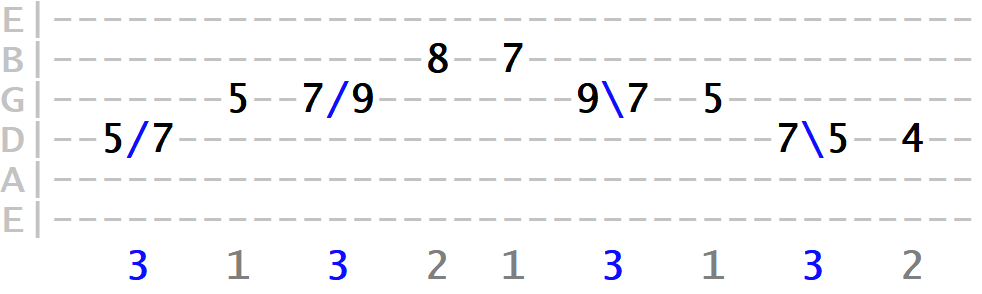
Ring Finger Slide
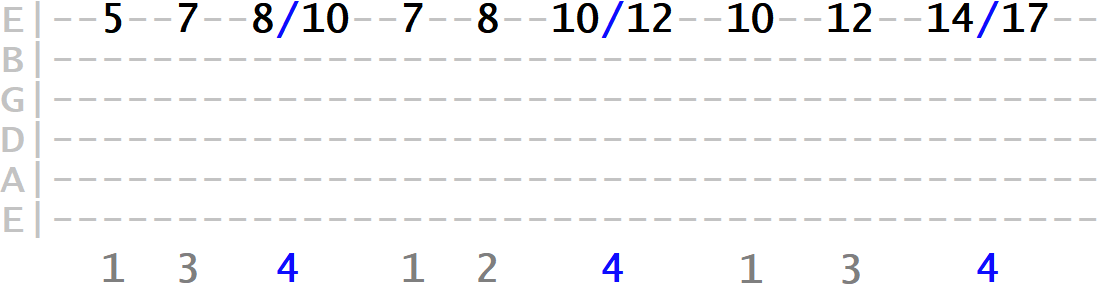
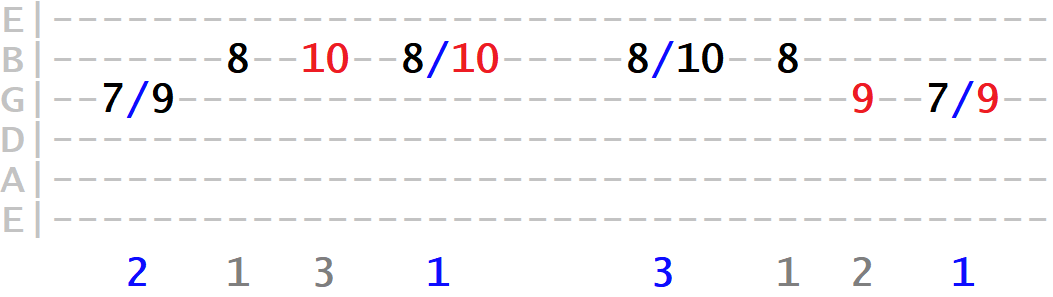
Pinky Finger Slide
Even our weakest finger can be useful for sliding, especially for moving across positions in ascending or descending single string runs...
Slide Dynamics
Let's now look at some different ways in which we can physically apply the slide. There are many dynamics that can change the effect the slide has on your music, including variations in speed, delay and repetition.
Sliding to Accent Note
This is the primary function of a slide - to help prepare and emphasise an accent or target note, similar to how we might use a bend. When forming a phrase/sequence, think about its destination (i.e. a tone you want to emphasise) and consider a slide as one final route to it.
In the above example, I targeted the tonic of the scale on the 2nd string, as opposed to the 1st string, which allowed more room for a whole step slide. Think about which string you choose for the target in terms of how it can accommodate techniques such as slides and bends.
We can also lengthen the slide to add more emphasis...
As long as we have that destination target, it doesn't matter so much where we begin the slide if it's immediate (i.e. we slide as soon as we fret and pick).
Sometimes the note we want to target will be on a different string to the slide. However the slide can still "prepare" it in a similar way...
Accent Repeat Slide
Here, we repeat a picked accent note with a slide, the repeated note sometimes being slid to on a different string to the initial note. Again this is about emphasis of an accent note...
However, you can also "accent repeat" on the same fret and string. In the below example, we use two sliding accent repeats. The repeated note is highlighted in red...
Sequential Slide
Slide between two or more notes in succession for a smooth run of notes...
Delayed Slide
You don't always have to slide immediately after picking the note. Try waiting a beat or two and then slide...
Grace Note Slide
Here we're sliding to the target note as immediately and quickly as possible. This means we can start from any tone, even tones outside the scale (known as chromatic tones), because the slide is so quick that its starting point isn't articulated to the ear. It's a subtle effect, but the movement in creates is just another way of ornamenting the accent note...
Here's an example of using grace notes in a descending minor pentatonic sequence. Remember, with grace notes, the slide happens immediately, as soon as the starting tone is picked...
We'll learn more about the effectiveness of grace notes in the next part. They really are an easy way to spice up your phrases.
Reflexive Slide
A combination of the accent repeat and sequential slide. Here we pick our accent note as usual, followed by a quick slide to another fret and immediately back. This creates a very subtle ornamentation effect that mimics vocal characteristic...
One way guitarists tend to use this type of slide is as an alternative to a hammer-on/pull-off sequence. Take the below example, where we use the "slide away/return" in quick succession with the 3rd finger...

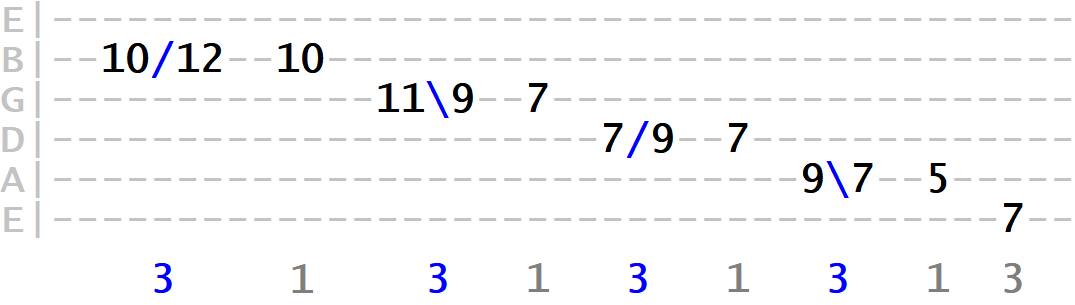
Long Slide
A good way of getting from one end of the neck to the other. Practice sliding up and down larger distances...
Slide/Fixed Note Alternation
Here we alternate between slides and fixed notes across two strings to move up or down the neck, for example...
Slide Outs
Once you've picked your accent note (perhaps with some vibrato time), slide up or down the fretboard without ending on another note. This means you have to mute the string to end the slide...
So there are numerous ways we can apply slides in our solos. Try working them into your practice, applying them to scales and licks you know. Build up your phrases in layers, starting with the basic picked sequence before adding in techniques such as slides, bends, hammer-ons and pull-offs as you repeat the phrase.
Experiment with different approaches to notes, slides being just one option. Before you know it, you'll be almost effortlessly turning simple, four, five, six tone phrases into something far more expressive.
The next and final part will help in bringing together everything we've learned over the past two lessons. In the meantime, have fun with what you learn and thanks for your time so far!
