


Home
> Scales
> Soloing Over Chord Changes

The aim of this lesson is to get you into the right frame of mind for learning how to play through chord changes and to give you three key ways to help connect your solo to the chords you're playing over - a connection that many struggle to see.
Don't worry if the first solos you attempt sound a little... basic. Every step we take in this lesson, no matter how small, is fundamental to our progress. You'll gradually build on this rudimentary knowledge - it will become the base for your soloing technique (bends, legato, speed, timing etc.).
Start by watching the short presentation below.
Then, before viewing the supplemental content further down this page, please ensure you bookmark this page as it's quite long and should realistically give you several weeks worth of practice material.
These chord tones act as safe target notes to help put your soloing phrases into context and give your lead lines a sense of purpose and direction. Simply being aware of their location will make improvising and writing solos a hell of a lot easier. They will save you on many occasions from wandering into (unpleasant) dissonance!
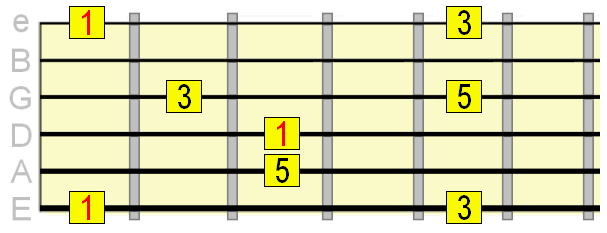
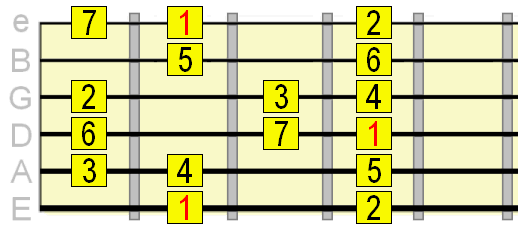
The easiest way to find these chord tones is to visualise the chord progression in the form of chord shapes. To keep things simple, we'll start by using the E and A form barre chord shapes you're hopefully familiar with. In the coming lessons, we'll explore additional shapes (C, D and G) to give you even more positions to visualise chords, but this is a good place to start.
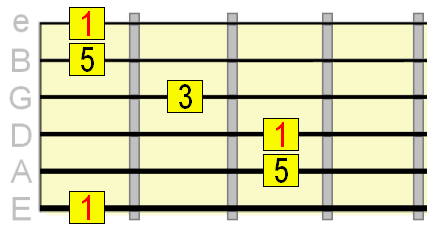
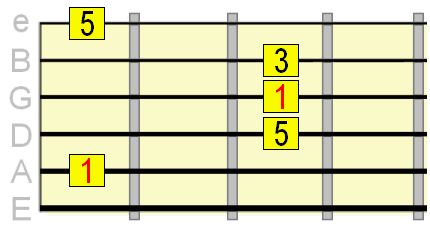
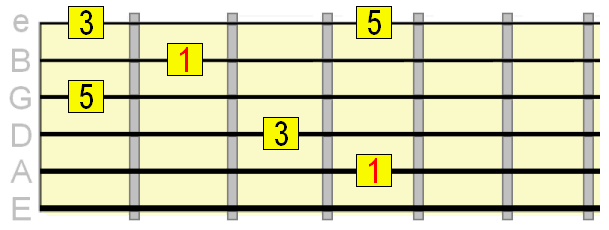
"E form" major chord "A form" major chord
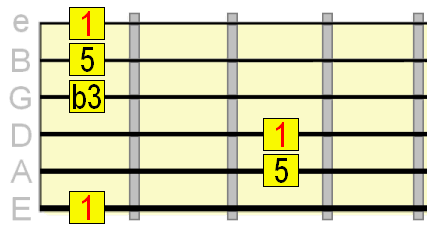
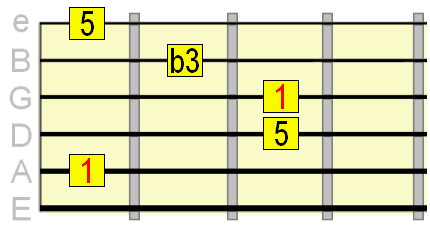
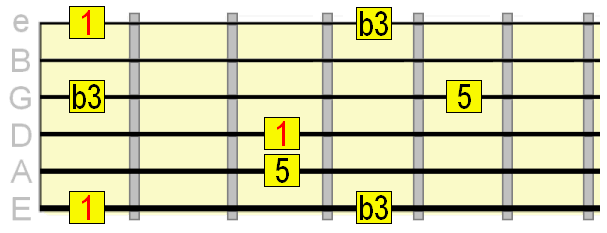
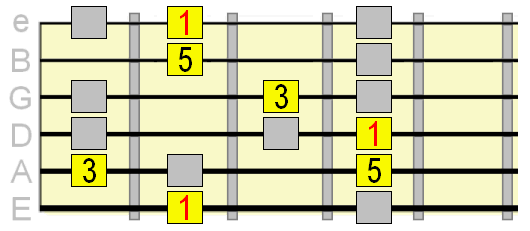
"E form" minor chord "A form" minor chord
So the first step is to get comfortable with using these shapes (or any others you're familiar with) to locate each chord in the progression. In the video, the example was Amaj / Emaj / Bm / Dmaj, but you should be confident with finding these major and minor triads in any key.
Note: If you're thinking "what about diminished/augmented/altered chords?!" - Patience! We'll move on to soloing over more complex chords later. One step at a time.
Let's just try a fresh major key example: Abmaj / Cm / Fm / Bbm
Where might we play these chords on the fretboard using E and A form barre chords? The answer is below, but at least try yourself before you look!
Tip: When selecting your chord shapes, try and choose the ones that are in close proximity to the previous and next chords.
Abmaj
Cm
Fm
Bbm
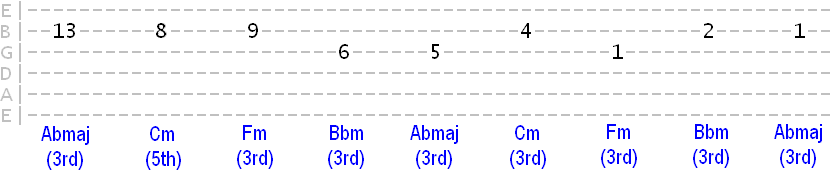
Once you have your chord shapes/tones identified, try playing over the progression one chord tone at a time.
That means for Abmaj, we'd play either the root, 3rd or 5th of that chord. When the chord changes, we'd play the root, 3rd or 5th of THAT chord etc.
Tip: If you know your seventh chord shapes (e.g. Cmaj7, C7, Cm7) then you can also use the 7th as a chord tone.
Try it yourself. Listen to the backing track below (it's the chord progression we've used in this example) and then start playing the appropriate chord tones as the chords change, perhaps selecting different ones each time around. I've included some tab examples below each track to start you off...
 Download
the backing track here - Abmaj
/ Cm / Fm / Bbm
Download
the backing track here - Abmaj
/ Cm / Fm / Bbm
How about a minor key example? Same process applies - find the chord tones using the E and A form chord shapes from earlier and start by playing through one note per chord...
Download
the backing track here - Cm
/ Abmaj / Fm / Bbmaj

Once you're confident with finding the chord tones through shapes, try and find the same notes on different strings. If you know the notes across the fretboard, this shouldn't be too difficult. In fact, this is a great exercise to help test your knowledge of how well you know the note positions!
Take your time with the one-note-per-chord exercises and, when you're ready, try linking them together using notes from a related scale (e.g. for the Abmaj progression - A major scale or major pentatonic. For the Cm progression, C natural minor or minor pentatonic).
Want to quickly learn the most important scale patterns for this method? Jonathan Boettcher has a great free cheat sheet here.
You should also allow for some trial and error and let your ear be the judge of what sounds good when moving between chord tones.
Start by using just one note in between the chord tones, then 2, then 3 etc. Embellish your phrases in gradual layers like this.
If you're struggling with identifying the correct scale/notes to use between the chord tones, don't worry, we'll cover that in more detail in later lessons. Even without this, you should be able to hear how important these chord tones are in creating musical, natural sounding solos.
Think of them like the "centre of gravity" over a given chord. Sure, you'll play notes outside the arpeggio (i.e. from a related scale), but the arpeggio will help pull it all together. Listen closely to your favourite solos and you'll hear a mixture of "horizontal" scale runs and "vertical" arpeggio movements.
So it's similar to the chord tone method above (since arpeggios are essentially the notes of a chord played one after the other), but this time we're using them more as part of our phrasing, combining them with scale movements.
Start by ensuring you're familiar with the basic major and minor arpeggio patterns.
Just like the chord tone approach, all you need to work on at first is being able to visualise these arpeggios in the correct positions based on the chord you're playing over.
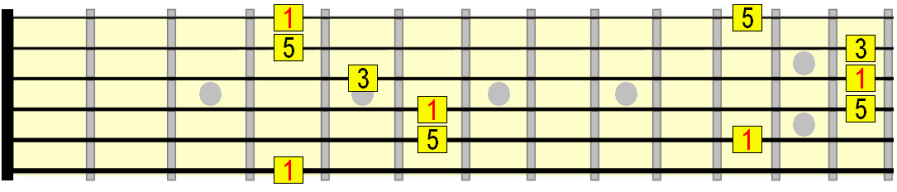
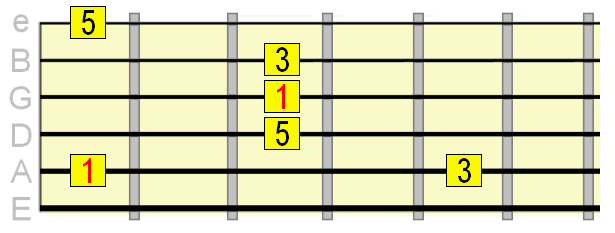
Using the example from the video - Amaj / Emaj / Bm / Dmaj - I might use the following positions (fret number below the diagrams!)...
Over A major
Fret 5
Over E major
Fret 7
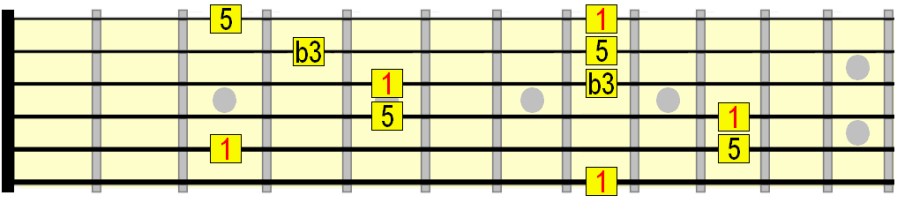
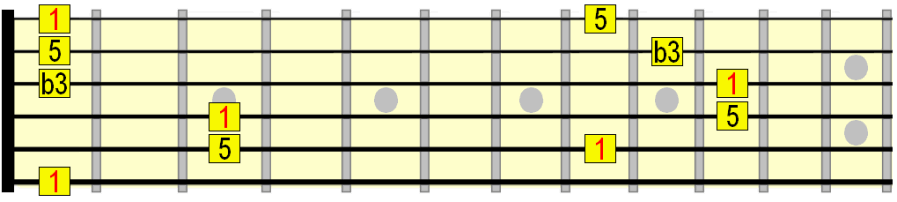
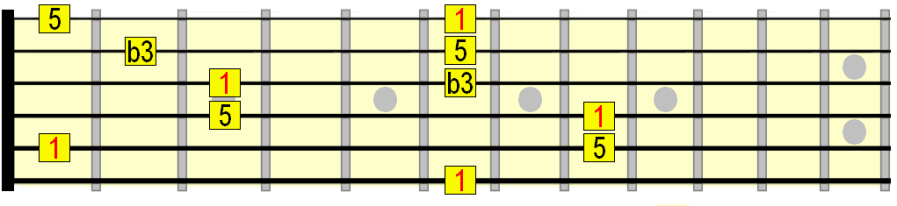
Over B minor
Fret 7
Over D major
Fret 5
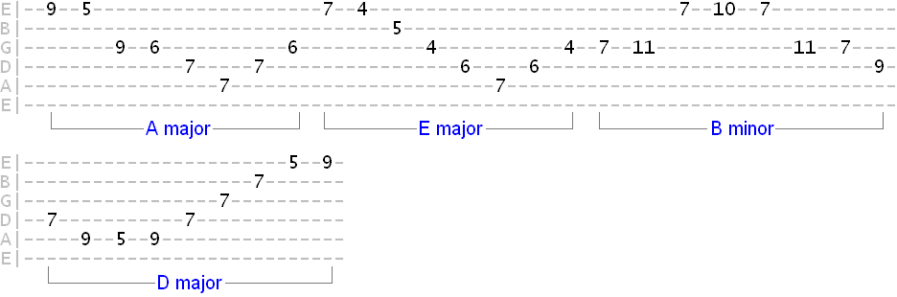
Next, try playing over each chord using its related arpeggio. When doing this, think about how you might connect each arpeggio to the next. Don't simply play every arpeggio from the lowest to highest string, try connecting them a bit more smoothly.
For example, take a look at the tab exercise below based on the same chord progression: Amaj / Emaj / Bm / Dmaj. Look at and listen to how I connect each arpeggio - I take the last note of the current arpeggio and play the first note of the next arpeggio in close proximity (both pitch wise and on the fretboard). This is good training for ensuring your chord change melodies flow smoothly and fluidly rather than sounding disjointed.
(Click the tab to hear)
Start slow!
Spend as much time as you can arpeggiating chord changes in this way. This is extremely valuable practice time for you, I promise! We'll build on this skill in later lessons.
Here are the backing tracks again...
Major
key 1 - Amaj
/ Emaj / Bm / Dmaj
Major
key 2 - Abmaj
/ Cm / Fm / Bbm
Minor
key - Cm
/ Abmaj / Fm / Bbmaj
First, understand that most progressions, especially those in mainstream pop and rock, are connected to the major scale. This is because the chords contain notes from the major scale.
So we're now looking inside the scale pattern for our chord tones. They're in there somewhere...
If you picture the major scale in its natural sequence (1 2 3 4 5 6 7), each degree of the scale marks the root of a new chord.
So from 1 - 7 we have a sequence of 7 chords that reside within this scale system. You'll often hear this referred to as "harmonising the major scale".
You'll also commonly see Roman numerals used to symbolise these chords (upper case numerals for the major chords, lower case for minor chords)...
These are the chord relationships used in countless songs. The major scale is the "formula" for many chord progressions over which you'll be soloing.
Tip: to get up to speed on this "chord scale" I highly recommend you check out the course Unlocking I IV V.
So, start by identifying the roots of each chord in the scale. Easy. The 1st chord's root is the 1st note in the scale. The 2nd chord's roots is the 2nd note. The 3rd chord's root is the 3rd note etc.
So if you saw a 1 4 5 (I IV V) chord progression, you'd know the roots of the chords are 1, 4 and 5 from the scale respectively.
The next step is to work out which intervals in the major scale are used in each of its chord.
For example, the 1 (or I) chord, which is major, uses the 1 3 and 5 from the scale.
The 2 (or ii) chord, which is minor, uses the 2, 4 and 6 from the scale.
The 3 (or iii) chord, which again is minor, uses the 3, 5 and 7 from the scale. And so it goes on...
The pattern you should be seeing here is that when we move to the next chord in the sequence, we also move each tone in the preceding chord to the next.
Notice also how we take the root of the chord, add 2 for the 3rd and another 2 for the 5th.
For example, the IV chord uses the following tones from the major scale: 4 (+2) 6 (+2) 1
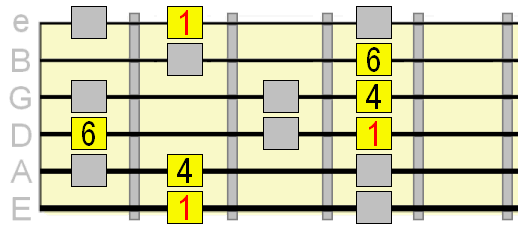
Once you have this sequence commited to memory, you'll know exactly where the chord tones for each chord in a typical major key progression lie, assuming you've also learned some major scale patterns, such as this one...
Let's use the example from earlier - Amaj / Emaj / Bm / Dmaj
We know from earlier that this is a 1 5 2 4 (I V ii IV) progression, which means it uses the 1st, 5th 2nd and 4th chords from the major scale.
Therefore, from learning the chord sequence above, we'd know that for the 1 chord the chord tones are 1, 3 and 5 from the A major scale (since A major is our 1 chord).
For the V chord, the chord tones are 5, 7 and 2 from the scale.
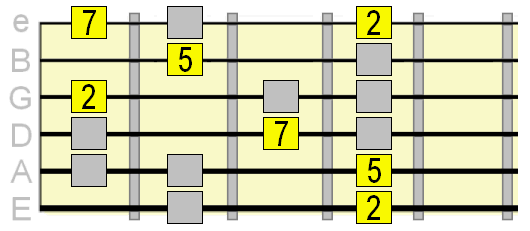
The ii chord - 2, 4 and 6
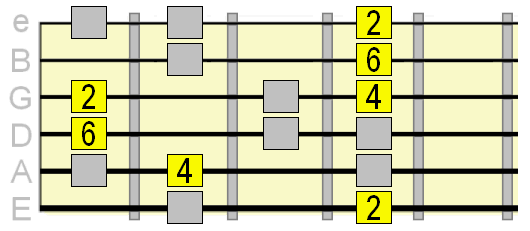
And the IV chord - 4, 6 and 1
These are exactly the same chord tones we located using the chord shape method (albeit within a smaller area). The only difference is we're now using the scale pattern as the reference as opposed to chord shapes.
While the scale method is a slightly more complicated way of finding chord tones, the benefit of learning this method is that you're already thinking in the context of the scale, rather than having to superimpose a scale pattern over chord shapes or arpeggios as with the other methods.
So the scale method is a far more integrated way of selecting target notes for your soloing phrases.
Here are the tracks again to help you practice finding the right scale tones for each chord.
Major
key 1 - Amaj
/ Emaj / Bm / Dmaj (I / V / ii /
IV - A major scale)
Major
key 2 - Abmaj
/ Cm / Fm / Bbm
(I / iii / vi / ii
- Ab major scale)
Wow, you made it this far...
I'm impressed! Maybe you're the only one... who knows? Either way, keep practicing at least one of the approaches we've covered in this lesson (the one you're most comfortable with).
Working on this stuff will have a huge impact on your ability to improvise and write your own solos, without that feeling of wandering aimlessly around the fretboard.
There are more chord change lessons to come... subscribe below to stay updated. Thanks for your time!
Share your thoughts...
Have any questions, thoughts or ideas about this lesson? Let us know using the comments form below.
Soloing
Over Blues Progressions

How to Solo Over Chord Changes - Make The Connection
Soloing over chord changes is one of the most valuable skills you can learn as a guitarist, but it can also be one of the most challenging. It therefore needs to be broken down into the smallest steps possible.The aim of this lesson is to get you into the right frame of mind for learning how to play through chord changes and to give you three key ways to help connect your solo to the chords you're playing over - a connection that many struggle to see.
Don't worry if the first solos you attempt sound a little... basic. Every step we take in this lesson, no matter how small, is fundamental to our progress. You'll gradually build on this rudimentary knowledge - it will become the base for your soloing technique (bends, legato, speed, timing etc.).
Start by watching the short presentation below.
Then, before viewing the supplemental content further down this page, please ensure you bookmark this page as it's quite long and should realistically give you several weeks worth of practice material.
1. Use chord shapes to find the chord tones
As mentioned in the video, the first (and arguably most important) approach for learning to solo over chord changes is to find the related tones/intervals of the chords you're playing over on the fretboard.These chord tones act as safe target notes to help put your soloing phrases into context and give your lead lines a sense of purpose and direction. Simply being aware of their location will make improvising and writing solos a hell of a lot easier. They will save you on many occasions from wandering into (unpleasant) dissonance!
The easiest way to find these chord tones is to visualise the chord progression in the form of chord shapes. To keep things simple, we'll start by using the E and A form barre chord shapes you're hopefully familiar with. In the coming lessons, we'll explore additional shapes (C, D and G) to give you even more positions to visualise chords, but this is a good place to start.
"E form" major chord "A form" major chord
"E form" minor chord "A form" minor chord
So the first step is to get comfortable with using these shapes (or any others you're familiar with) to locate each chord in the progression. In the video, the example was Amaj / Emaj / Bm / Dmaj, but you should be confident with finding these major and minor triads in any key.
Note: If you're thinking "what about diminished/augmented/altered chords?!" - Patience! We'll move on to soloing over more complex chords later. One step at a time.
Let's just try a fresh major key example: Abmaj / Cm / Fm / Bbm
Where might we play these chords on the fretboard using E and A form barre chords? The answer is below, but at least try yourself before you look!
Tip: When selecting your chord shapes, try and choose the ones that are in close proximity to the previous and next chords.
Abmaj
Cm
Fm
Bbm
Once you have your chord shapes/tones identified, try playing over the progression one chord tone at a time.
That means for Abmaj, we'd play either the root, 3rd or 5th of that chord. When the chord changes, we'd play the root, 3rd or 5th of THAT chord etc.
Tip: If you know your seventh chord shapes (e.g. Cmaj7, C7, Cm7) then you can also use the 7th as a chord tone.
Try it yourself. Listen to the backing track below (it's the chord progression we've used in this example) and then start playing the appropriate chord tones as the chords change, perhaps selecting different ones each time around. I've included some tab examples below each track to start you off...
Download
the backing track here - Abmaj
/ Cm / Fm / BbmHow about a minor key example? Same process applies - find the chord tones using the E and A form chord shapes from earlier and start by playing through one note per chord...
Download
the backing track here - Cm
/ Abmaj / Fm / BbmajOnce you're confident with finding the chord tones through shapes, try and find the same notes on different strings. If you know the notes across the fretboard, this shouldn't be too difficult. In fact, this is a great exercise to help test your knowledge of how well you know the note positions!
Take your time with the one-note-per-chord exercises and, when you're ready, try linking them together using notes from a related scale (e.g. for the Abmaj progression - A major scale or major pentatonic. For the Cm progression, C natural minor or minor pentatonic).
Want to quickly learn the most important scale patterns for this method? Jonathan Boettcher has a great free cheat sheet here.
You should also allow for some trial and error and let your ear be the judge of what sounds good when moving between chord tones.
Start by using just one note in between the chord tones, then 2, then 3 etc. Embellish your phrases in gradual layers like this.
If you're struggling with identifying the correct scale/notes to use between the chord tones, don't worry, we'll cover that in more detail in later lessons. Even without this, you should be able to hear how important these chord tones are in creating musical, natural sounding solos.
2. Use arpeggios to support the chord changes
In the video I briefly explain the "arpeggio approach" - using arpeggios as the skeleton or scaffolding of your soloing phrases. Arpeggios can help outline the chord you're playing over and put any embellishments into the context of the chord you're playing over (important!).Think of them like the "centre of gravity" over a given chord. Sure, you'll play notes outside the arpeggio (i.e. from a related scale), but the arpeggio will help pull it all together. Listen closely to your favourite solos and you'll hear a mixture of "horizontal" scale runs and "vertical" arpeggio movements.
So it's similar to the chord tone method above (since arpeggios are essentially the notes of a chord played one after the other), but this time we're using them more as part of our phrasing, combining them with scale movements.
Start by ensuring you're familiar with the basic major and minor arpeggio patterns.
Just like the chord tone approach, all you need to work on at first is being able to visualise these arpeggios in the correct positions based on the chord you're playing over.
Using the example from the video - Amaj / Emaj / Bm / Dmaj - I might use the following positions (fret number below the diagrams!)...
Over A major
Fret 5
Over E major
Fret 7
Over B minor
Fret 7
Over D major
Fret 5
Next, try playing over each chord using its related arpeggio. When doing this, think about how you might connect each arpeggio to the next. Don't simply play every arpeggio from the lowest to highest string, try connecting them a bit more smoothly.
For example, take a look at the tab exercise below based on the same chord progression: Amaj / Emaj / Bm / Dmaj. Look at and listen to how I connect each arpeggio - I take the last note of the current arpeggio and play the first note of the next arpeggio in close proximity (both pitch wise and on the fretboard). This is good training for ensuring your chord change melodies flow smoothly and fluidly rather than sounding disjointed.
(Click the tab to hear)
Start slow!
Spend as much time as you can arpeggiating chord changes in this way. This is extremely valuable practice time for you, I promise! We'll build on this skill in later lessons.
Here are the backing tracks again...
Major
key 1 - Amaj
/ Emaj / Bm / Dmaj
Major
key 2 - Abmaj
/ Cm / Fm / Bbm
Minor
key - Cm
/ Abmaj / Fm / Bbmaj3. Identifying chord tones within scale patterns
This is a more advanced approach to soloing over chord changes, but it's just another way of seeing it. If you already know the major scale pretty well, you may even find this a more efficient approach than the others in this lesson.First, understand that most progressions, especially those in mainstream pop and rock, are connected to the major scale. This is because the chords contain notes from the major scale.
So we're now looking inside the scale pattern for our chord tones. They're in there somewhere...
If you picture the major scale in its natural sequence (1 2 3 4 5 6 7), each degree of the scale marks the root of a new chord.
So from 1 - 7 we have a sequence of 7 chords that reside within this scale system. You'll often hear this referred to as "harmonising the major scale".
You'll also commonly see Roman numerals used to symbolise these chords (upper case numerals for the major chords, lower case for minor chords)...
| Scale Tones | 1 | 2 | 3 | 4 | 5 | 6 | 7 |
| Related Chords | I | ii | iii | IV | V | vi | vii |
These are the chord relationships used in countless songs. The major scale is the "formula" for many chord progressions over which you'll be soloing.
Tip: to get up to speed on this "chord scale" I highly recommend you check out the course Unlocking I IV V.
So, start by identifying the roots of each chord in the scale. Easy. The 1st chord's root is the 1st note in the scale. The 2nd chord's roots is the 2nd note. The 3rd chord's root is the 3rd note etc.
So if you saw a 1 4 5 (I IV V) chord progression, you'd know the roots of the chords are 1, 4 and 5 from the scale respectively.
The next step is to work out which intervals in the major scale are used in each of its chord.
For example, the 1 (or I) chord, which is major, uses the 1 3 and 5 from the scale.
The 2 (or ii) chord, which is minor, uses the 2, 4 and 6 from the scale.
The 3 (or iii) chord, which again is minor, uses the 3, 5 and 7 from the scale. And so it goes on...
| Chord | Scale Tones Used | ||
| I | 1 | 3 | 5 |
| ii | 2 | 4 | 6 |
| iii | 3 | 5 | 7 |
| IV | 4 | 6 | 1 |
| V | 5 | 7 | 2 |
| vi | 6 | 1 | 3 |
| vii | 7 | 2 | 4 |
The pattern you should be seeing here is that when we move to the next chord in the sequence, we also move each tone in the preceding chord to the next.
Notice also how we take the root of the chord, add 2 for the 3rd and another 2 for the 5th.
For example, the IV chord uses the following tones from the major scale: 4 (+2) 6 (+2) 1
Once you have this sequence commited to memory, you'll know exactly where the chord tones for each chord in a typical major key progression lie, assuming you've also learned some major scale patterns, such as this one...
Let's use the example from earlier - Amaj / Emaj / Bm / Dmaj
We know from earlier that this is a 1 5 2 4 (I V ii IV) progression, which means it uses the 1st, 5th 2nd and 4th chords from the major scale.
Therefore, from learning the chord sequence above, we'd know that for the 1 chord the chord tones are 1, 3 and 5 from the A major scale (since A major is our 1 chord).
For the V chord, the chord tones are 5, 7 and 2 from the scale.
The ii chord - 2, 4 and 6
And the IV chord - 4, 6 and 1
These are exactly the same chord tones we located using the chord shape method (albeit within a smaller area). The only difference is we're now using the scale pattern as the reference as opposed to chord shapes.
While the scale method is a slightly more complicated way of finding chord tones, the benefit of learning this method is that you're already thinking in the context of the scale, rather than having to superimpose a scale pattern over chord shapes or arpeggios as with the other methods.
So the scale method is a far more integrated way of selecting target notes for your soloing phrases.
Here are the tracks again to help you practice finding the right scale tones for each chord.
Major
key 1 - Amaj
/ Emaj / Bm / Dmaj (I / V / ii /
IV - A major scale)
Major
key 2 - Abmaj
/ Cm / Fm / Bbm
(I / iii / vi / ii
- Ab major scale)Wow, you made it this far...
I'm impressed! Maybe you're the only one... who knows? Either way, keep practicing at least one of the approaches we've covered in this lesson (the one you're most comfortable with).
Working on this stuff will have a huge impact on your ability to improvise and write your own solos, without that feeling of wandering aimlessly around the fretboard.
There are more chord change lessons to come... subscribe below to stay updated. Thanks for your time!
| Was this
helpful? Please support this site. I really appreciate it! |
Stay updated
and learn more Sign up to the newsletter for updates and grab your free Uncommon Chords book |
Share your thoughts...
Have any questions, thoughts or ideas about this lesson? Let us know using the comments form below.
Related Lessons
Soloing
Over Two-Chord Progressions
Soloing
Over Blues Progressions


