


Barre Chord Shape Relationships
Firstly, this lesson requires that you're familiar with the five main barre/movable chord shapes. Visit the first guitar barre chord lessons to see what you've missed.After following the course to this point, you should now have built up a good library of chord shapes and voicings to play around with. This lesson is about using these chord shapes together, knowing how they relate to each other on the guitar's fretboard. This does take some time to grasp, but once you "get it", your songwriting and improvisation with chords will dramatically improve. You'll see!
Just take your time, experiment independently with what you learn and, above all, have fun.
| I strongly recommend you learn the notes on the fretboard. You'll see, when we come to it, how important it is to be able to identify a particular note on more than one string. |
Barre chord root note relationships
Of the five main chord shapes we learned on this course (E, A, C, G and D)...
- The E and G shapes of the same chord share the same low E string root note
- The A and C shapes of the same chord share the same A string root note
- The D shape has it's own bass root note on the D string.
Let's take a look at these relationships more closely...
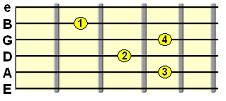
E and G shapes
Tip: You don't have to play the full chord shapes - try cutting them down for more convenient fingering!
Notice how, when we're using the same chord for
both shapes, the E shape ascends from that bass
root note, and the G shape
descends from that same root note on
the low E string. There are higher root notes in these shapes, but
we're just
focusing on the lowest root notes as "marker points" at the moment.
Remember - that root note, positioned at a particular fret,
determines the notation of the chord. For example, if it's positioned
at the
8th fret it would be the note C.
Therefore, building either the E or G chord shapes onto that root note
would make the basic chord a
C chord.
If you're playing the
minor shape, it'll be Cm. If
you're playing the
Major 7th shape, it'll be Cmaj7.
That initial letter always refers to the root note of the chord. That's
partly why root notes are so important!
Since both chord shapes, when positioned at the same root note
fret, offer different voicings of the same chord, it's down to you to
choose which one suits the music you're trying to create.
One shape might accommodate chords the other cannot. We won't go into
the theory behind what makes the voicings different right now - just
hear the difference!
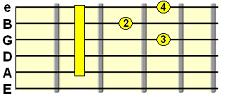
A and C shapes
So again, just like above, same root note and same chord, the A shape
ascends from that root note position and the C shape
descends from it.
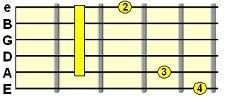
D shape and something you may have noticed
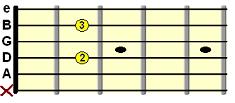
We know from learning about the D shape chords, that they ascend from a D string root note. However, I've deliberately ignored the descending shape of the same root note. The reason? Well, take a look below and see if you notice anything familiar about the descending chord shape on the D string, starting with the basic major chord...
It merges with the E shape. See, that D string root note can also be seen as a higher root note (an octave higher to be specific) of the E shape's low E string root note, as indicated with the red dot above. Now, you may want to use the fuller E shape, or you may just want that higher, top section of the shape. This is where your creative judgment takes over. I can't tell you which one is "right" or "wrong" to use in your own songwriting - I'm merely showing you the options you have.
A lot of this stuff will naturally become clearer the more you study the fretboard.Identifying different voicings for the same chord
Because we've learned 5 main chord shapes, that
essentially means we
have 5 different voicings for any given chord. For example, if we were
playing A7
(A dominant 7th) we could use:
1)
Dominant E-shape with root note at
fret 5 (fret 5 on low E string = A note)
(Click the diagrams to hear)
2) Dominant G shape with root note, also at fret 5 (as we learned that G and E shape use the same low E string root note)
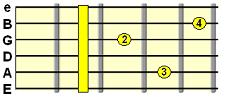
3) Dominant D shape with root note at fret 7 (fret 7 on D string = A note)
4) Dominant C shape with root note at fret 12 (fret 12 on A string = A note)
5) Dominant A shape with root note at fret 12
Or we could just use the open A7 shape, which we know is what the A shape above is based on...
Now, let's hear them all being played one after the other...
So you can hear how the actual chord being played is the same with each shape, yet the voicing is different. That's what we're focusing on here - the ability to know the variations available to you and picking the one that best suits the music you want to create!
Try a similar exercise to above with different chords (e.g. Cm, Fmaj7 etc.). Refer back to the chord charts in the previous barre chord lessons for ideas.Getting C-A-G-E-D in
There's a useful visualisation method you can use to connect the different chord shapes right across the fretboard. It's often referred to as the CAGED system.
You may notice that the 5 letters refer to the 5 chord shapes we've learned. Why C-A-G-E-D in that particular order? Well, apart from the convenient acronymn spelling, what it does is put these shapes into sequence on the fretboard. Let's take a look...
That diagram shows the E major chord across all the 5 main chord shapes we've learned. Look at the order of the sequence in which they appear...
- First we start with the open E major chord, which is effectively the E-shape with its low E string root note.
- Next we move into the D shape for the same E major chord.
- Next we find the E major chord in the C shape position at fret 7 on the A string.
- Next we hit the A-shaped E major chord, right next door to the C shape preceding it.
- Finally, we end up at the G shape for the same E major chord.
Now, while the above particular sequence does not
spell "CAGED" in
that order, if we continued the sequence, we would find ourselves back
at the E shape, at the 12th fret (as the 12th fret is the same note as
the open string we started on, just an octave higher). Then the cycle
continues to the D shape again, but we're getting quite high up the
fretboard
now, so chord fingerings will get kind of awkward.
Anyway, this is more just for visualising related chord (and even
scale) positions, and we can almost see it like a conveyor belt, which
would follow the sequence...
E-D-C-A-G-E-D-C-A-G- etc.
In this particular example, the sequence happened to start with the "E"
from "CAGED" and continued the sequence from there.
Remember, the letters in CAGED represent the chord shape,
not the chord
type (the chord type was E major in this example).
Take a look at that diagram again. Observe how the sequence of chords
merge
together and overlap each other. We already know
which chord shapes share the exact same root
note, so that creates an instant link to the next chord shape
in sequence.
What this means is, if you know how to identify a particular key (using
your knowledge of where a given chord shape's root notes lie), you can
instantly
know which related chord shapes lie nearby. For example, below is how
the CAGED system would span out for the chord of
Bmaj7 (B major 7th):
Each of these major 7th chord shapes are rooted on the note B.
So, try picking your own chord and, using your knowledge of the sequence outlined above, and how certain chord shapes share the same root note, try and identify where all the related chord shapes would lie. Don't just play it in sequence, mix it around to really test your knowledge (e.g. instead of CAGED, try DACEG!).Time for a deep breath (or a beer)
Make sure you spend time getting to know all the chord relationships we've looked at. Be on the lookout for these common relationships between the chord shapes. You will have your own ways of seeing these relationships, and the more you look for them and play around with them, the more they will sink in.
Remember, you don't have to play the full chord shapes. Cutting them down to just 3 or 4 strings can help with more economical fingering. Knowing the full shapes is, however, beneficial on the theory side of things, as you can use them as the scaffolding for smaller chord shapes and even related scale patterns in the same position.
Enjoy your discoveries.
| |
Tweet |
Sign up to the newsletter for updates and grab your free Uncommon Chords book
More Guitar Chords Lessons


