Jump to...
Recap - Triad Harmonisation | Basic Shape Targeting (Two Chords) | Triad & 7th Target Shapes
Targeting Chords in Isolation | Three & Four-Chord Examples | 9th, 11th & 13th Target Shapes
Recap - Triad Harmonisation
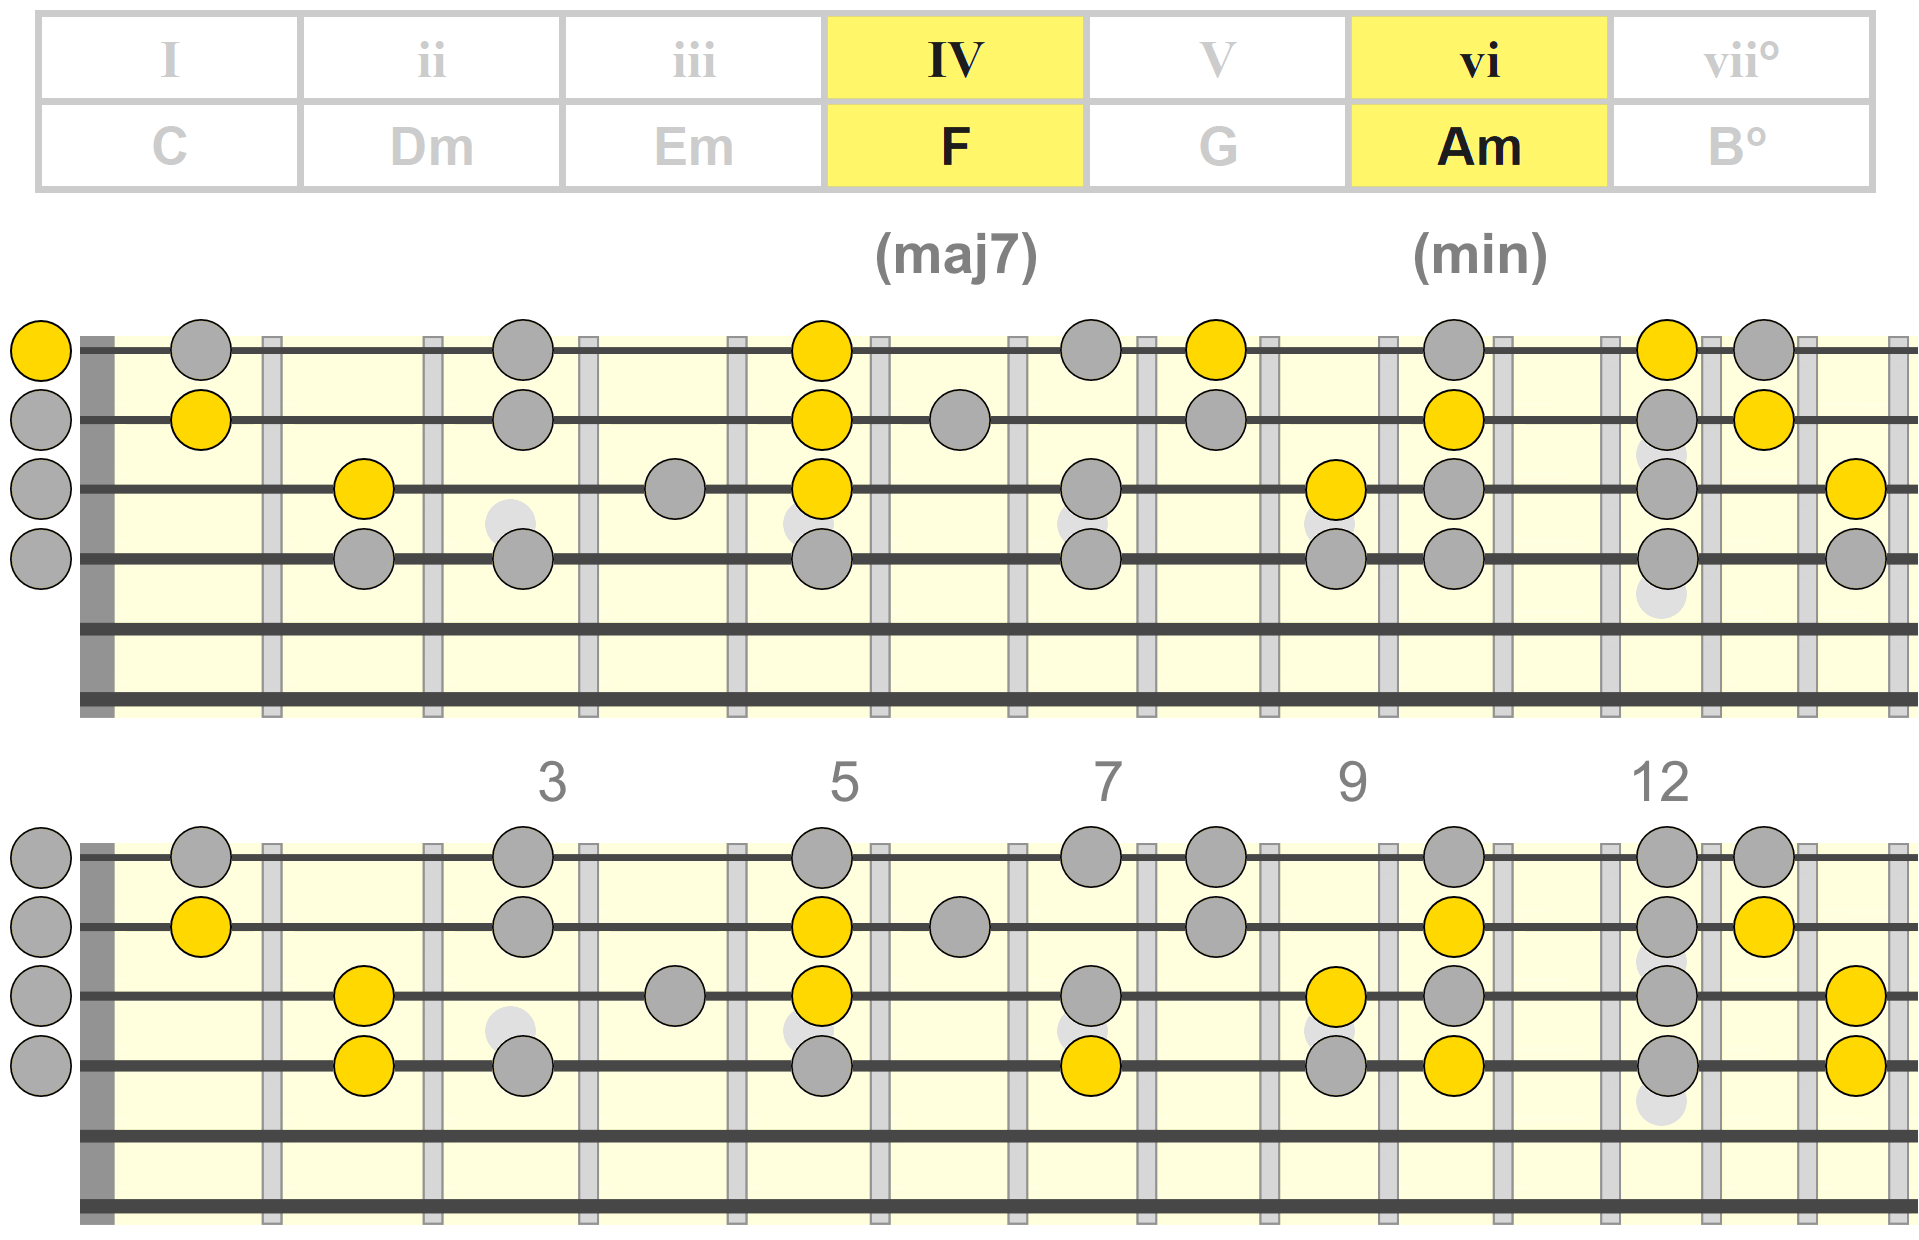
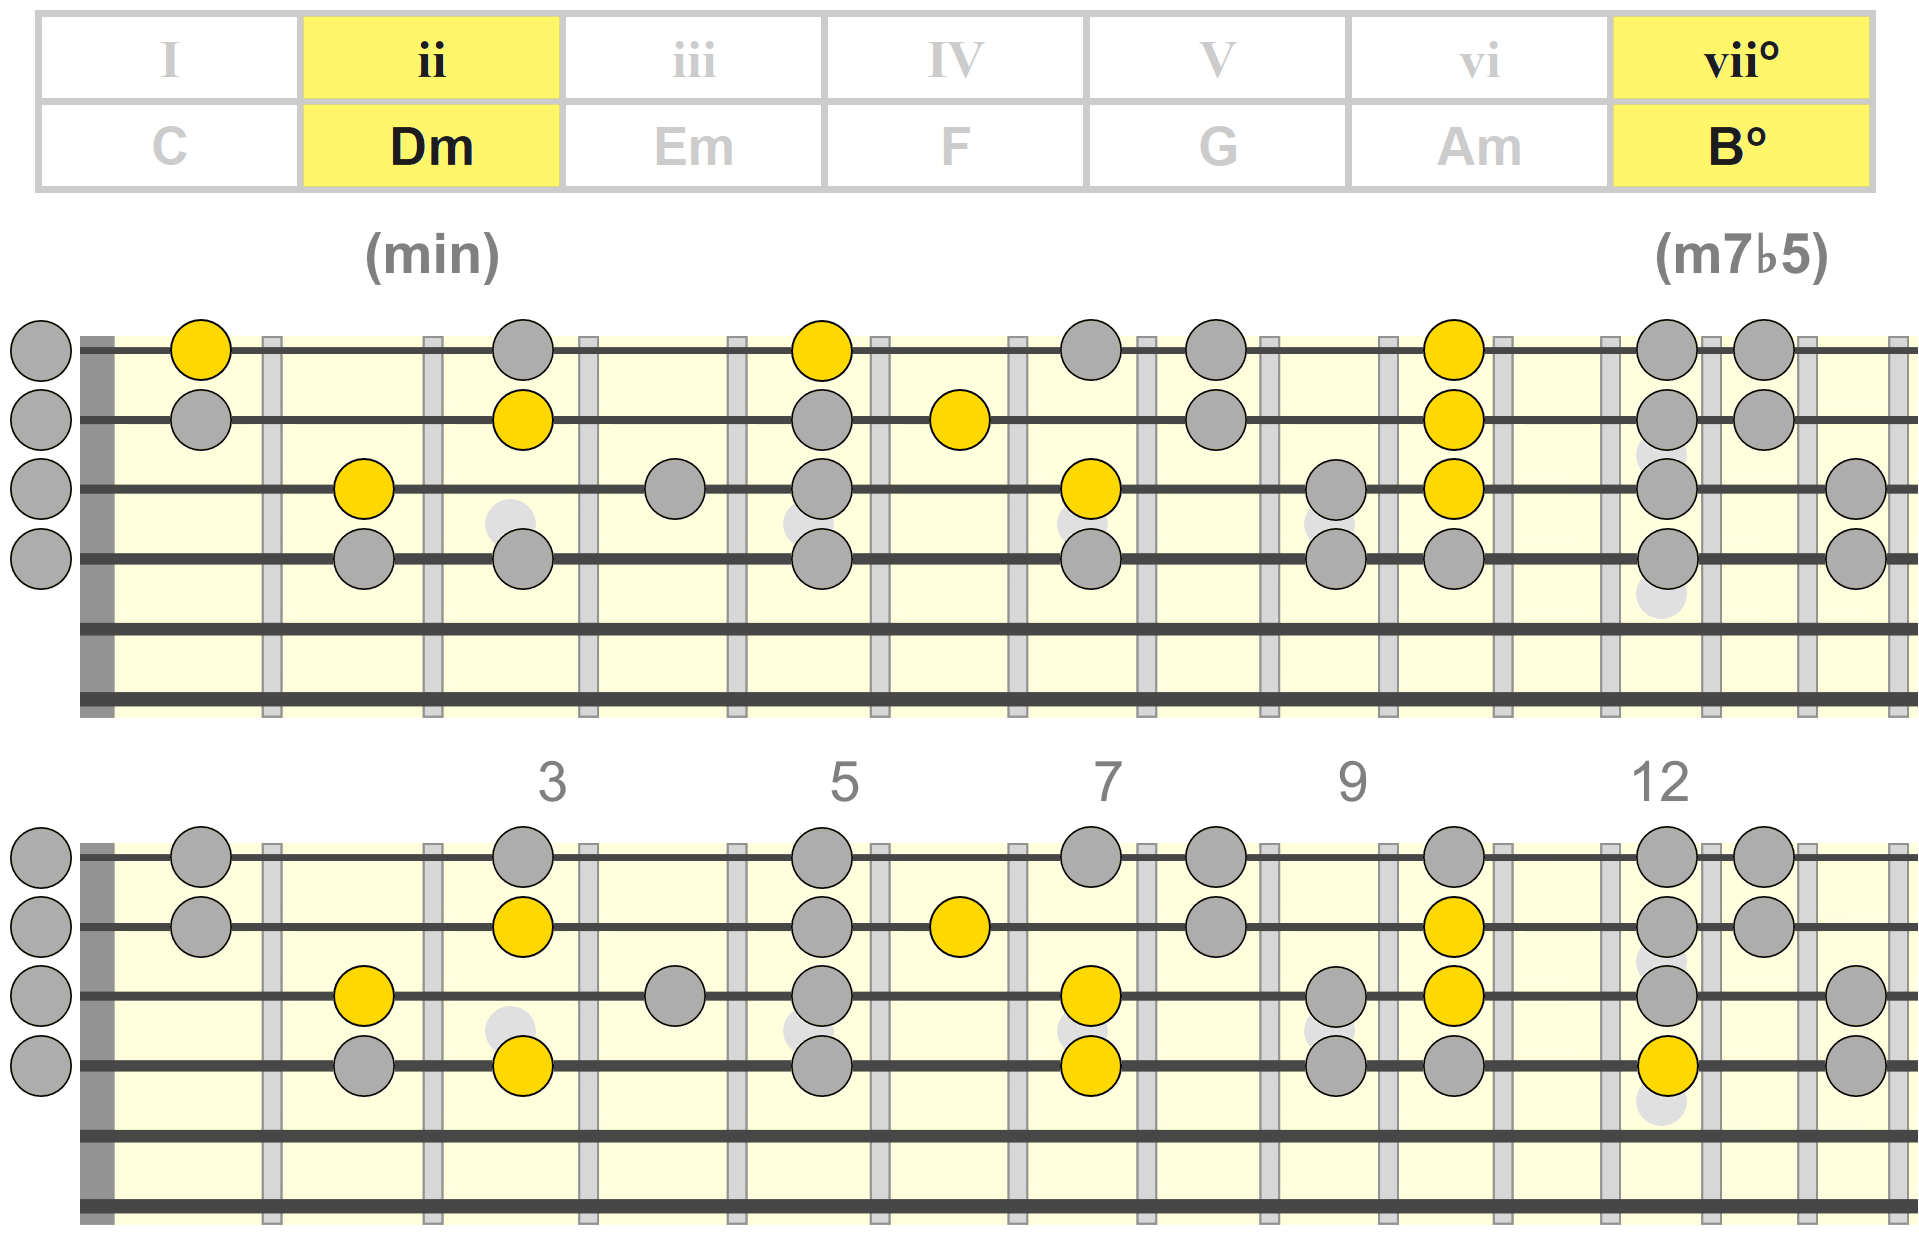
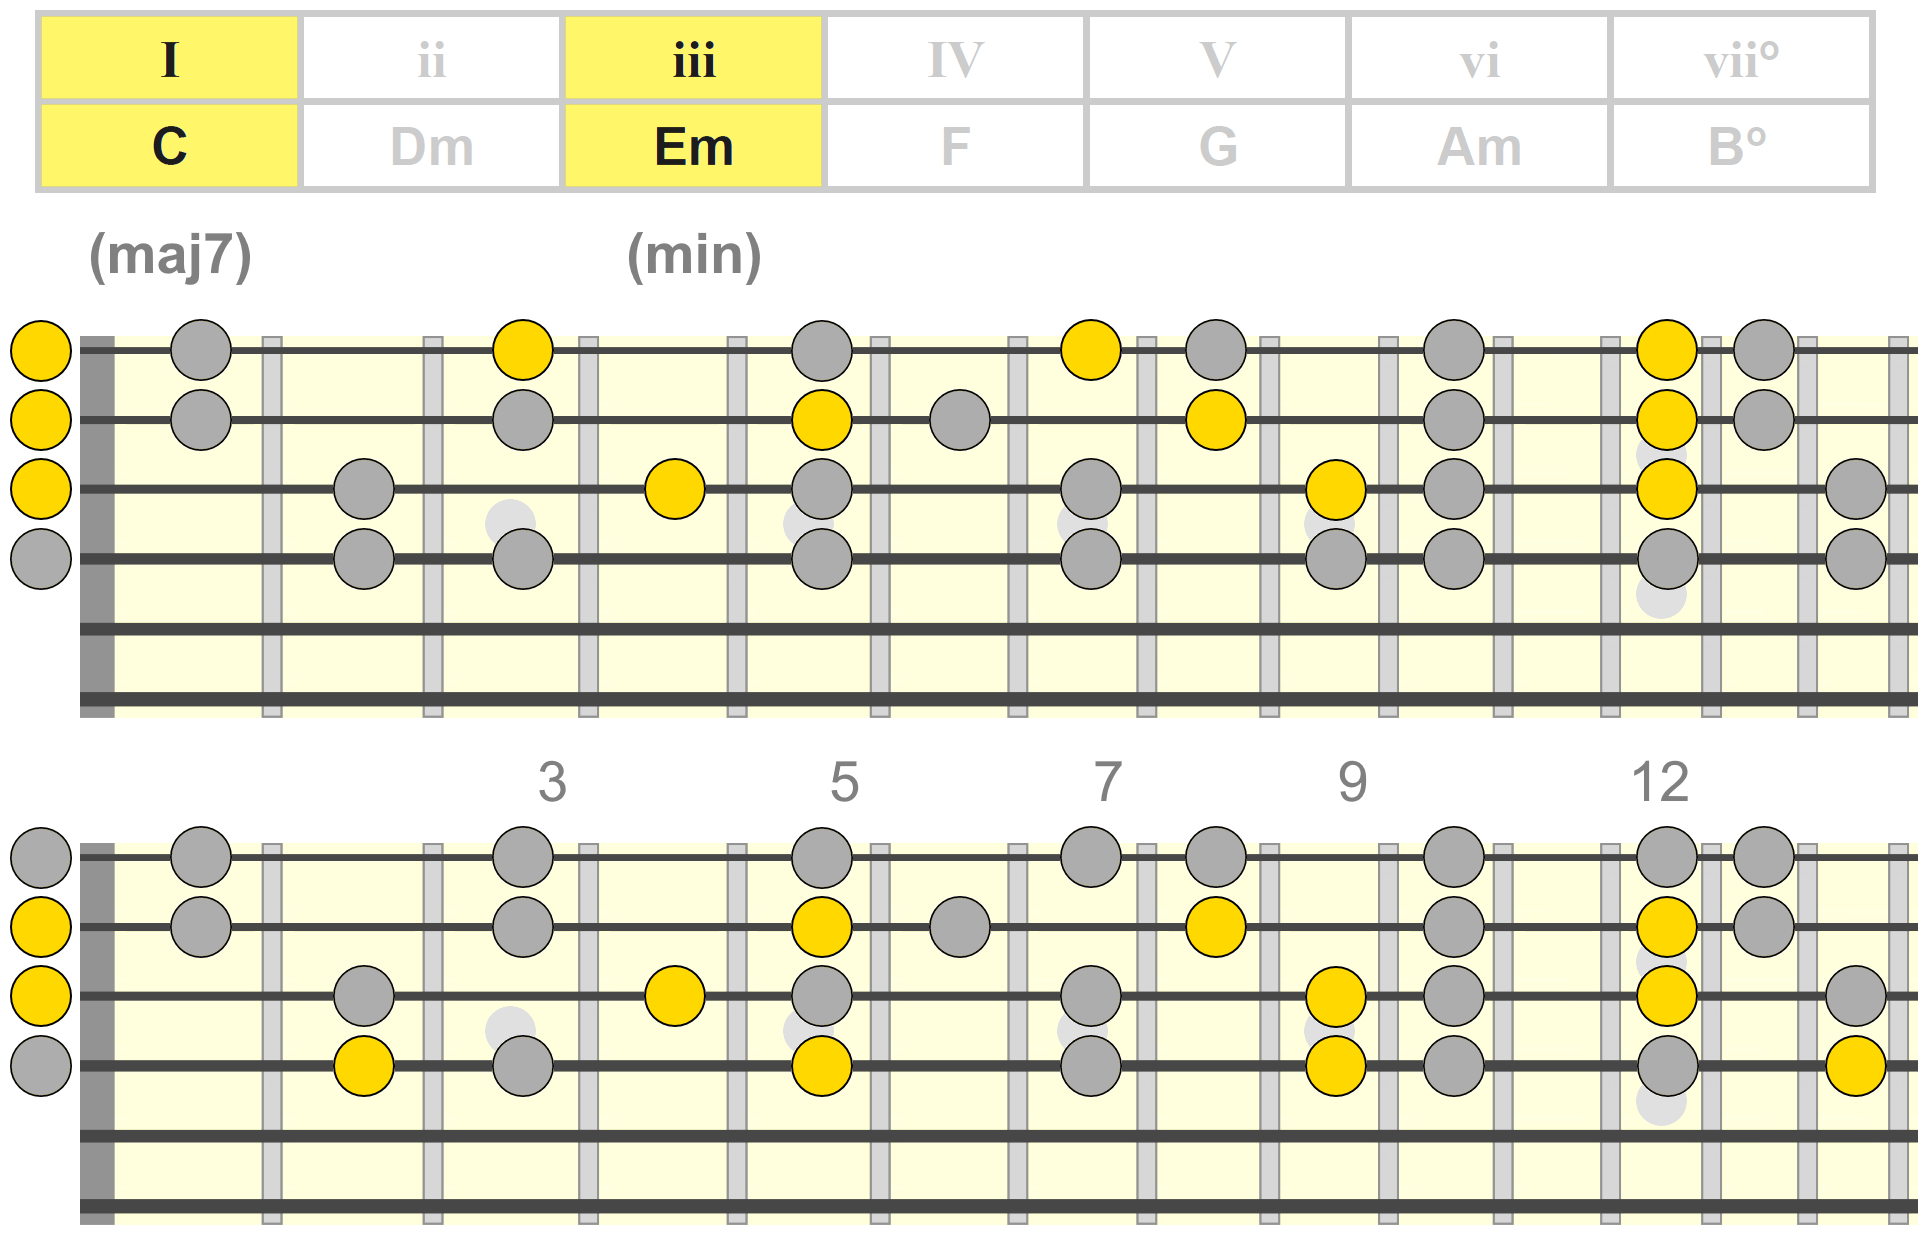
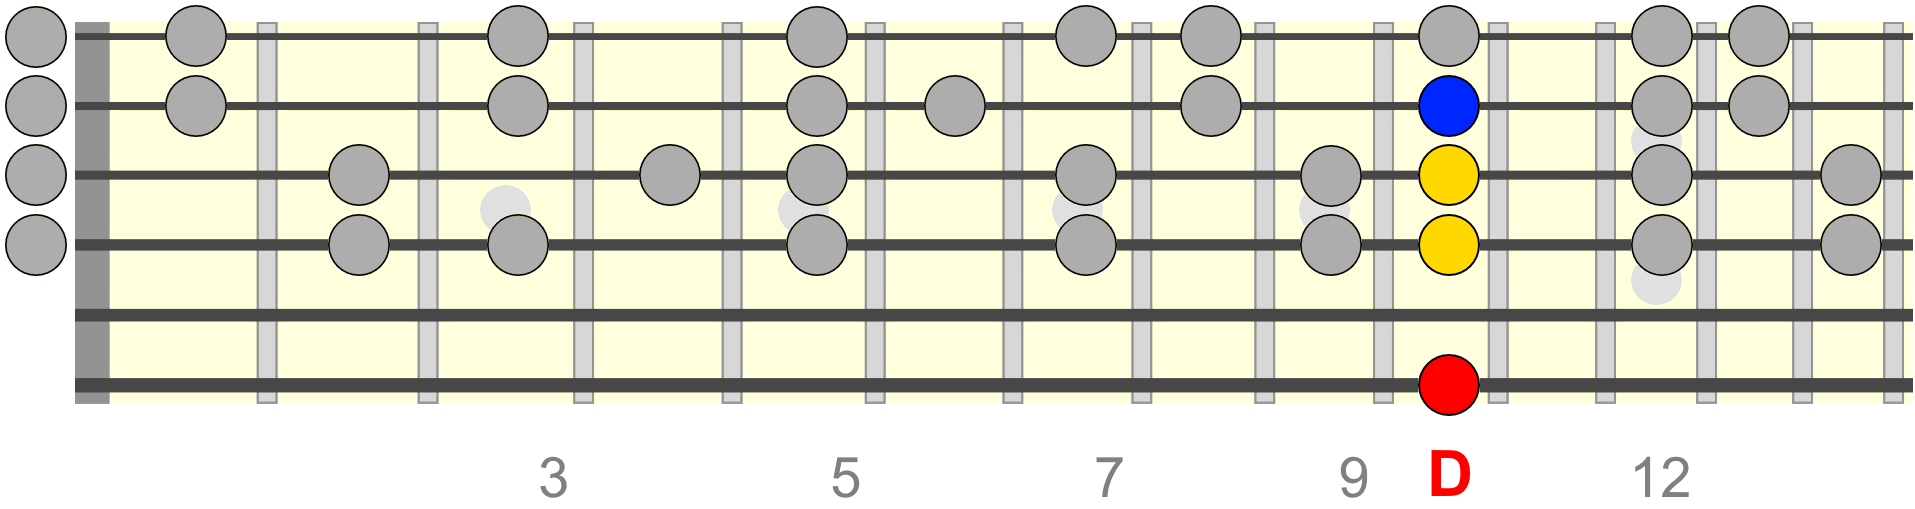
Below we have the C major scale mapped out across the top four strings, covering the diatonic C major key. This scale will also cover the relative minor key of A minor (starts on the 6 of major) and the additional modes of the scale...
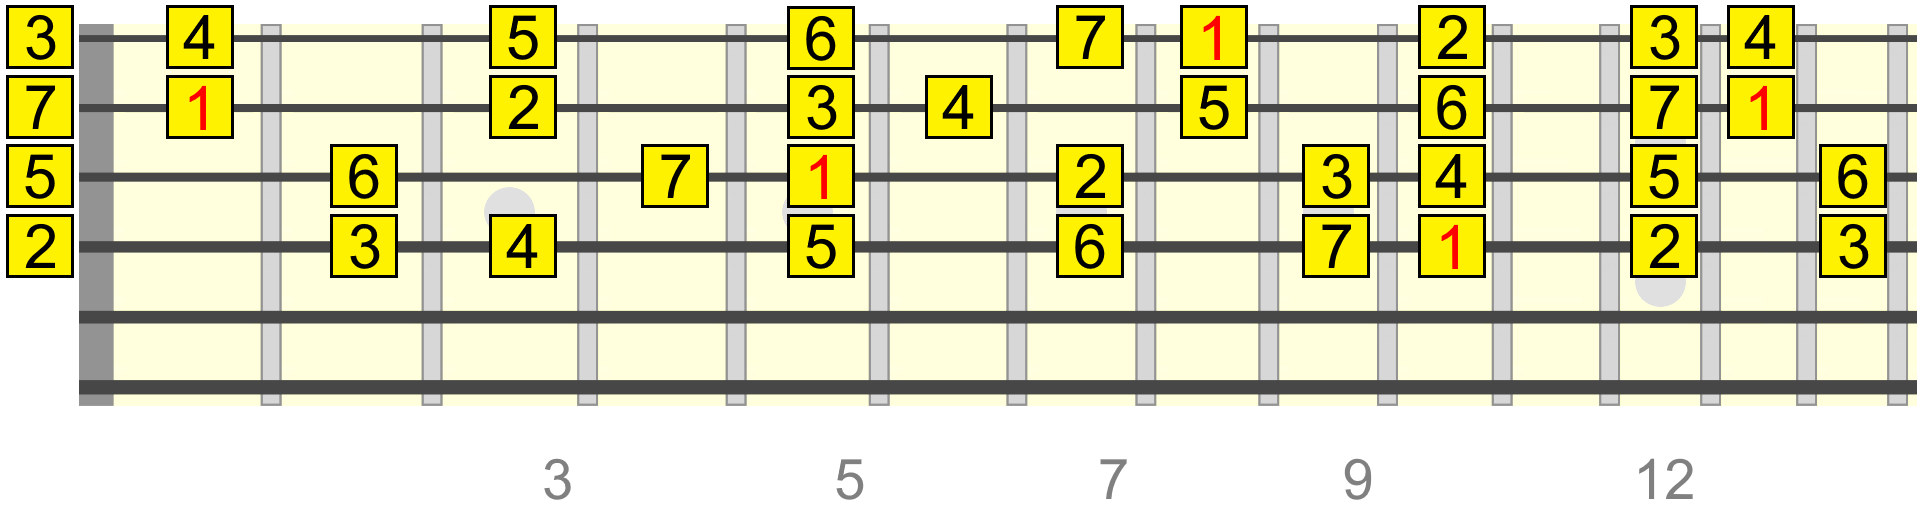
By harmonising this diatonic scale using both major and minor triads, we can see how each triad can be associated with two related chords in the scale, starting with the major triad shapes...
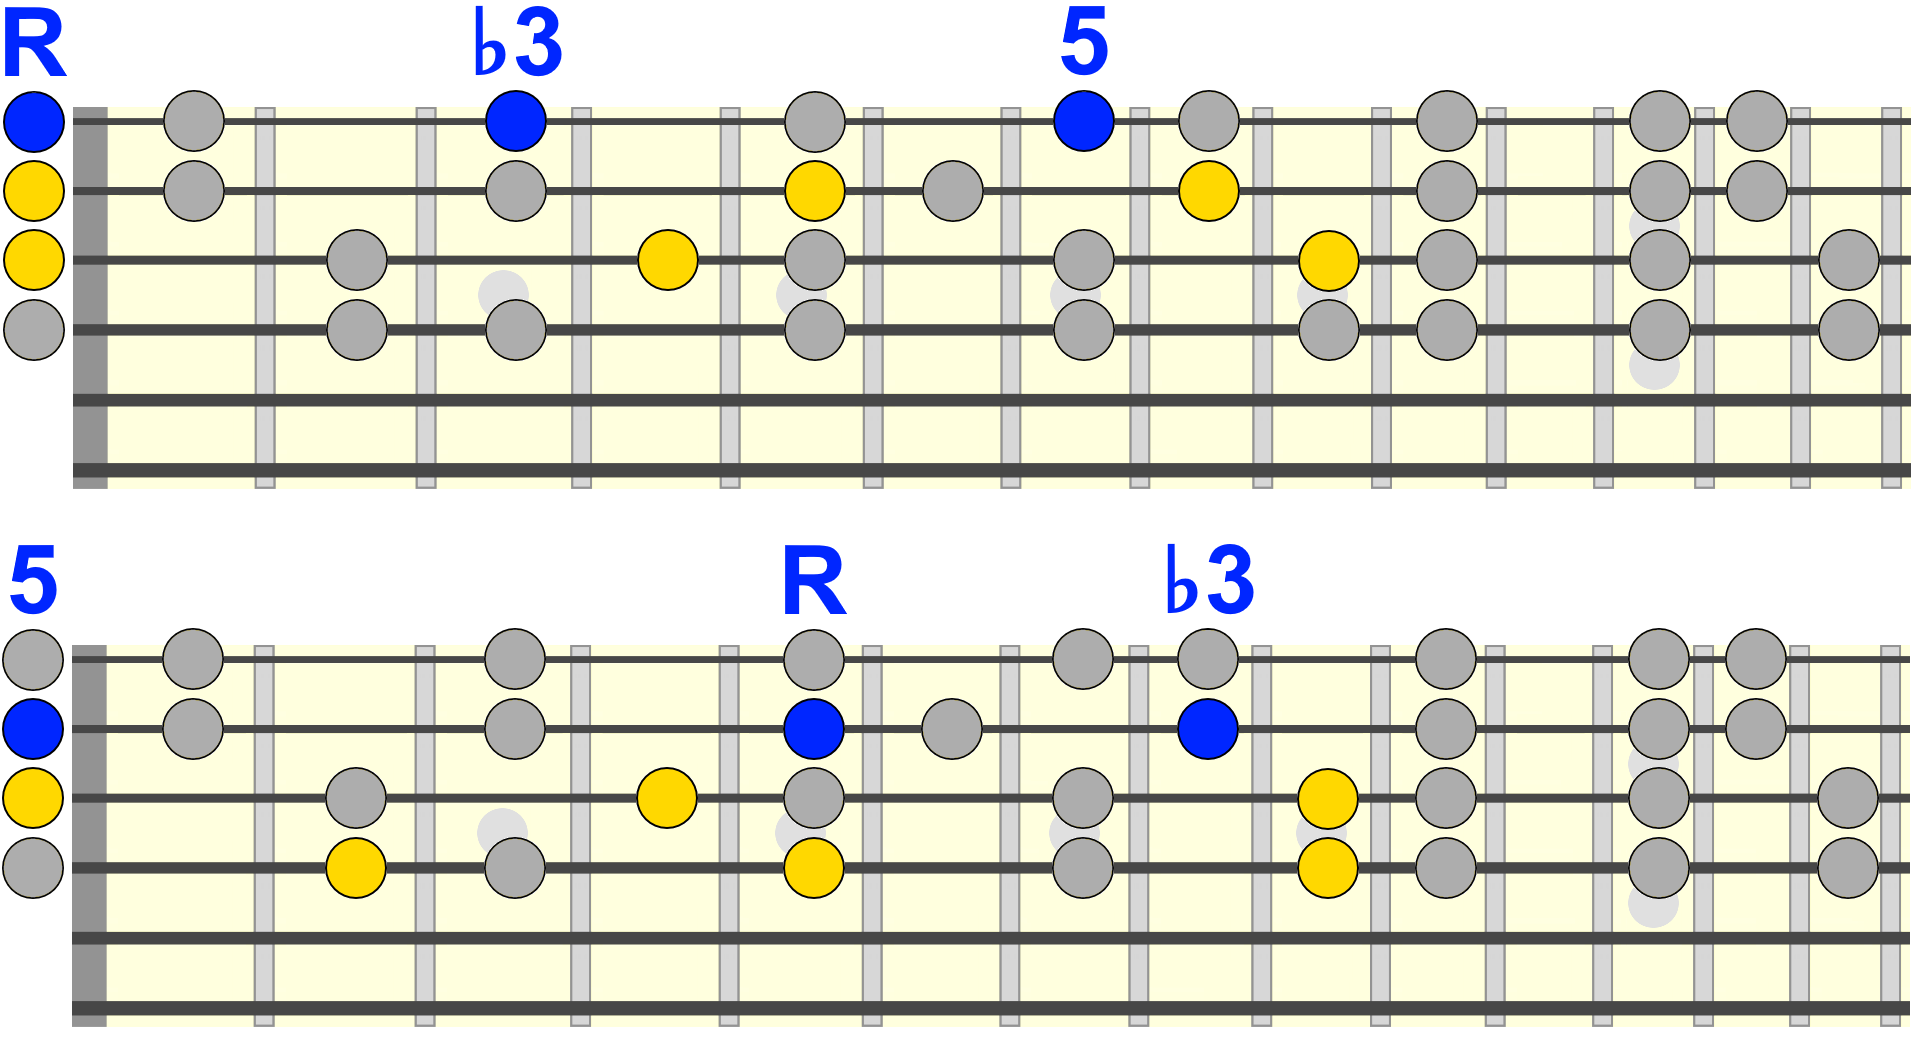
And now the minor triad shapes...
These will become our primary "target shapes" for linking our melody notes to triad and 7th chord voicings within a diatonic key.
Basic Shape Targeting (Two Chords)
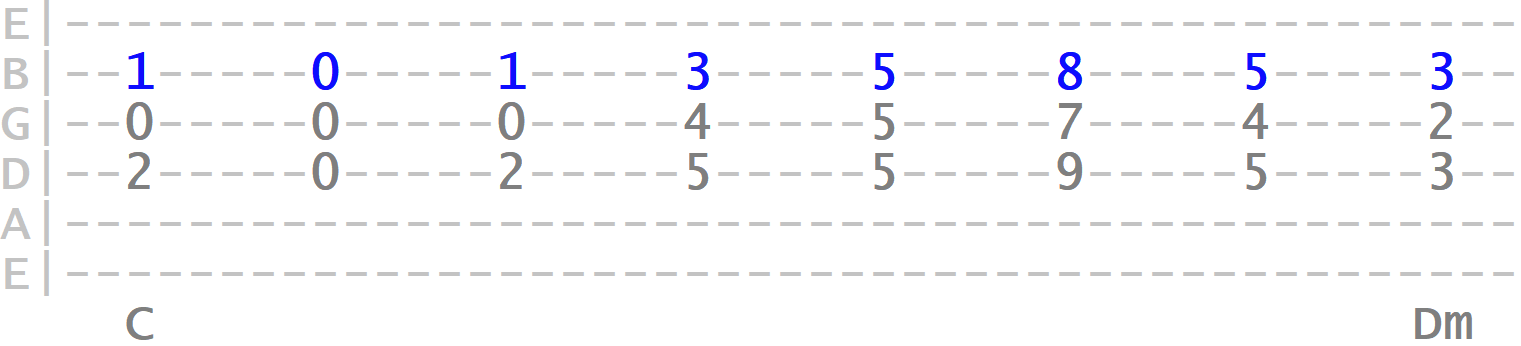
Let's say we were in the key of C major, moving between C and Dm, or the 1 (I) and 2 (ii) chords of the scale. We might start by forming a simple melody around these chords. Or, there may already be a vocal melody, for example, that you want to instrumentalise. Here's an example...
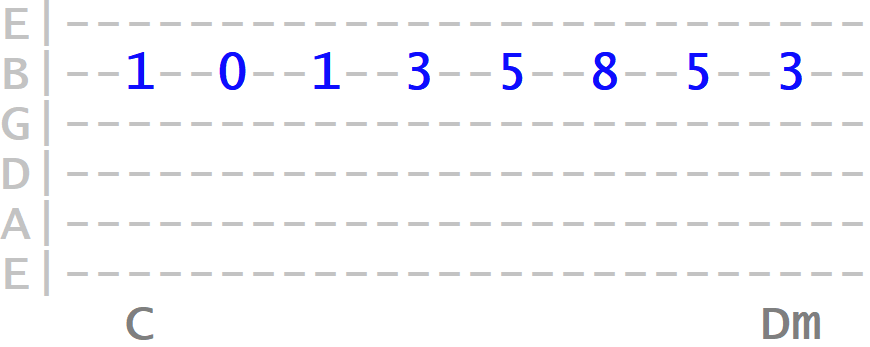
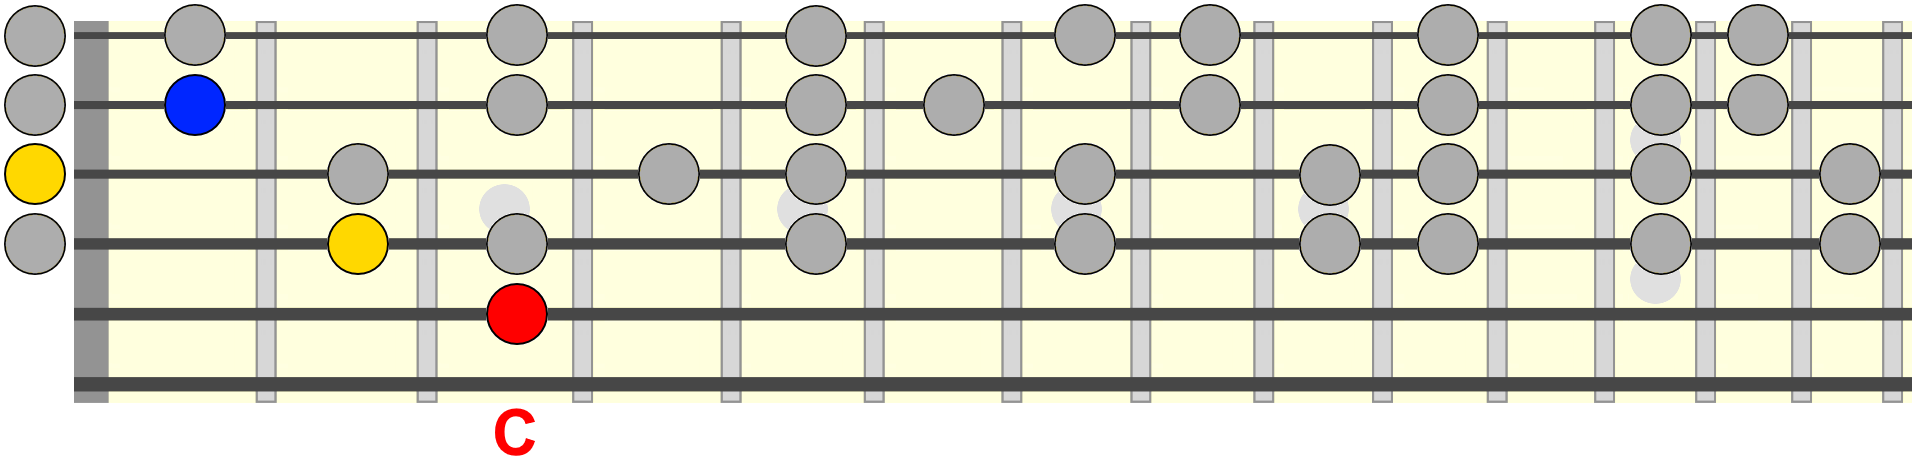
Initially it's helpful to identify the melody notes that mark the resting start or change of a chord. So on C major, we might start with this C major triad position, which gives us the first melody note at the top of the shape (We might reference the root of C to help us with positioning. As it happens, this particular C shape is in the open position, so it'll be especially familiar)...
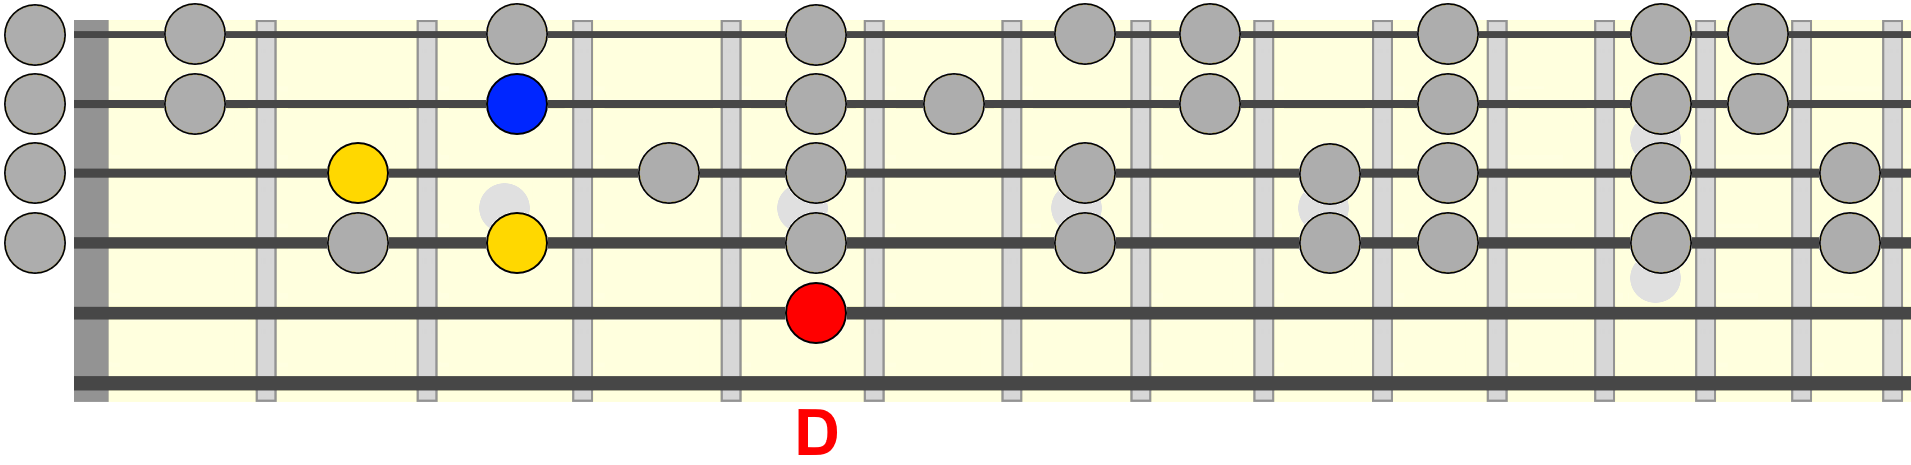
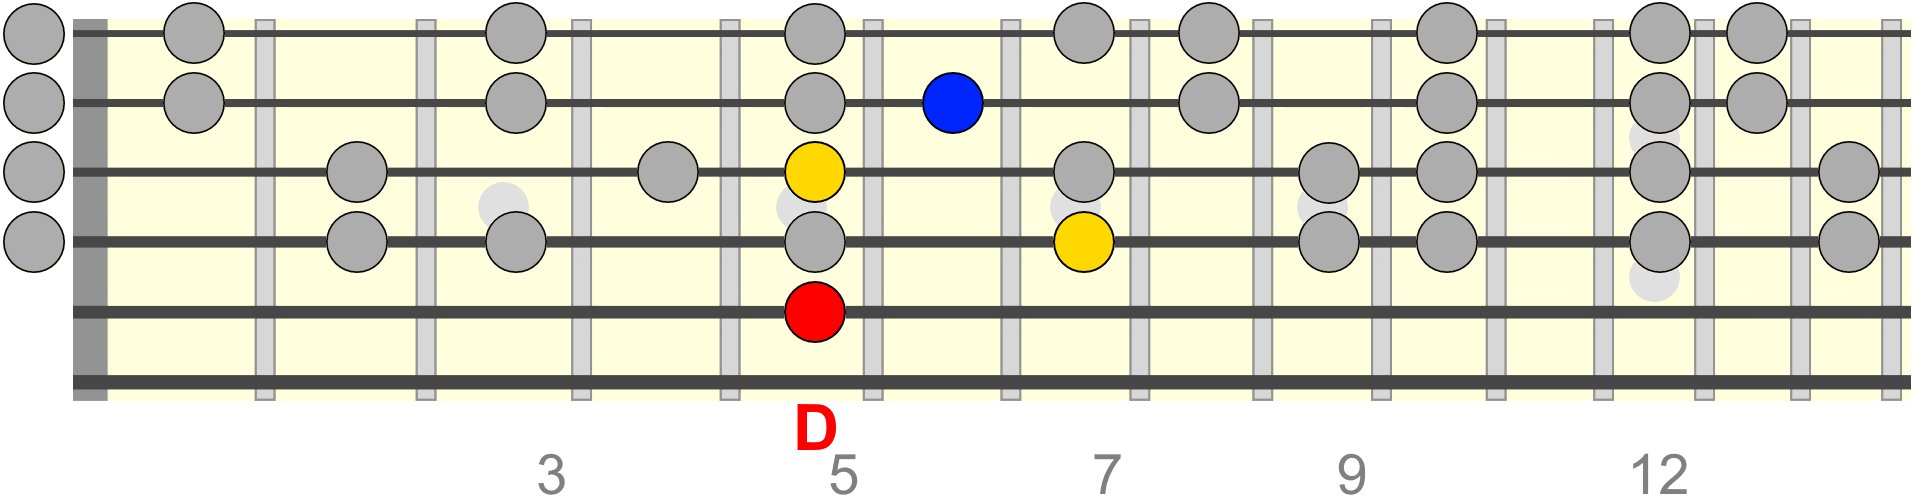
When the chord changes to D minor, we could play a D minor triad in the same position as our voiced melody note, again with the note voiced at the top of the shape. And again, we could visualise a root position (D) in relation to this shape for reference...
We now have a reference shape for both chords that supports the resting part of the melody. We can now work on bridging them together, using the initial melody as our guide for forming the intervening harmony...
Side note: If you're wondering where those intervening shapes come from, you'll want to head back to the previous part where we drew triads from the scale. They are all either major or minor triad shapes tagged to the melody.
By knowing where we need to be when the chord changes. i.e. our destination, we can help to keep the harmonic flow more connected to the backing music, while serving the melody.
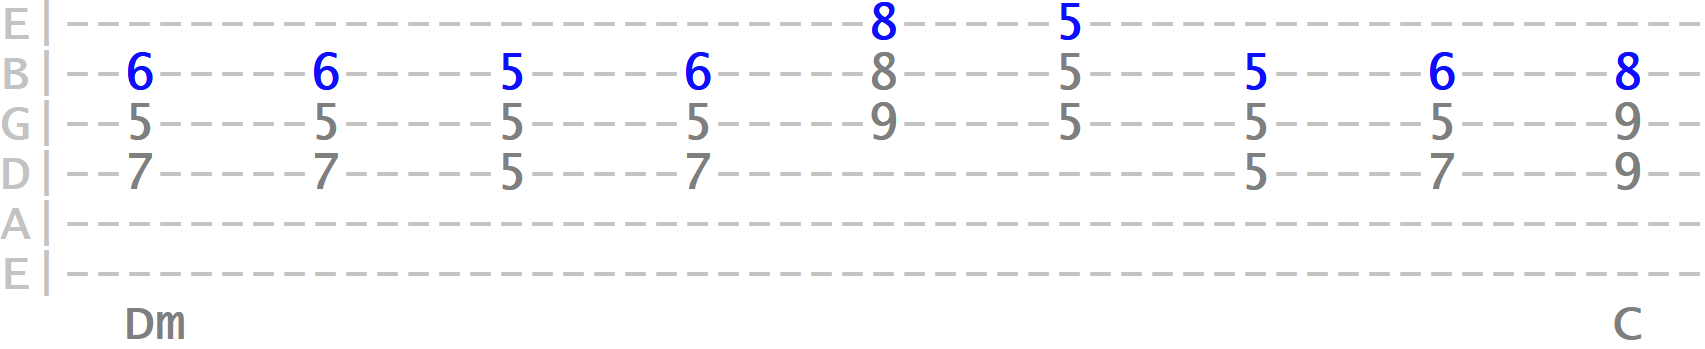
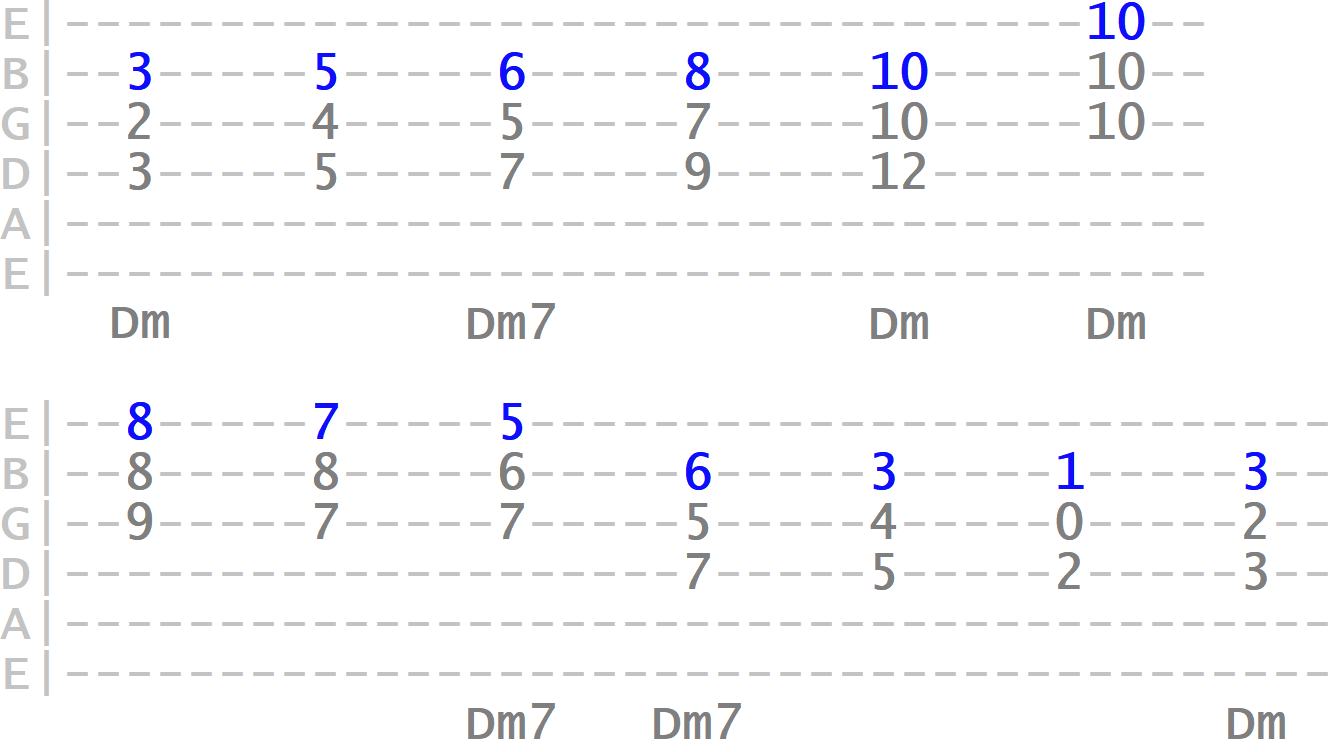
Let's continue, moving back from Dm to the tonic C major, starting with the proceeding melody line...
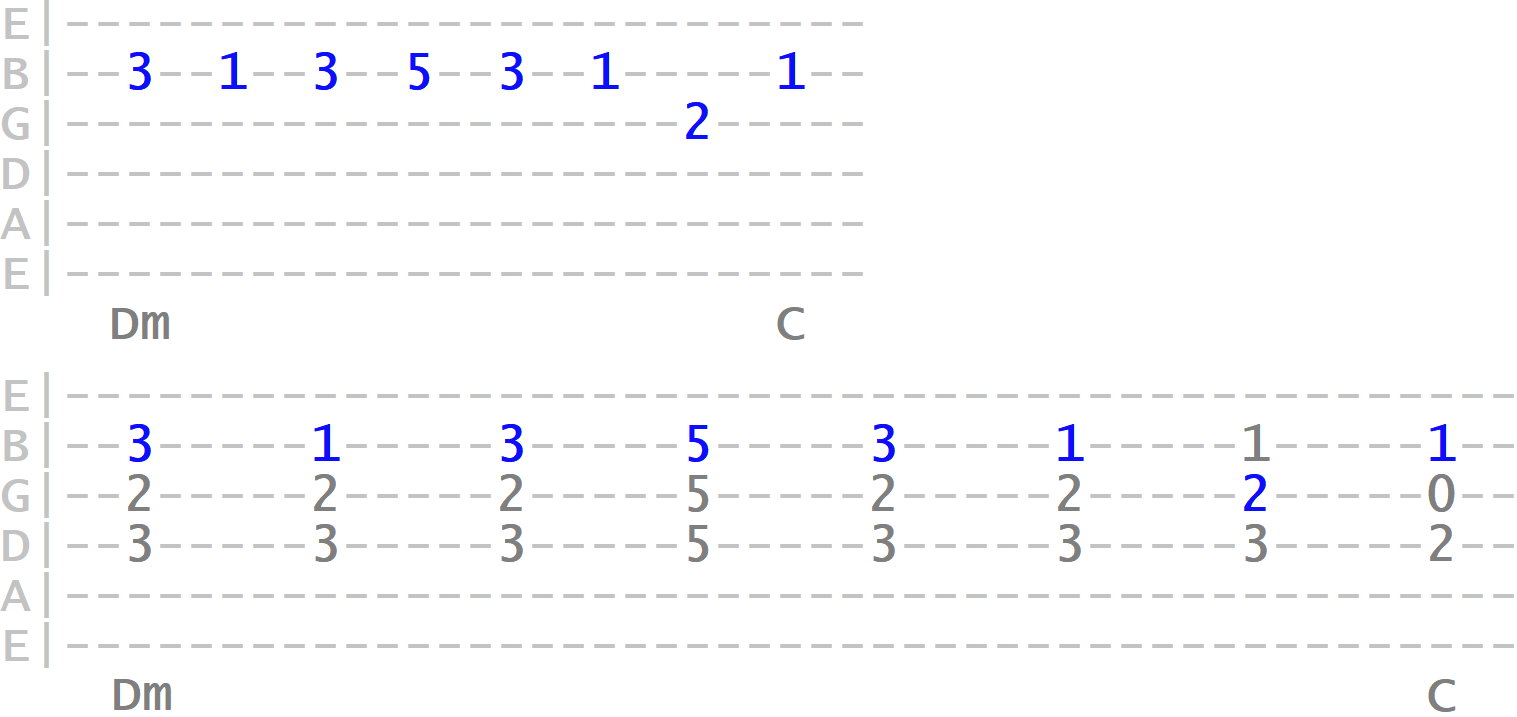
This time, we'll target a different Dm position to accommodate the following melody...

This following triad shape, which gives us the melody note on the resting chord change, can be associated with a Dm7 shape with the bass on the 6th string...

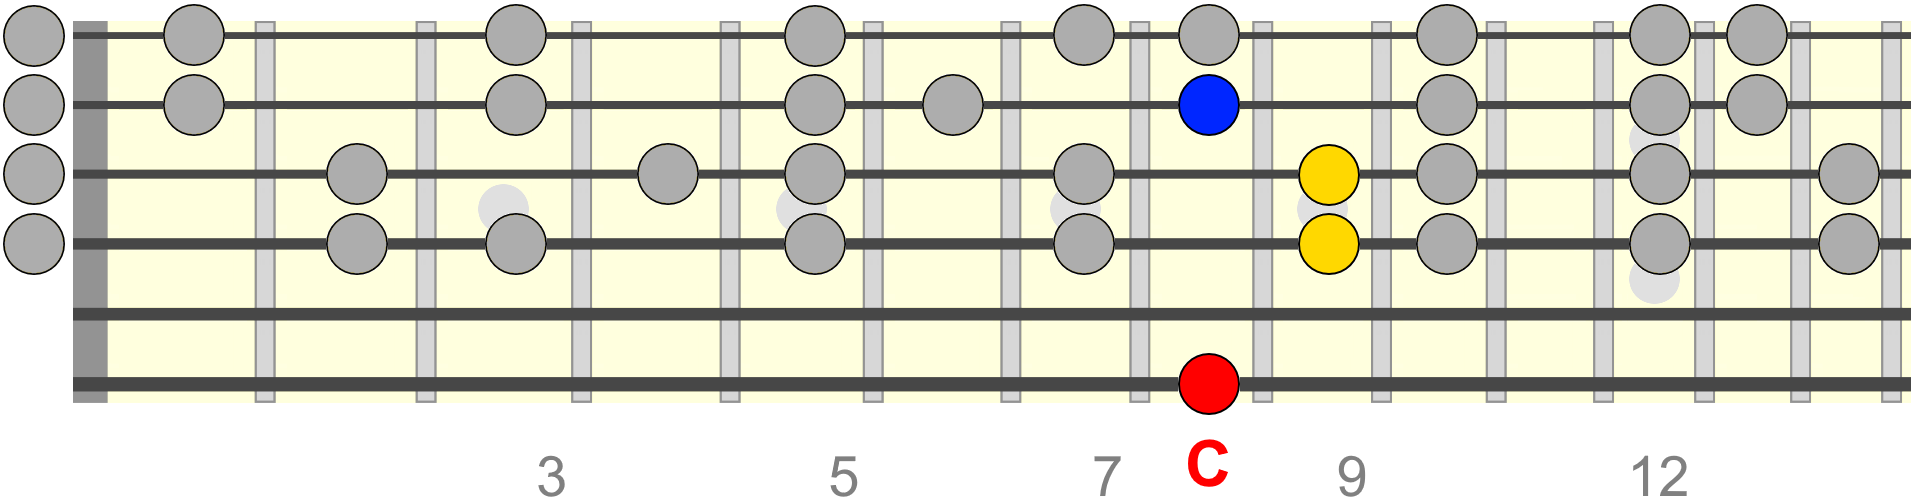
And finally resolving back to C major...
At the beginning of that phrase, we referenced another Dm7 related shape (still formed with a triad shape), with the bass root on the 5th string...
And then resolving to Cmaj7, we can associate this triad shape with a Cmaj7 shape, with the bass root on the 6th string...
So what we've done here is use the triad shapes from the harmonised C major scale to target our chord changes (and more rested moments) with the melody. Each of these target shapes can be referenced against a fuller root shape for the chord we wish to target.
Triad & Seventh Target Shapes
Each chord in the key has a shape that can be used to target the following chord tones - Root, 3rd, 5th and 7th. These are the most common resting tones for any melody line, and therefore it's useful to associate them with a chord shape. Think of it like giving the melody note two supporting voices.
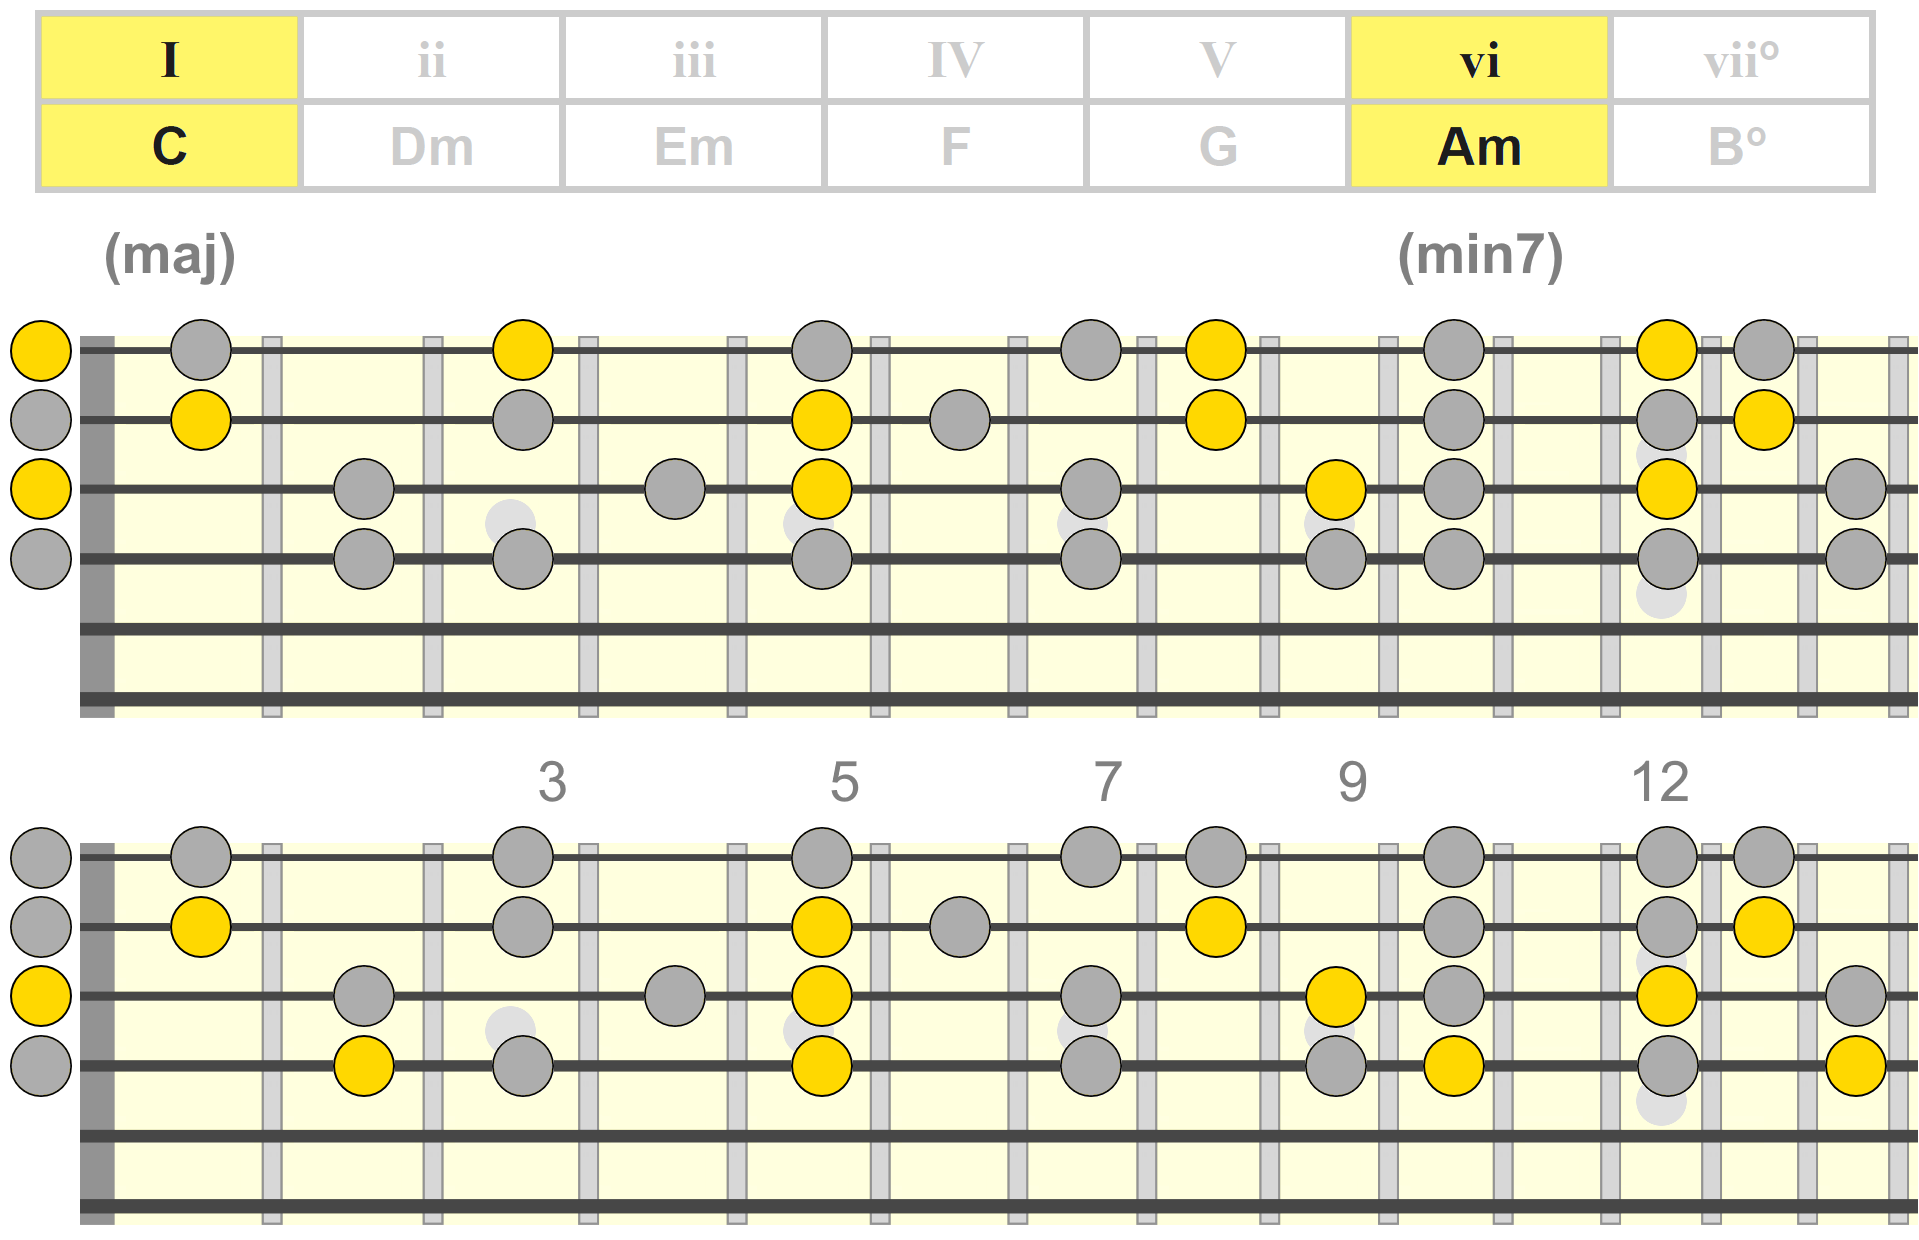
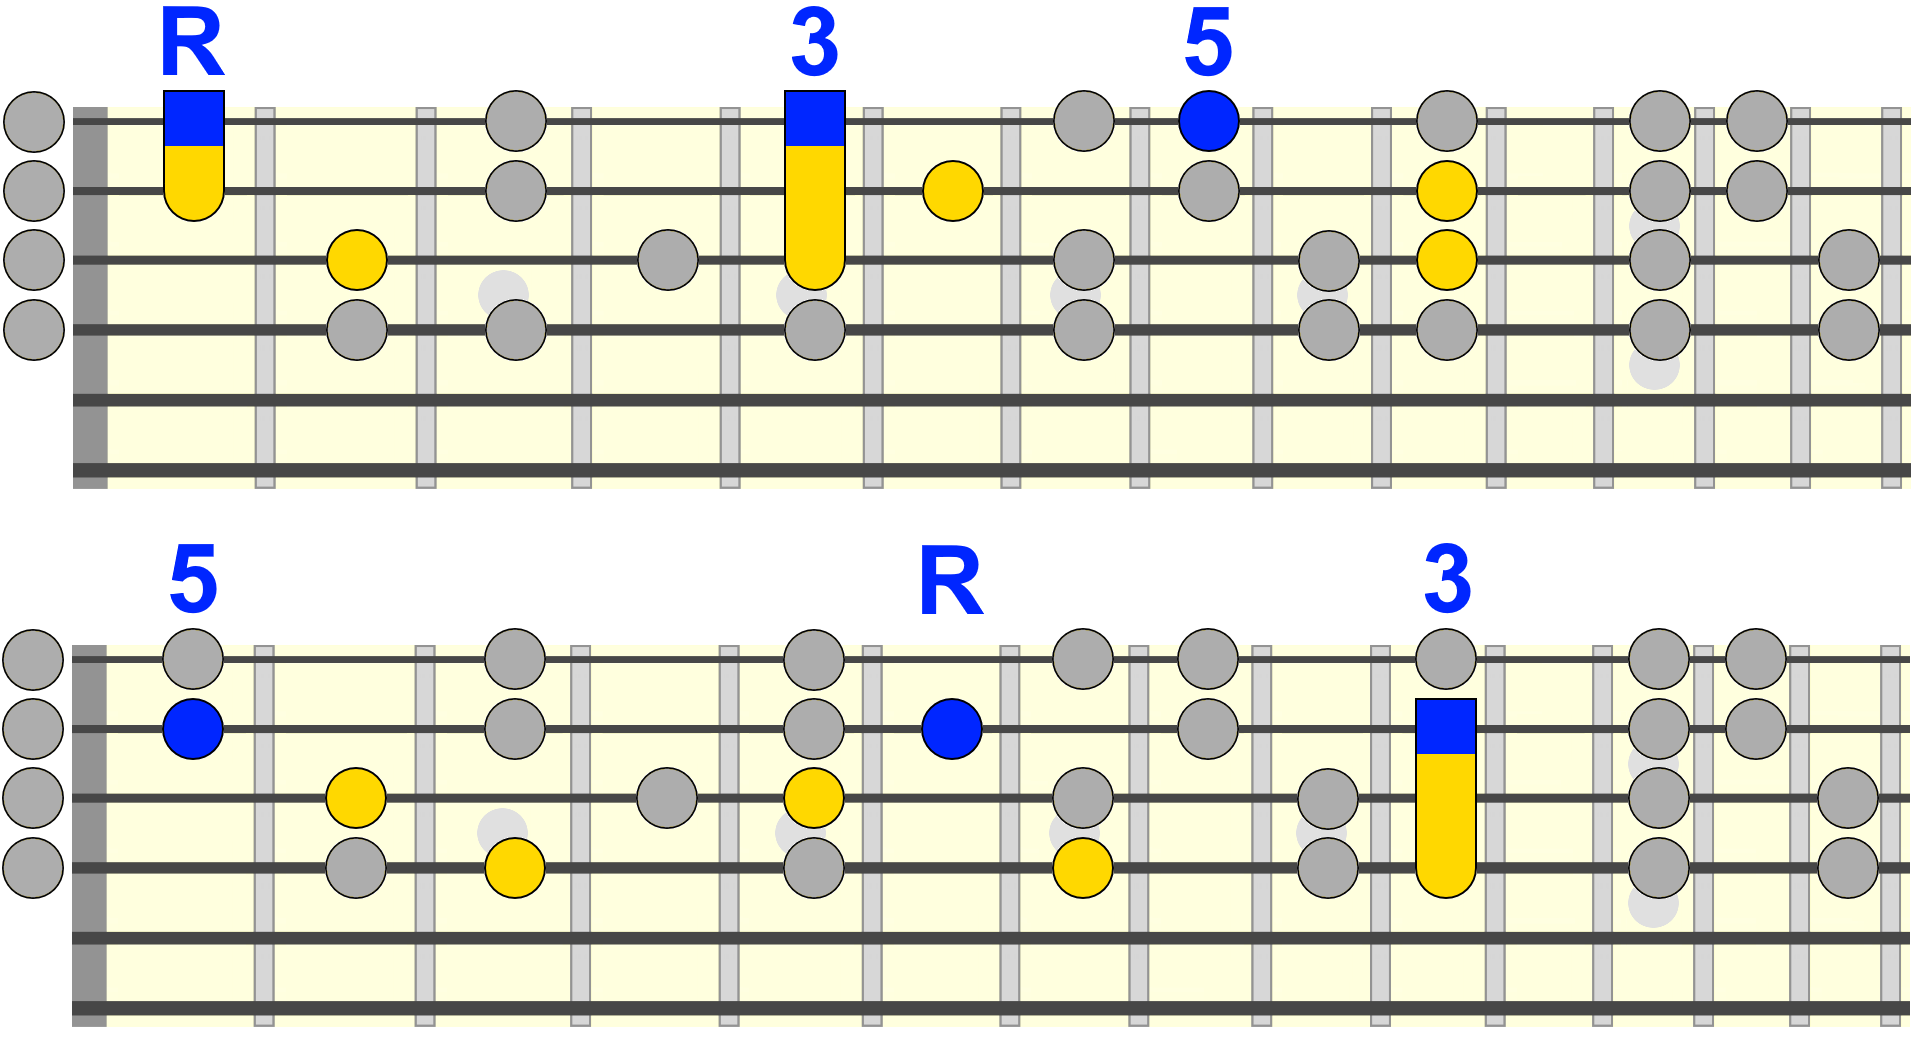
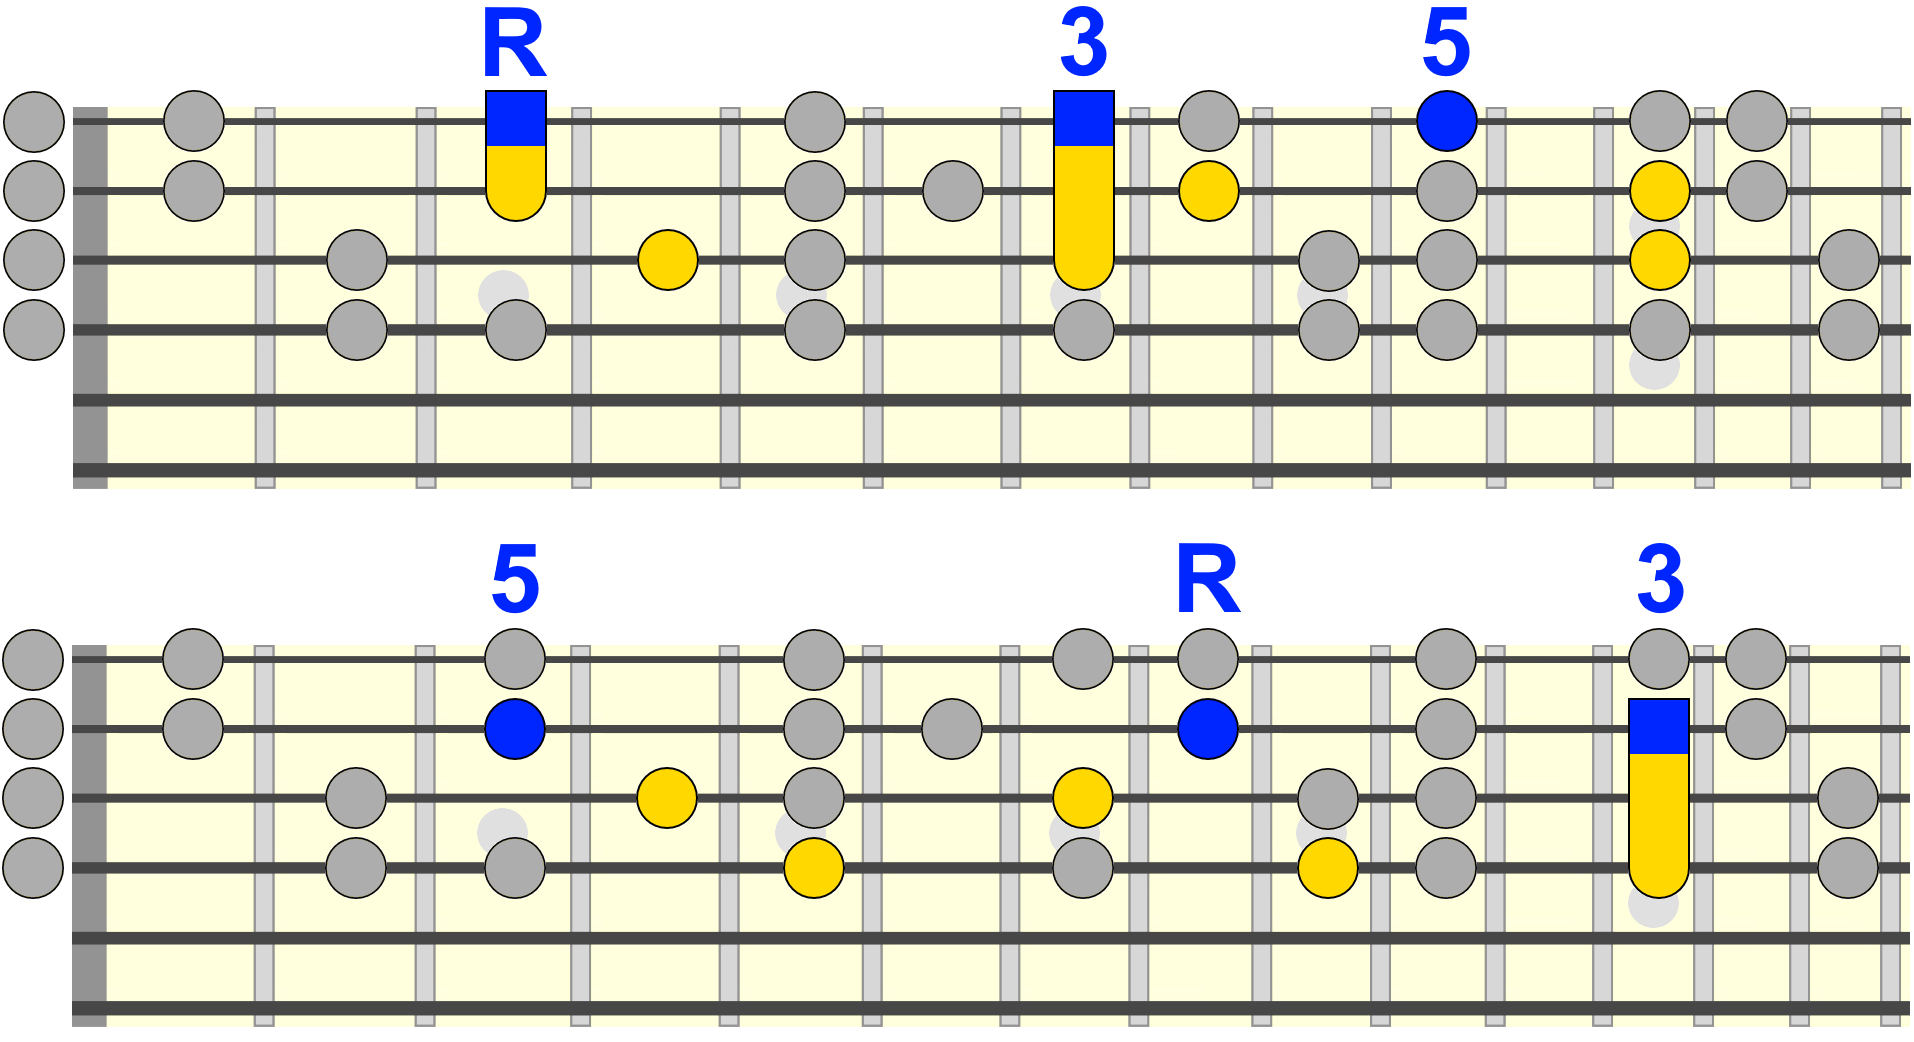
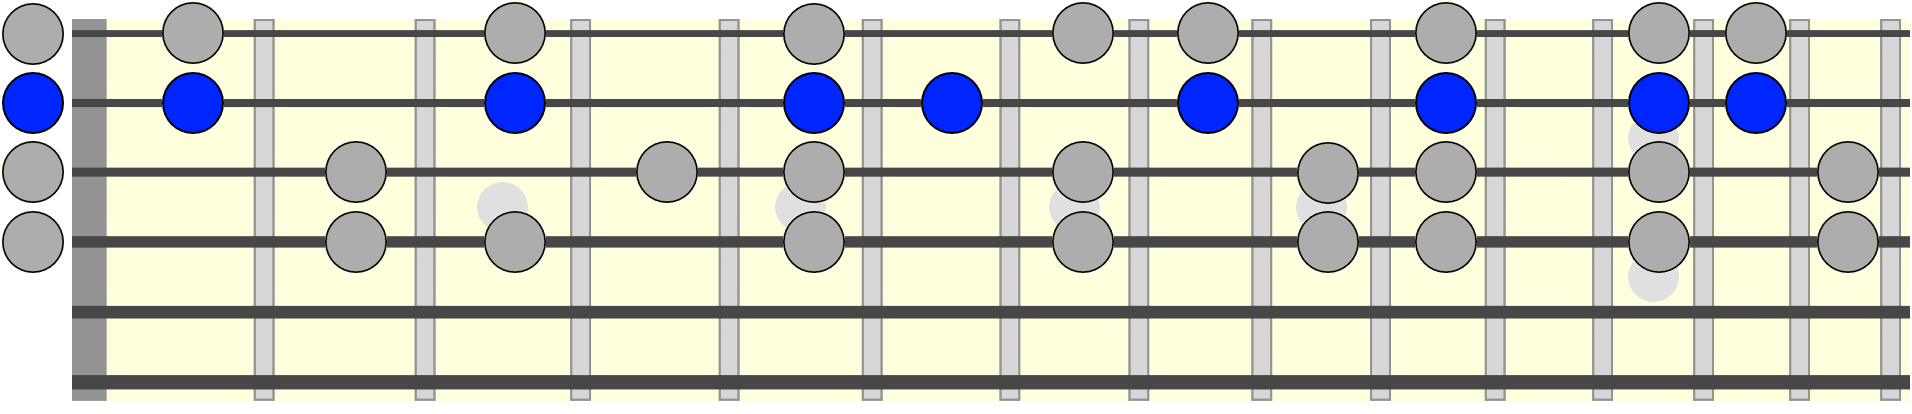
I Chord (Cmaj / Cmaj7)
For example, if we were targeting the tonic C major, we could use the following triad shapes to target different chord tones (in blue)...
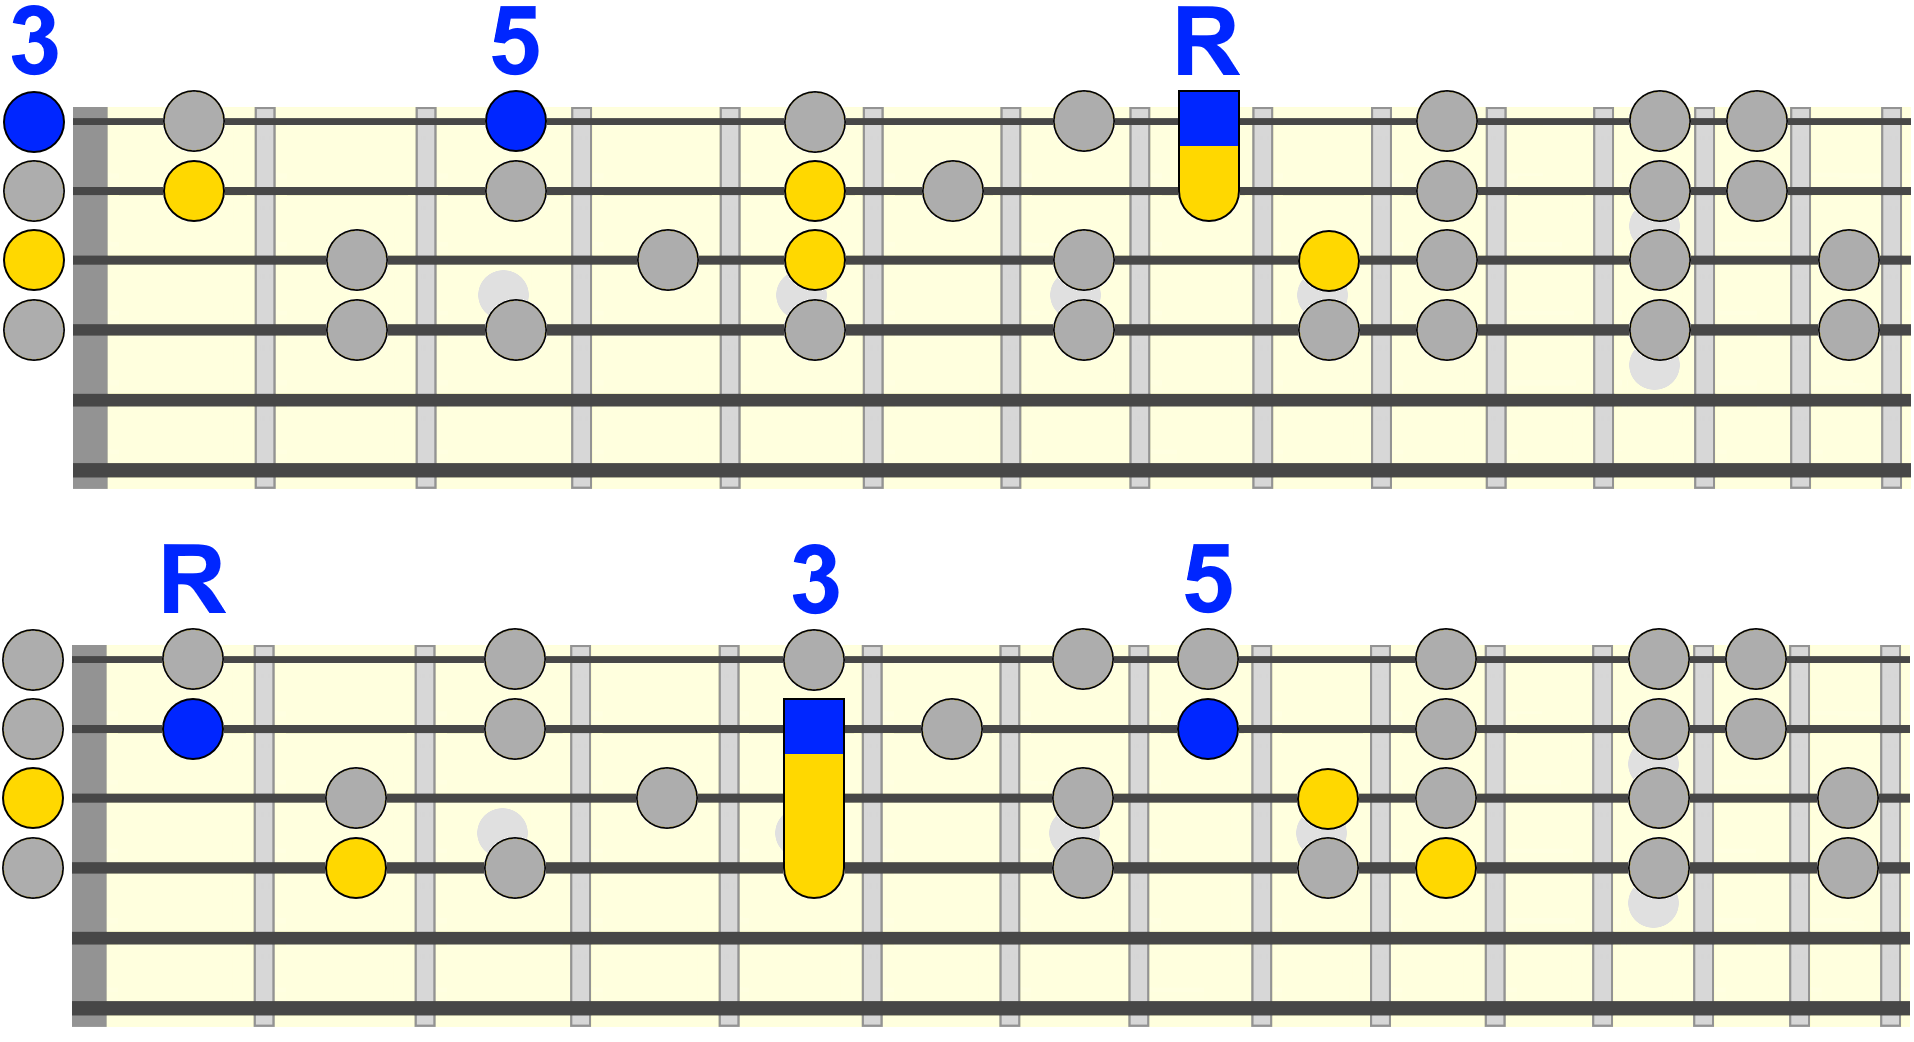
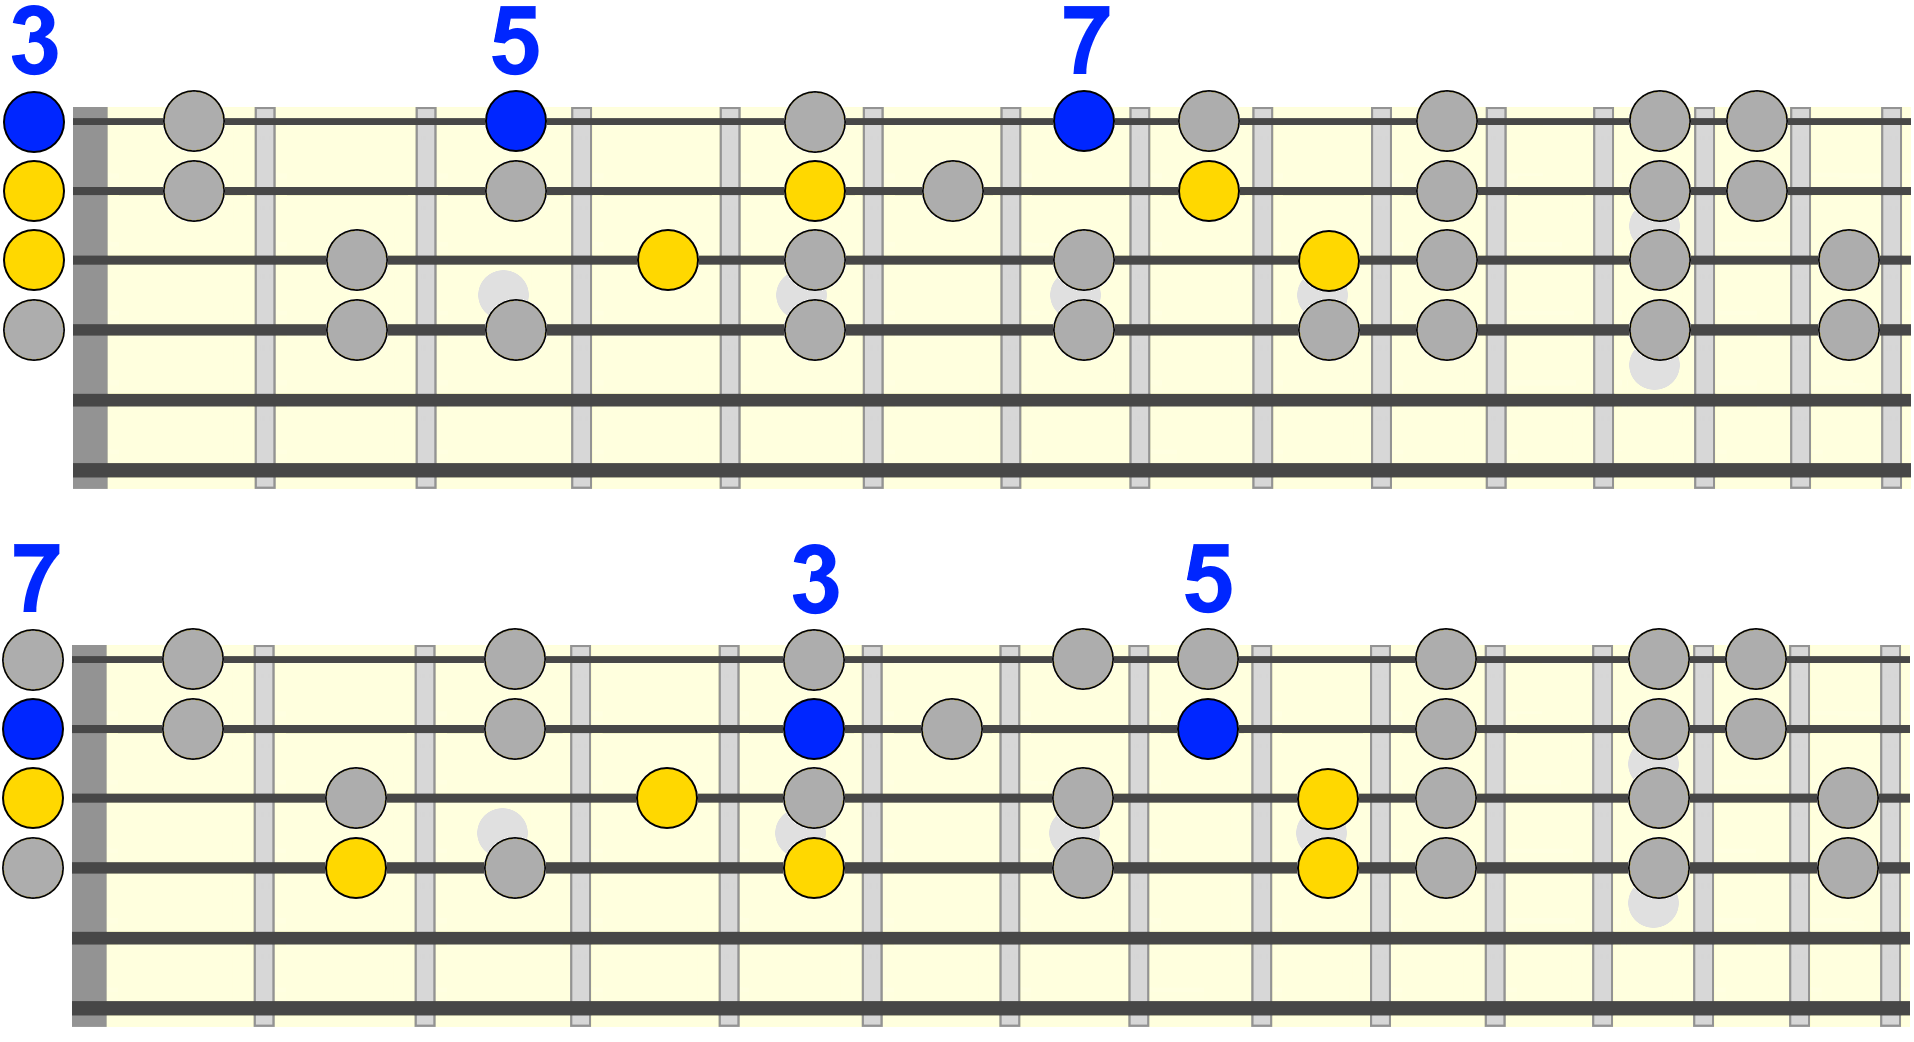
Which position we use depends on the melody note we wish to voice, most typically on the top string of the shape. With all these positions, we have the root, 3rd, 5th and 7th of the chord available as a melodic voice, the most common resting chord tones.
You can practice moving between these positions and train your ears to distinguish the triad and seventh voicings by creating a simple backing track (Cmaj or Cmaj7 in this example).
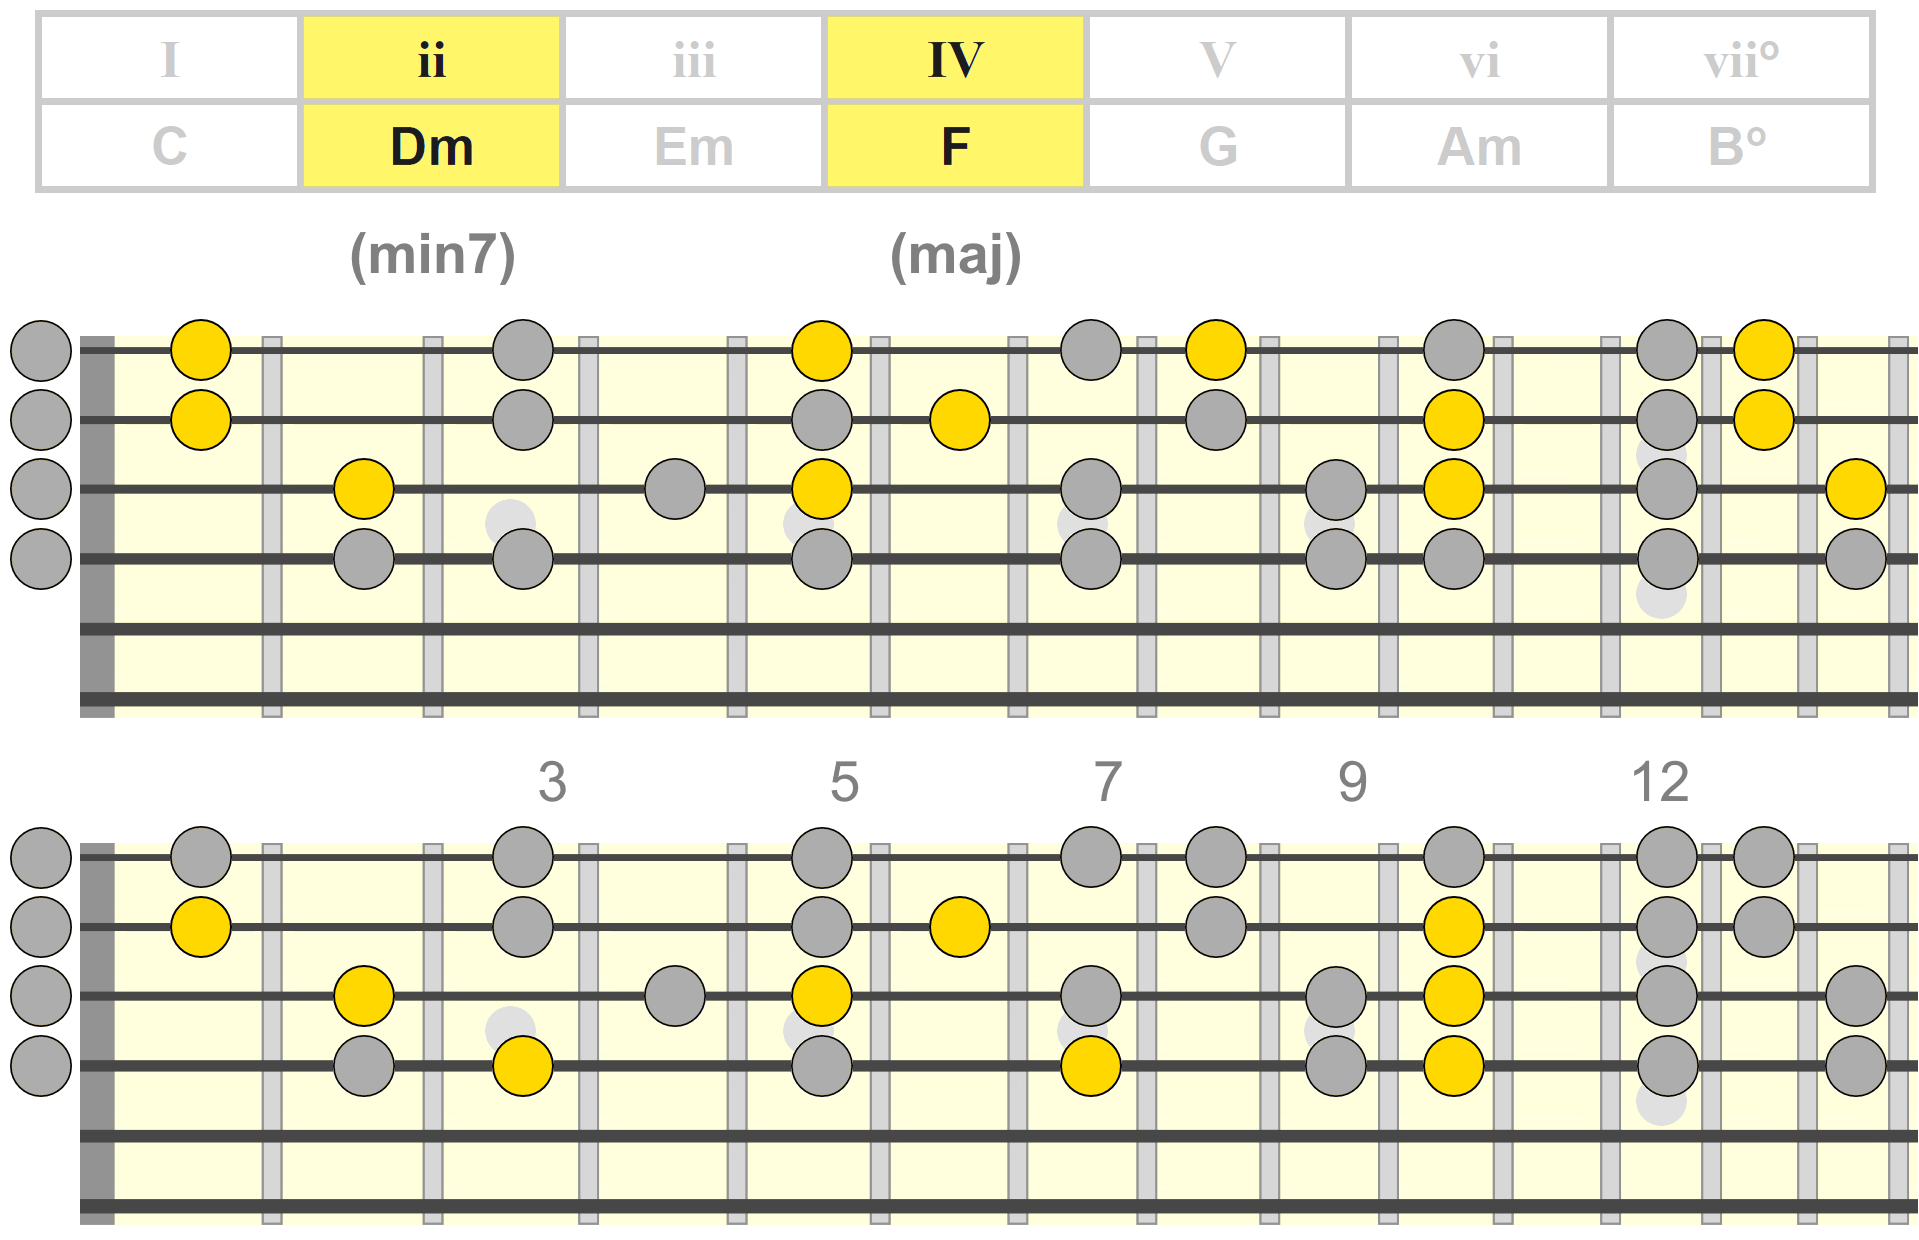
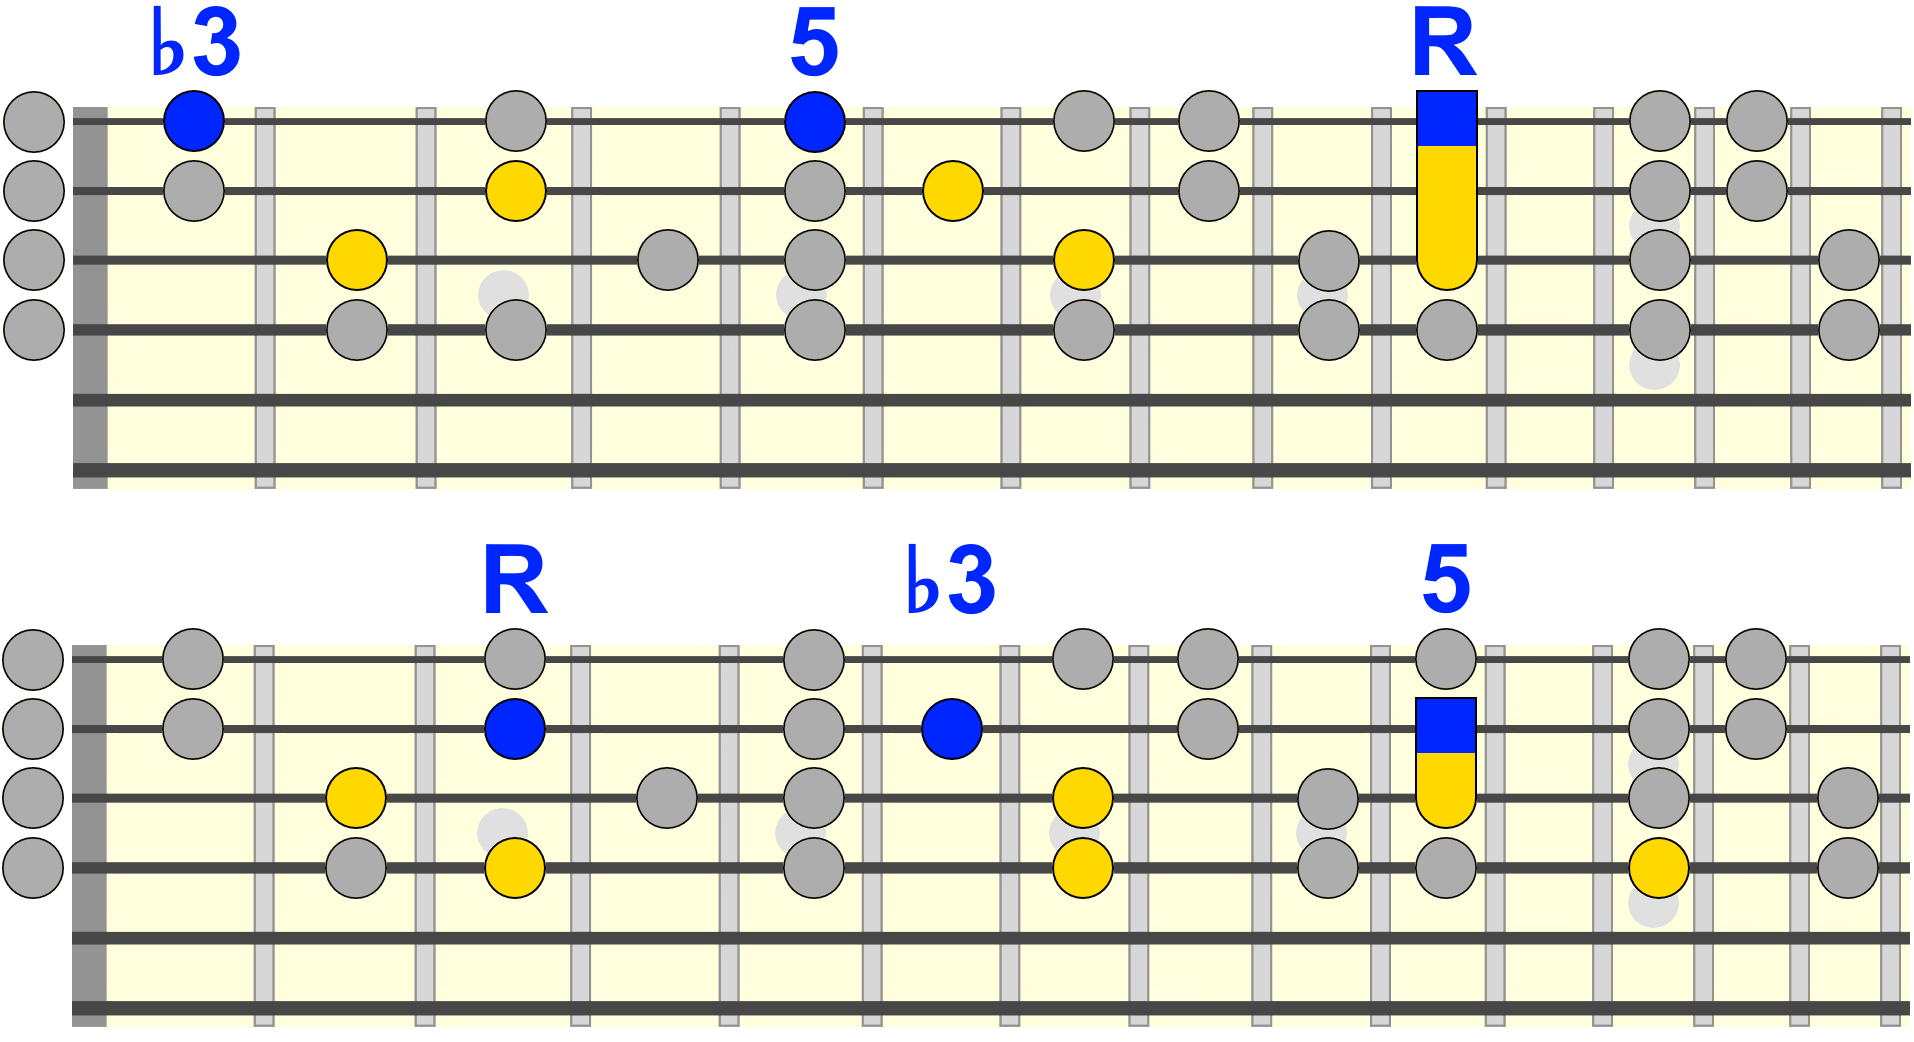
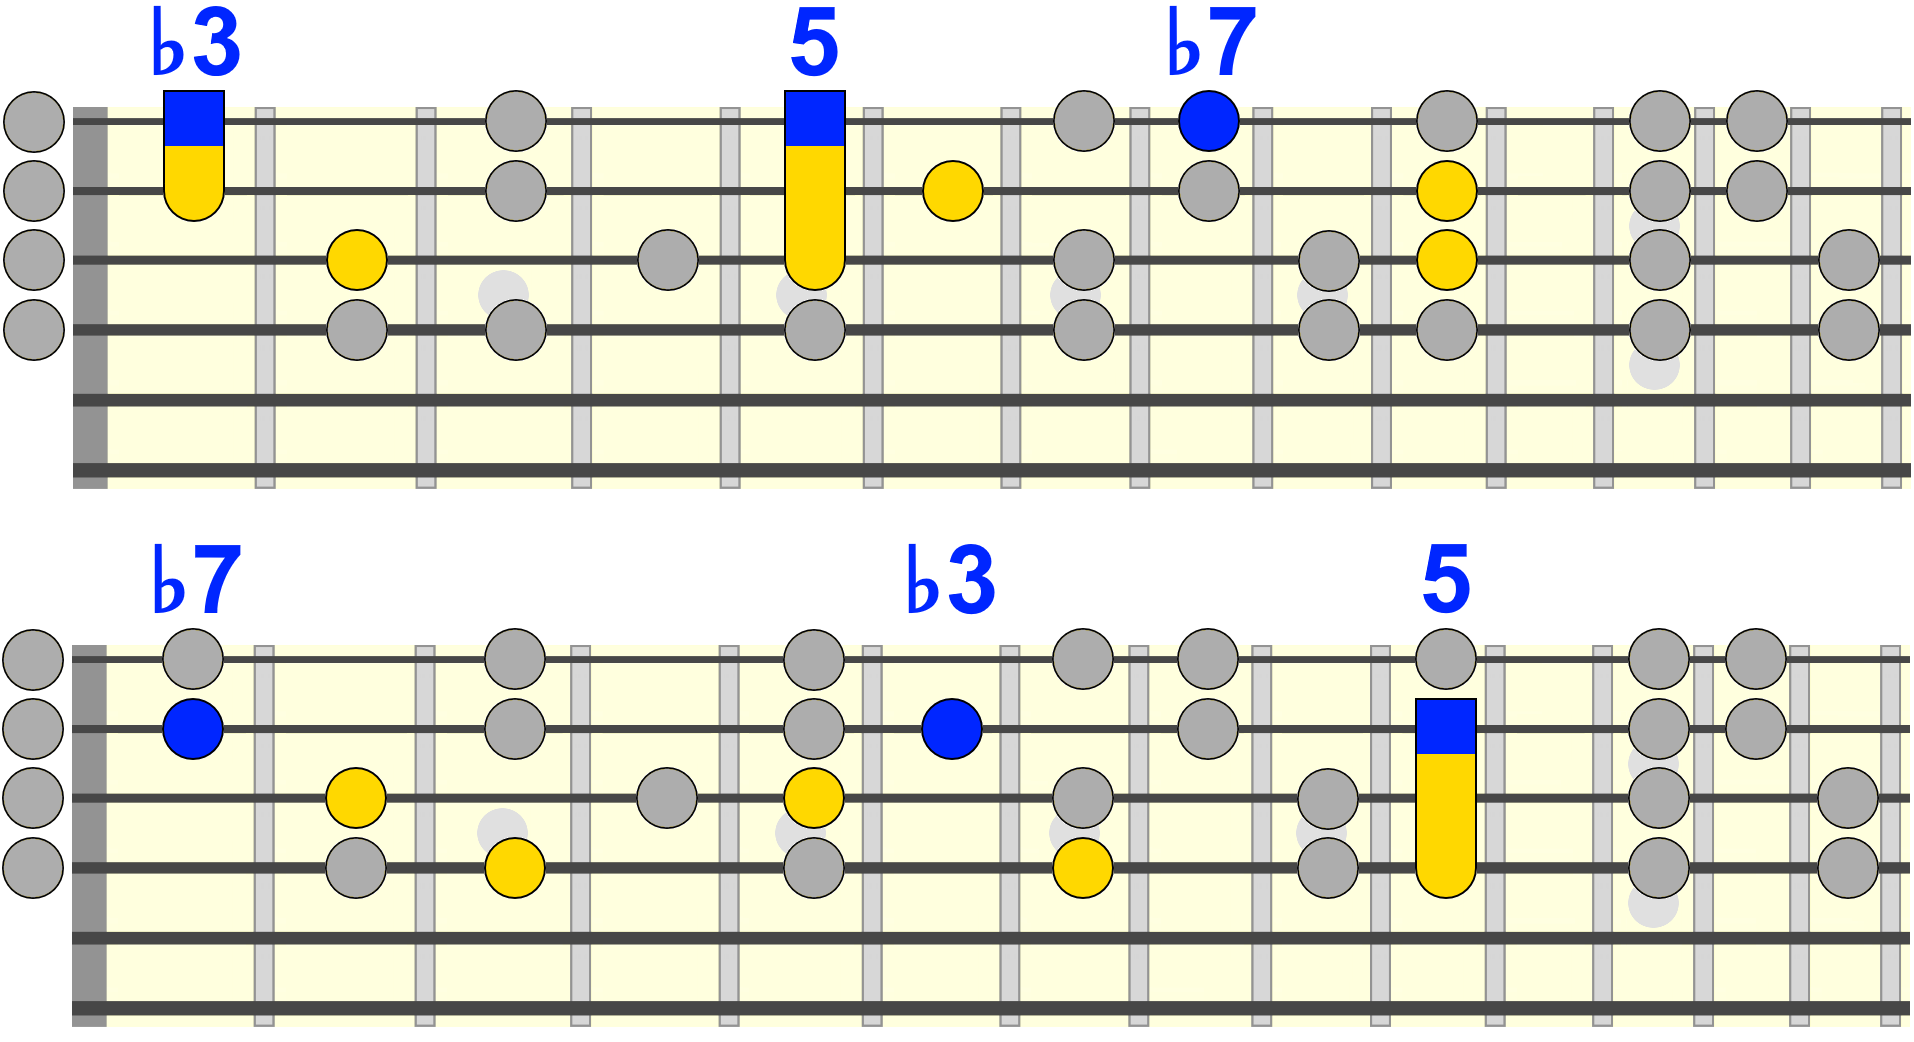
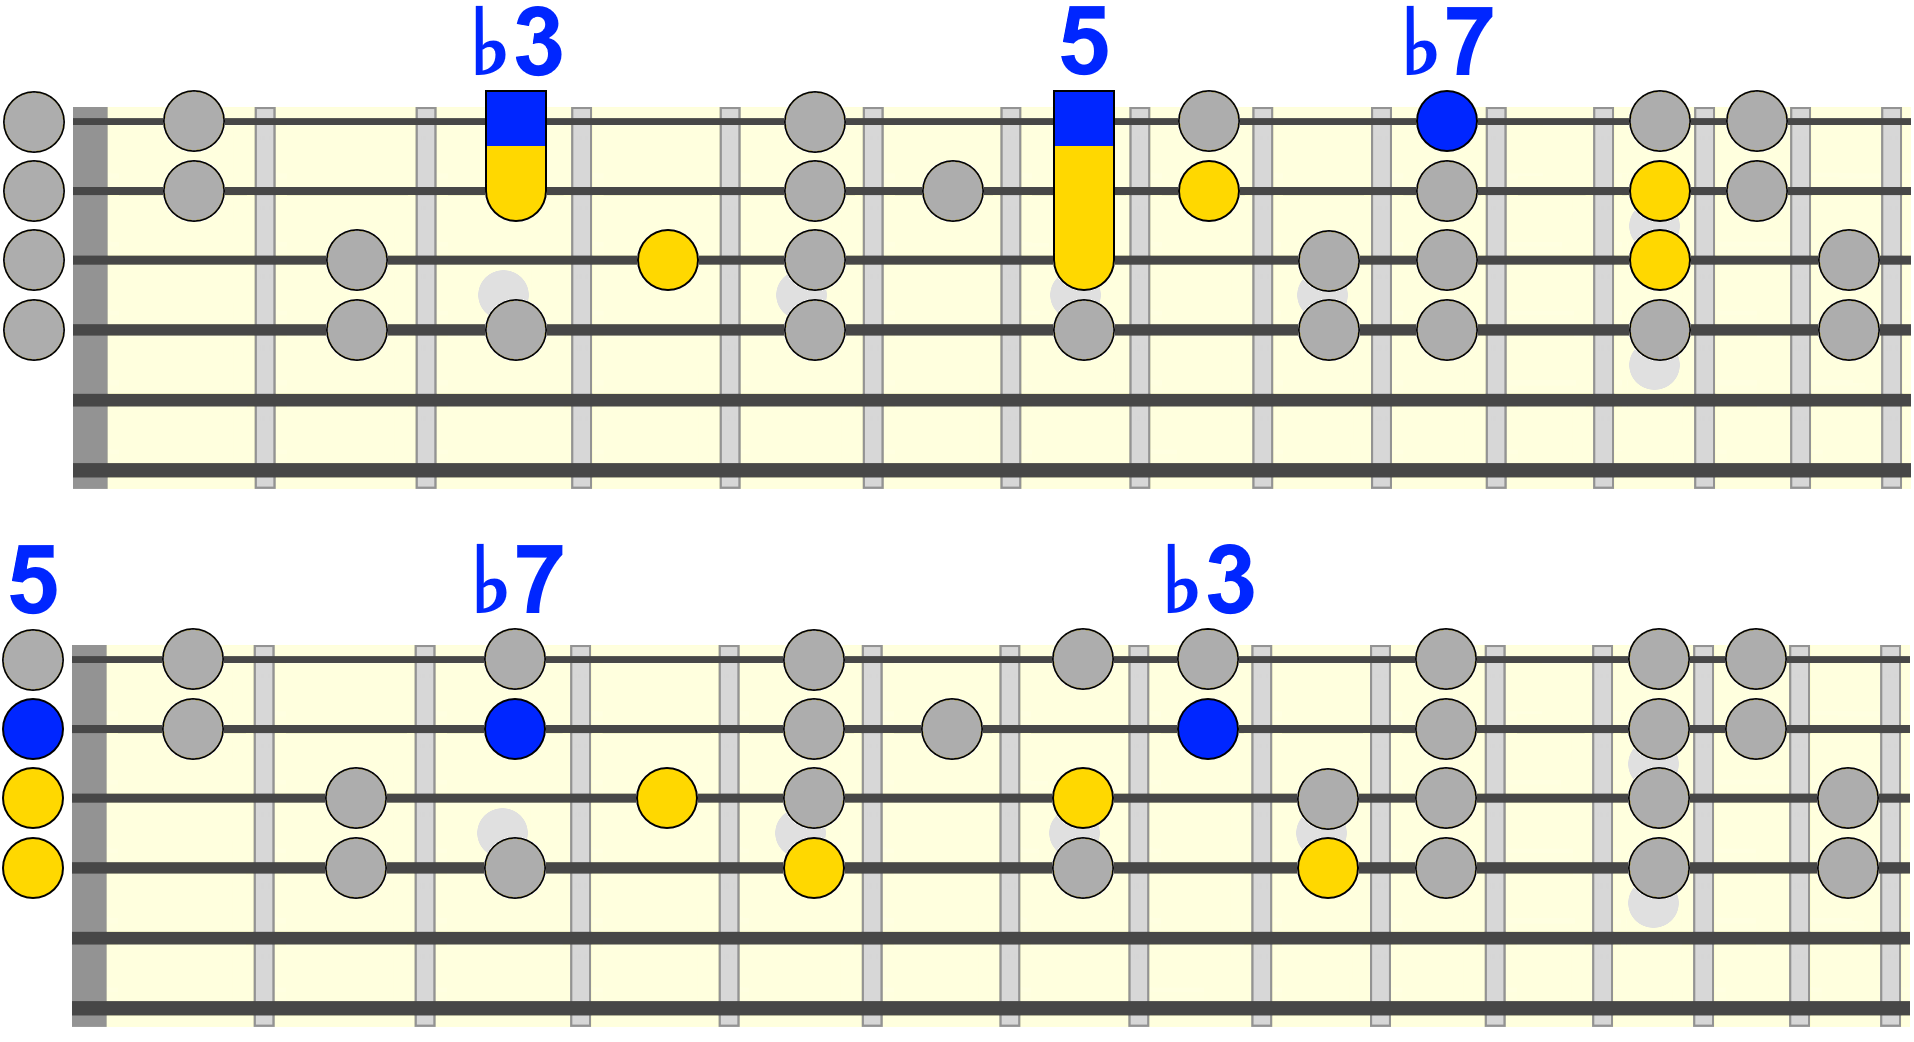
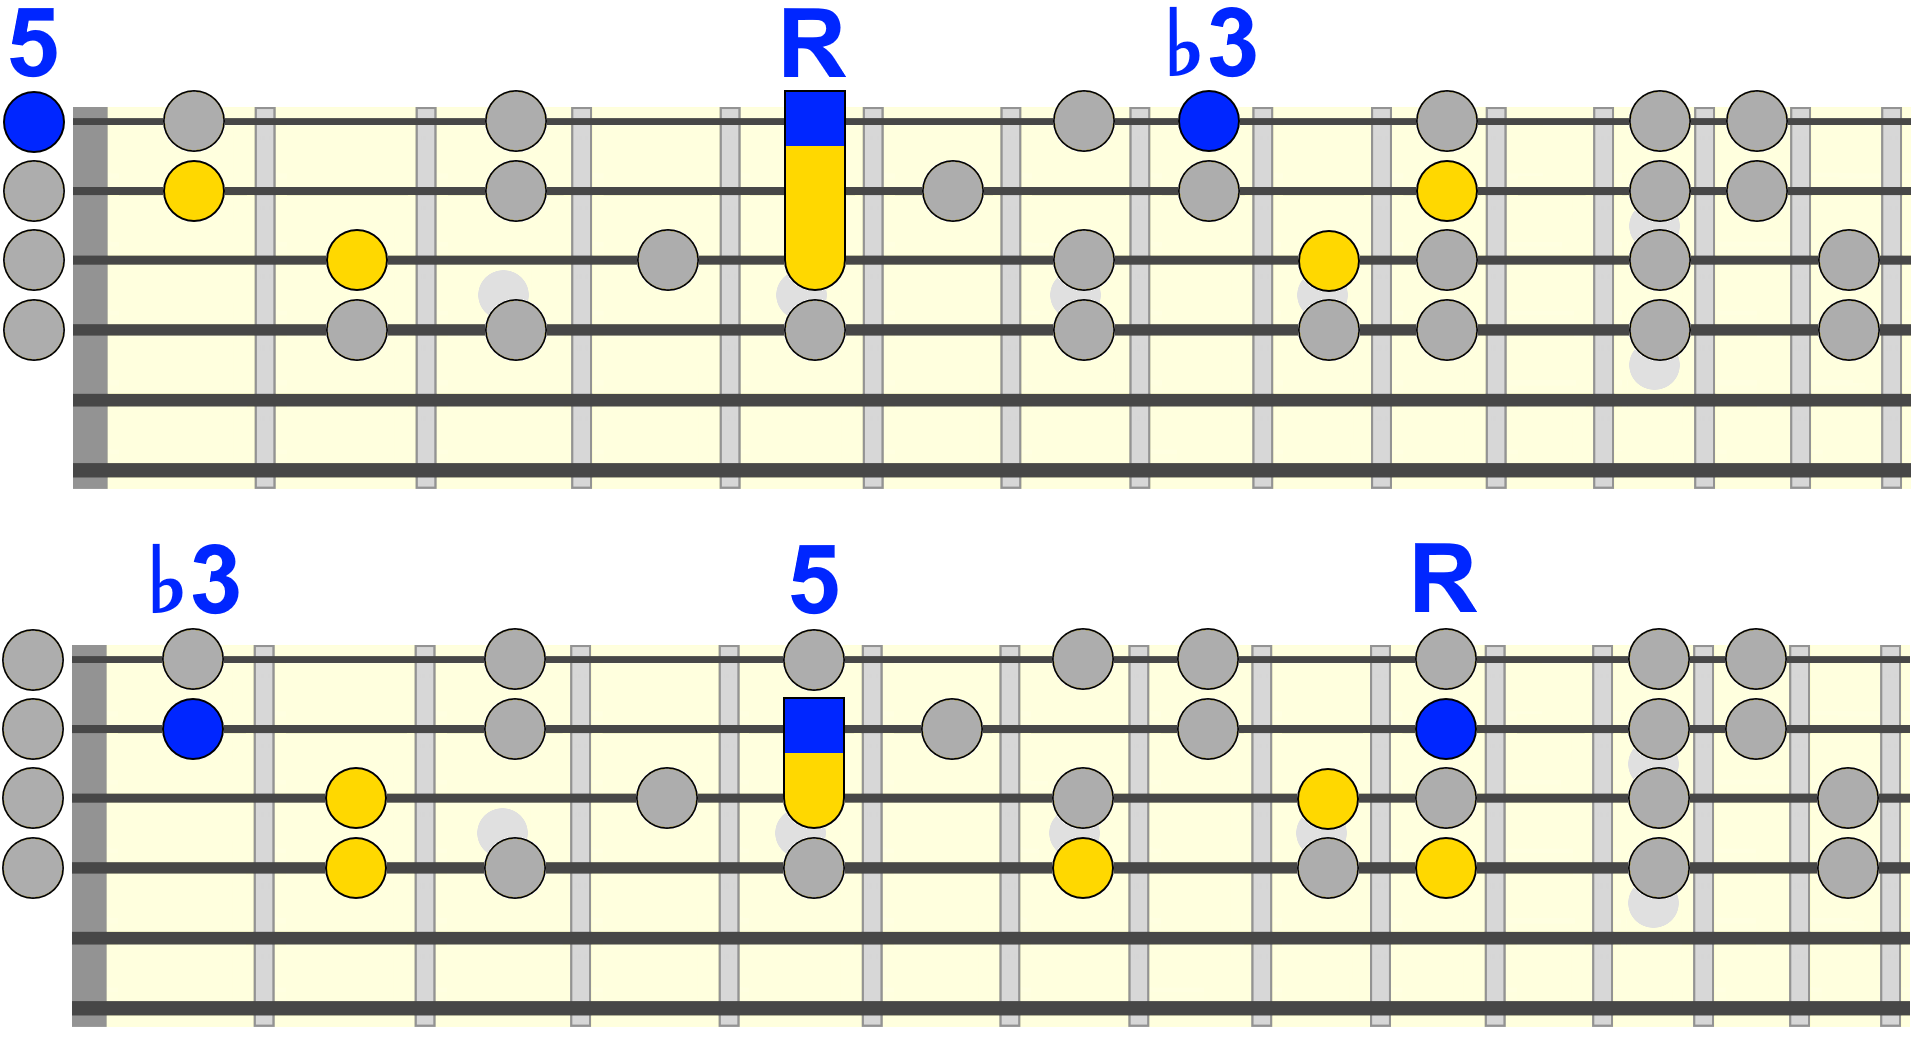
ii Chord (Dm / Dm7)
For the ii chord, Dm in this key, we could target the following triad shapes, again giving us the target shapes for the Root, 3rd, 5th and 7th of the melody...
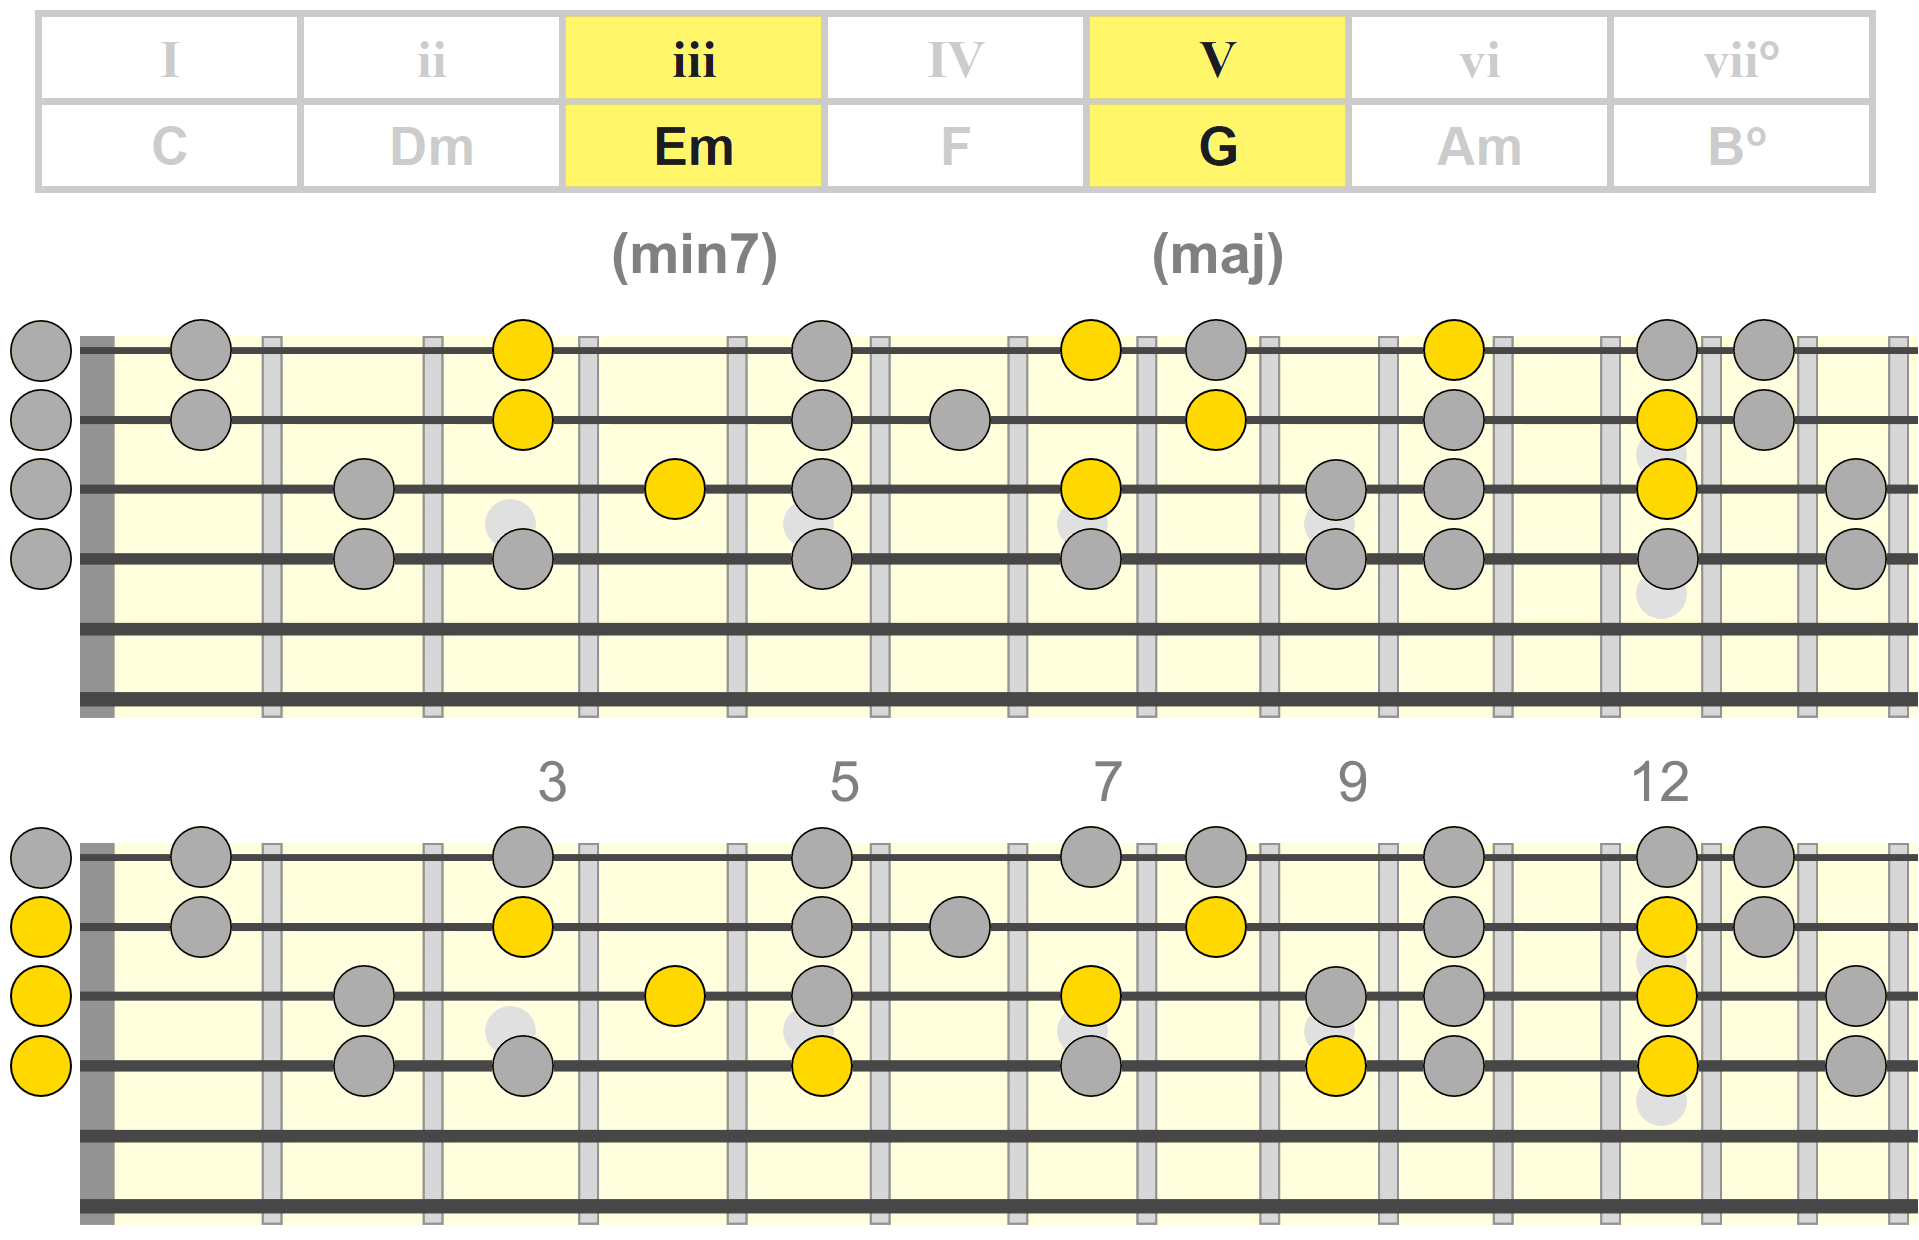
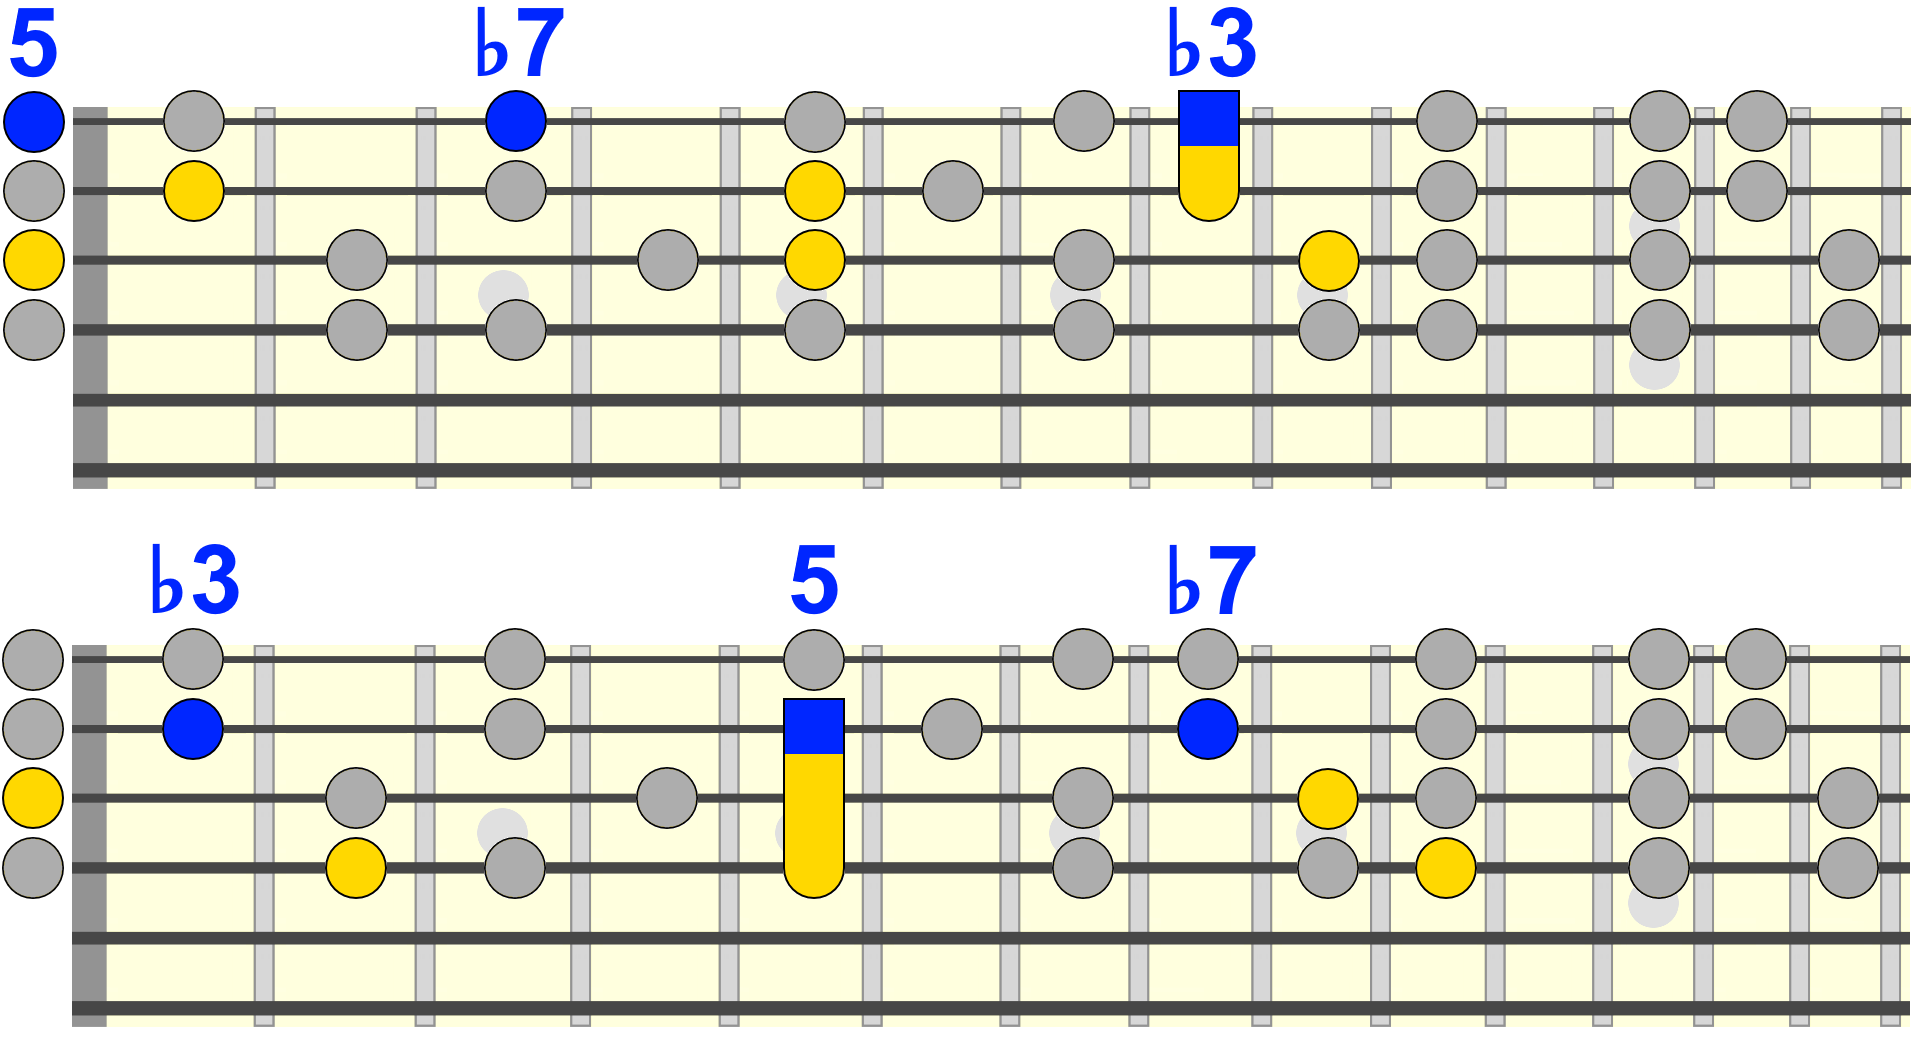
iii Chord (Em / Em7)
Just like the ii, naturally a minor 7th chord...
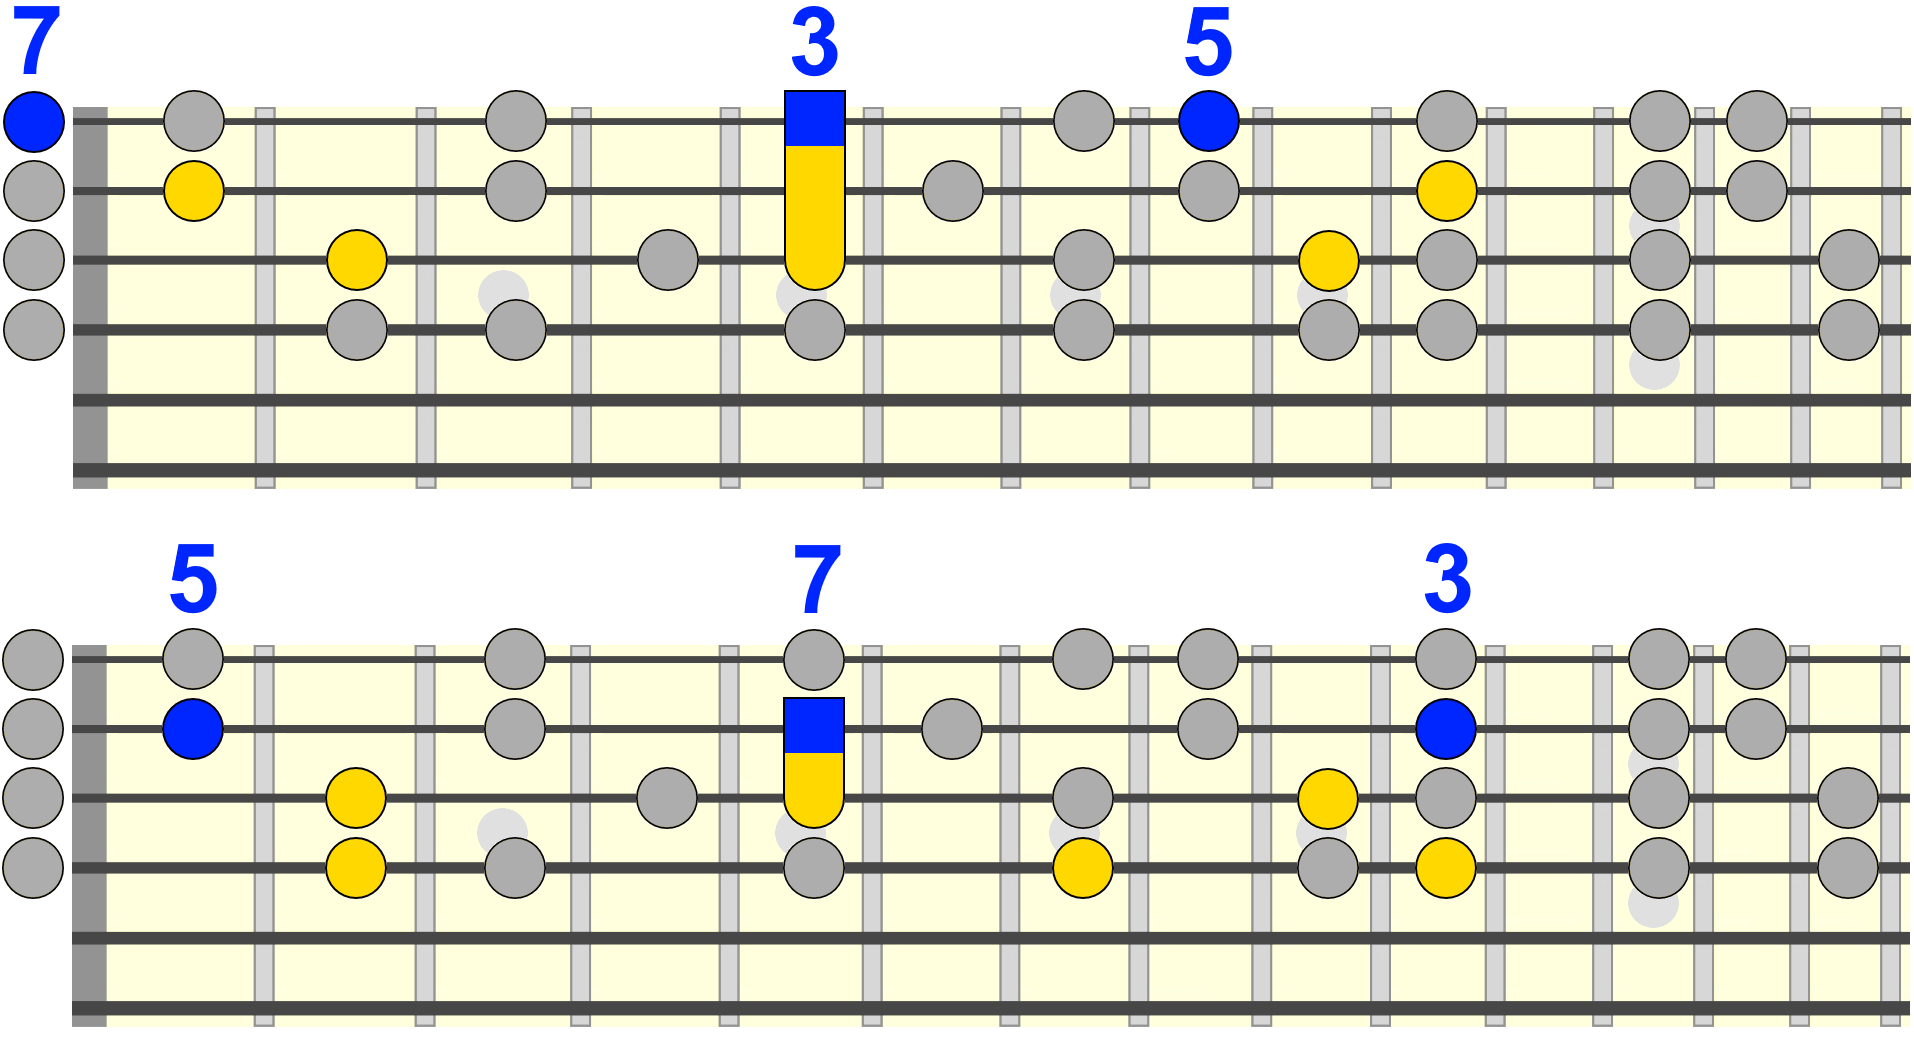
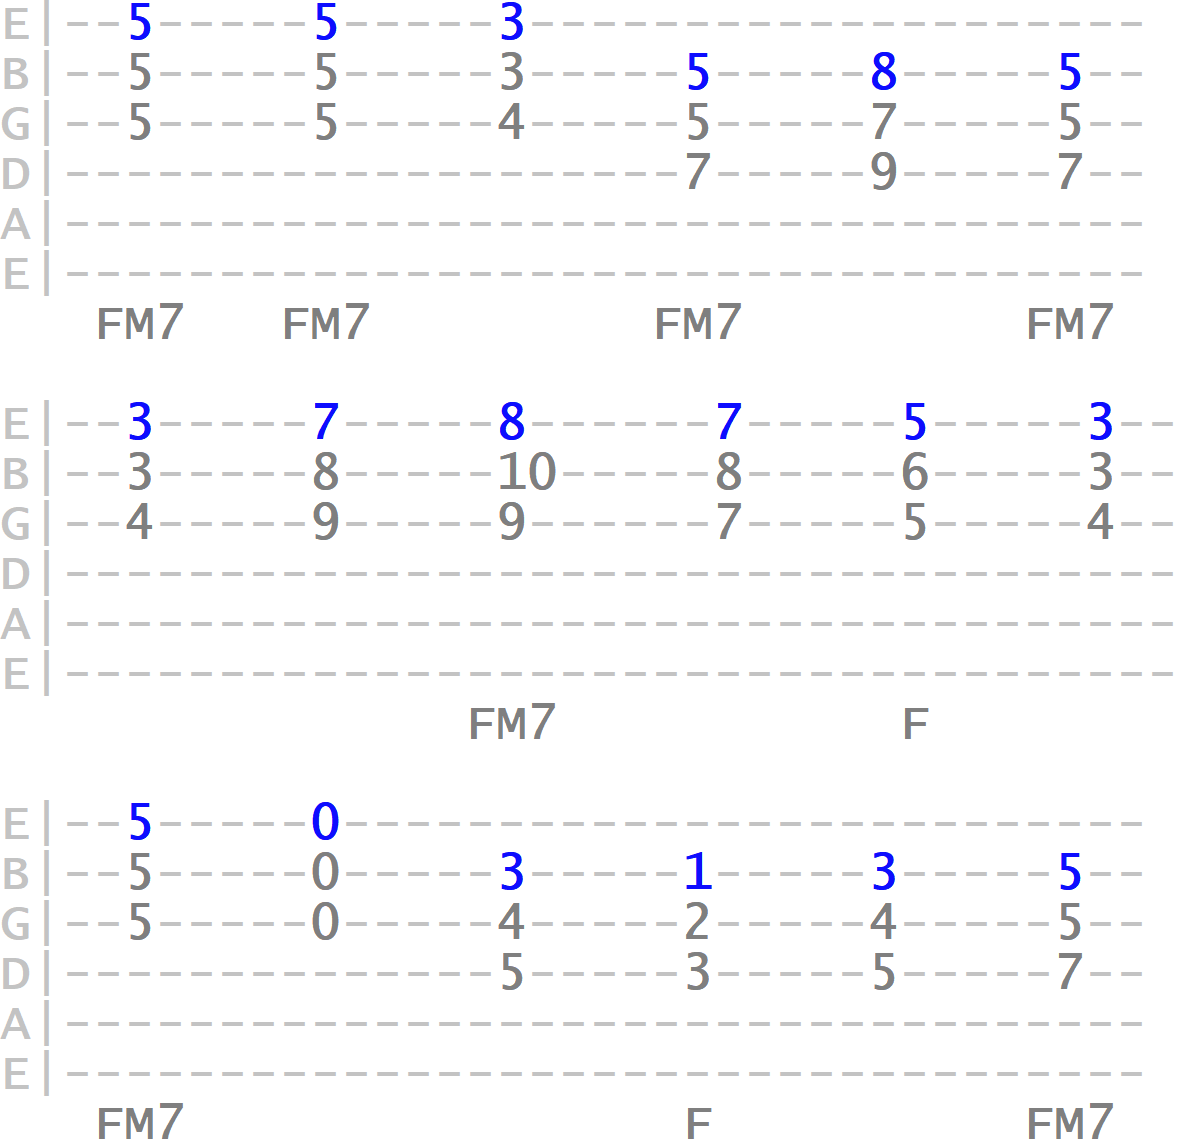
IV Chord (Fmaj / Fmaj7)
Same shapes as the I (albeit positioned differently) due to its maj7 quality...
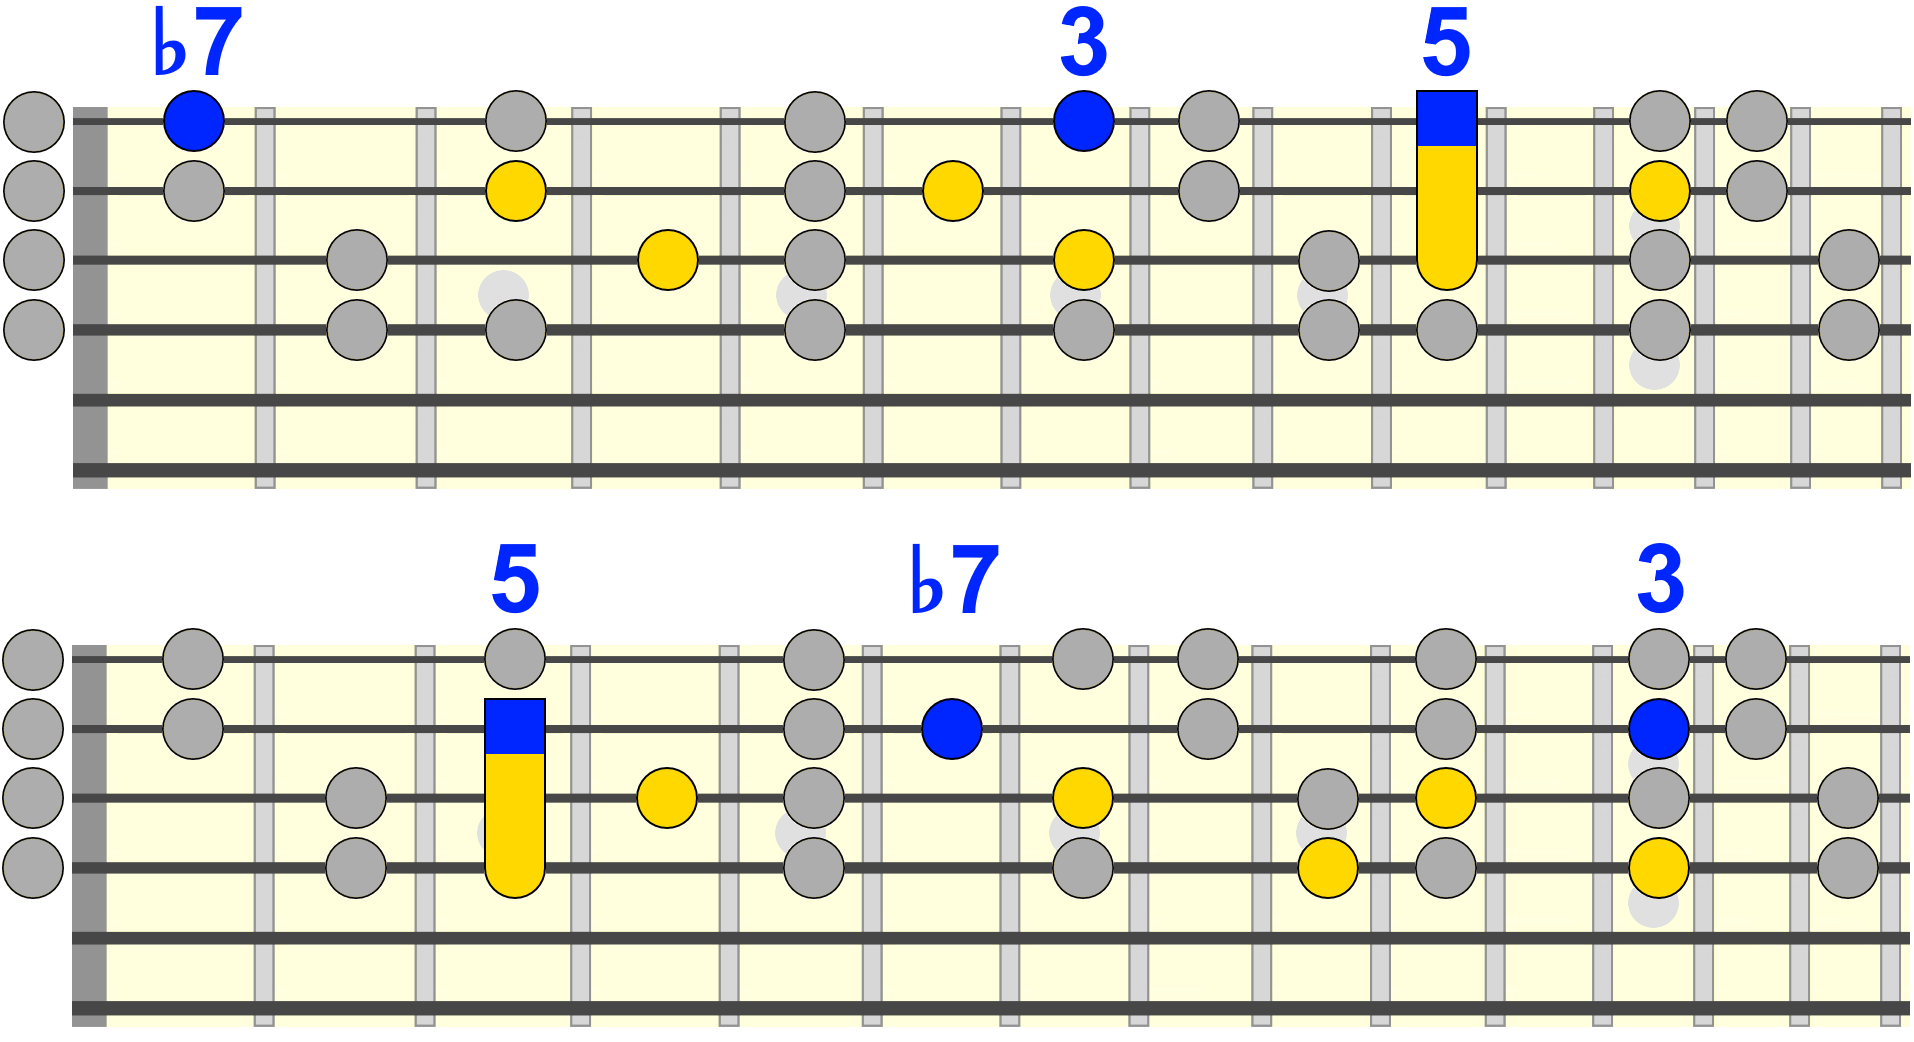
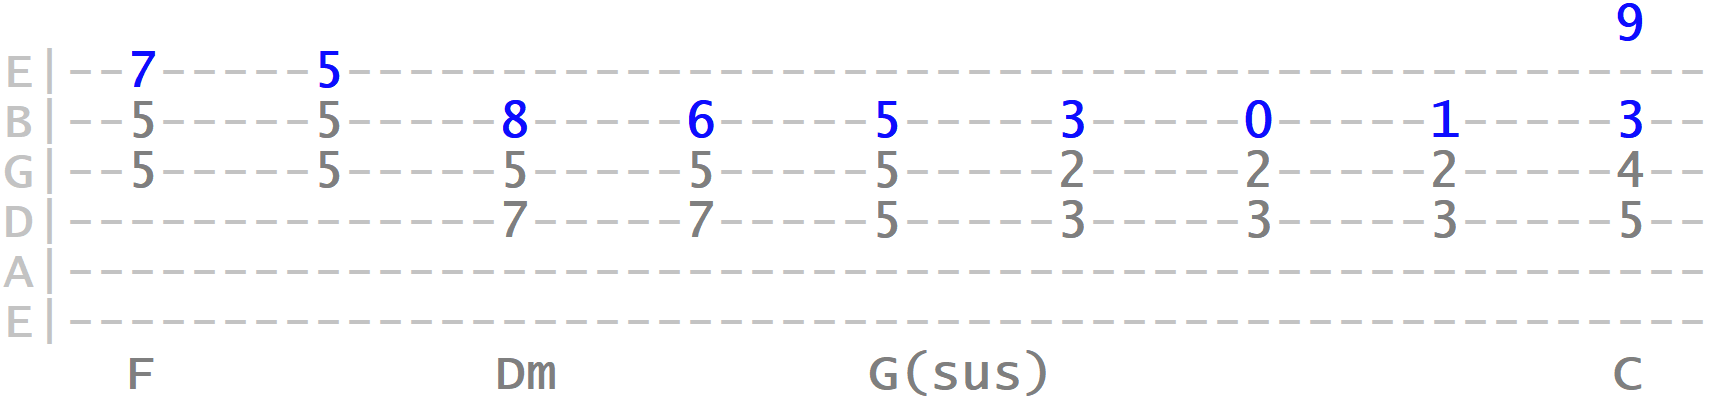
V Chord (Gmaj / G7)
If we wanted to voice the V chord as a dominant 7th, it's natural 7th quality, we can introduce additional economy shapes, which gives us the flat 7th (♭7) interval...
vi Chord (Am / Am7)
The relative minor key tonic. Same minor/minor 7th shapes as the ii and iii...
Targeting Chords in Isolation
Let's try some targeting exercises over isolated chords so we can practice linking shapes together for each individual chord in the key, using other triads from the scale as a melodic bridge. Remember, you can use a basic backing track creator to select your chosen chord, beat and tempo for accompanying your movements.
A few examples, starting with C major (target positions highlighted on the tab)...

Side note: Often you'll see "maj7" abbreviated as "M7" (capital M for Maj, lower case m for min).
An example using Dm (you could also think of this playing in the D Dorian mode)...
Fmaj (or F Lydian mode)...
G7 (or G Mixolydian mode)...

You can hopefully hear that, although we're targeting the isolated chord in various places throughout the sequence, we've created movement by linking them with other triads/shapes from the scale. It no longer sounds like one chord, rather a harmonic phrase or expression around that chord.
The more you practice moving around the scale using triads, forming melodic movements of harmony, the more intuitively you'll learn when to target the triad (or 7th shape) of the backing chord and when to bridge between them.
What we're aiming at here is to be able to connect the melody to the shape positions we use, no matter where the melody note happens to fall. Shortly, we'll modify these shapes to accommodate other potential melody notes.
Three & Four-Chord Examples
Back to chord changes, and an example in the relative key of A minor. Remember all our major key triad positions will also work in their relative minor key...
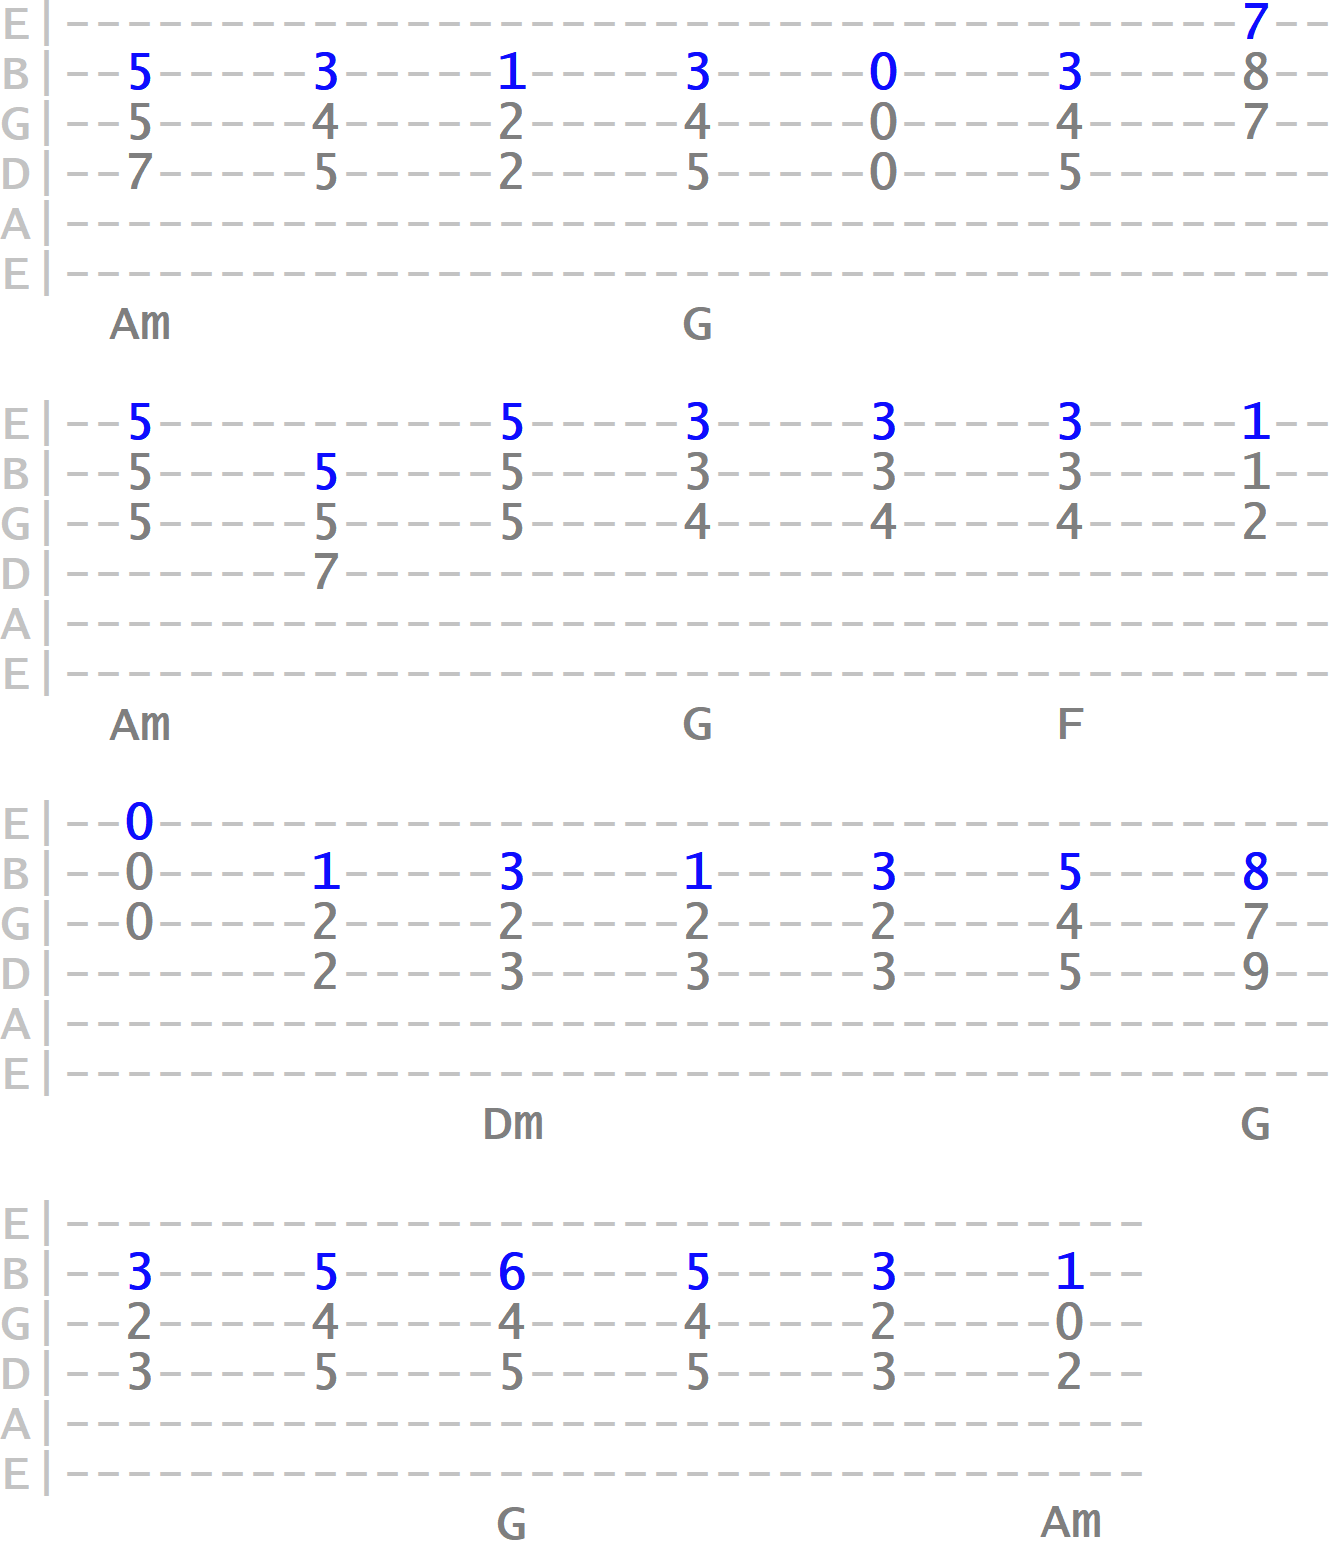
Again, through each chord change there we targeted the chord in question with a related shape. With these harmonic markers in place, it's much easier to connect our chord melody to the backing music.
Another example. Here we're descending from the IV chord of F to the tonic, C via Em and Dm, the iii and ii respectively. Notice the target shapes as we change chord...
Side note: By being able to move fluidly between upper and lower 3 part shapes, we can more economically harmonise melodies that move across a wider interval and pitch span. Be sure to practice those more "vertical" shape movements!
9th, 11th & 13th Target Shapes
So far, we've given ourselves the most important harmonic destinations up the neck to connect a resting melody note to its related chord. We've essentially made the root, 3rd, 5th and 7th of each chord in the key available for our resting melody note.
But we can complete this picture by making colour tones such as the 9th, 11th and 13th available for our melody, still referencing the same shape positions. To do this, let's scale out the top string of our three-part shapes, starting with the lower shapes...
We'll now go through each reference shape like before, but this time we'll move the top string, effectively our melody string, through the different available chord tones. Starting with C major (above the tab is the top chord tone/interval of the shape- R, 3, 4, 5, 7, 9 or 13. Below the tab is the chord name)...
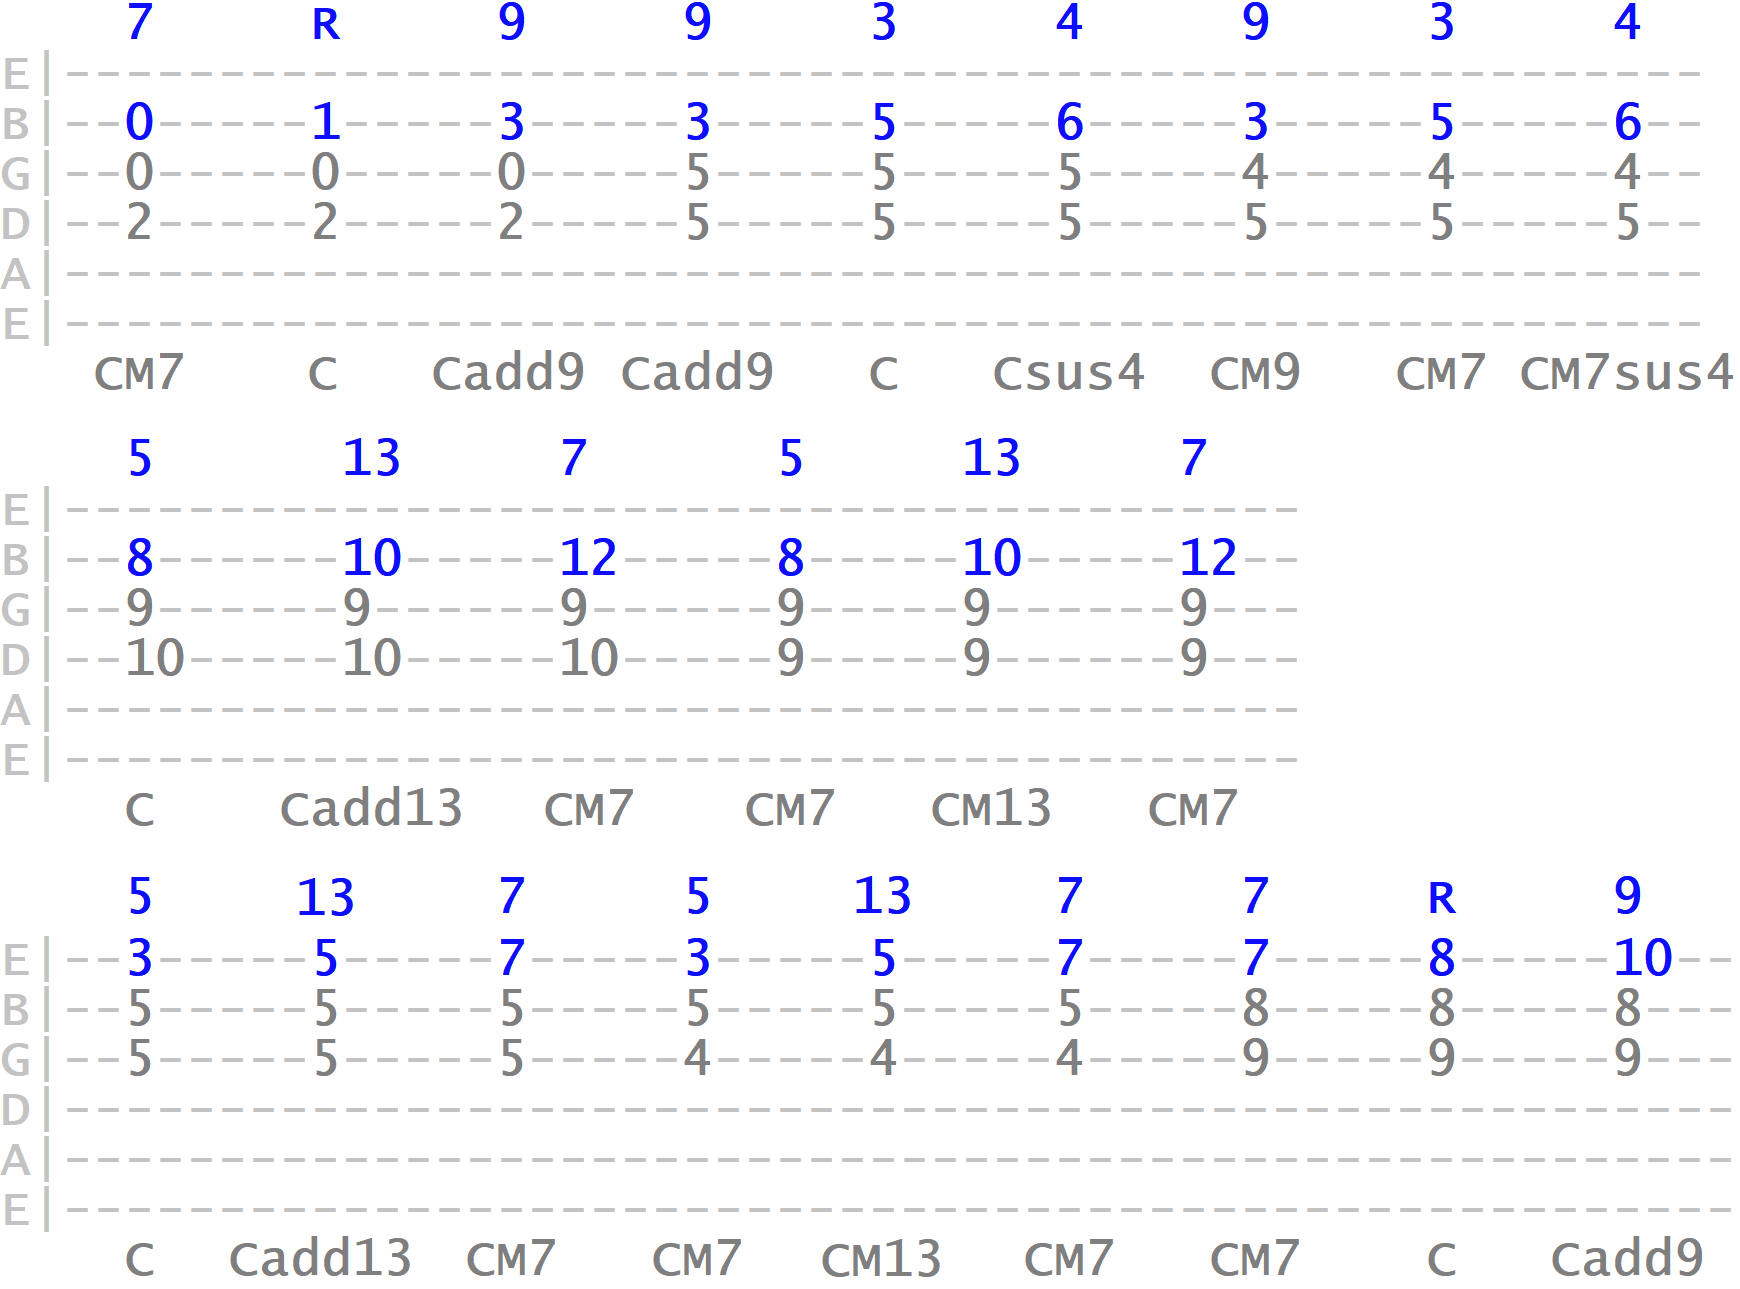
Side note: It's far more important to train your ear to these top tones of the shapes than understand why we call them "9th" or "13th", for example. We could call them anything we want really. The main thing is that you can identify these overlying tones, both visually and by ear, as potential melody notes. Take your time with it!
What we've essentially done here is create new colour shapes around those initial reference/target shape positions, simply by repositioning the top tone. But what's also interesting is that, when we find ourselves forming familiar triad shapes such as this 9th shape...
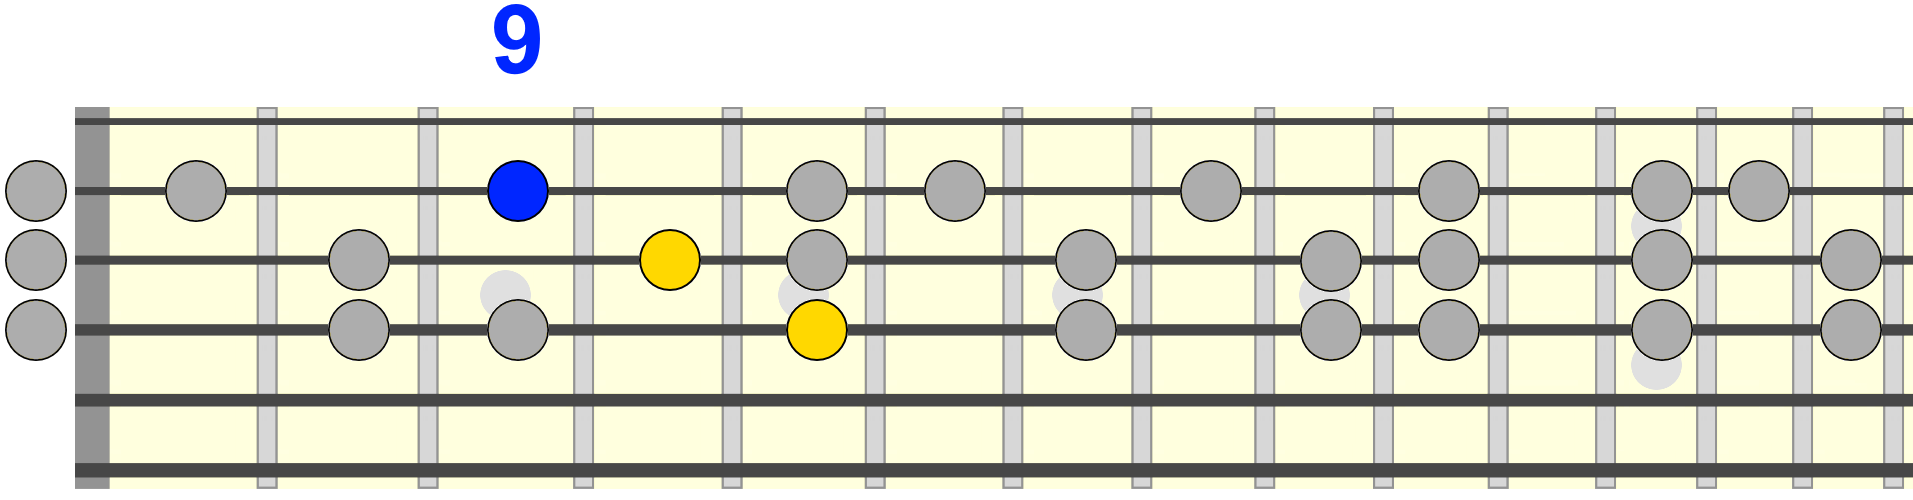
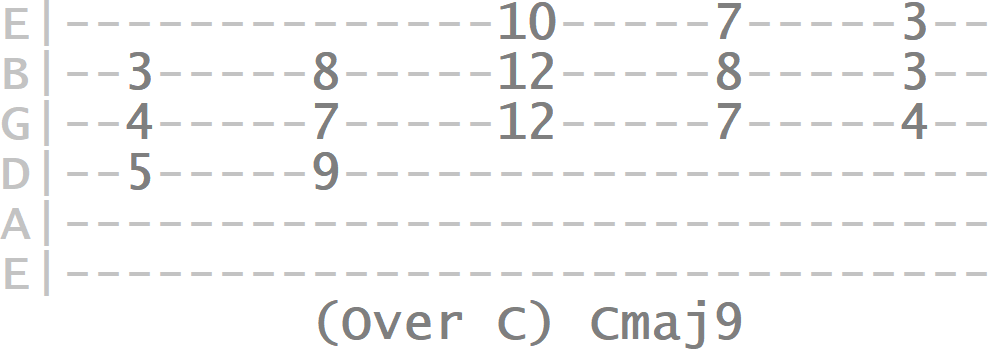
...we can play it in different positions like we would any other triad. In this case, G major over C gives us a Cmaj9 voicing...
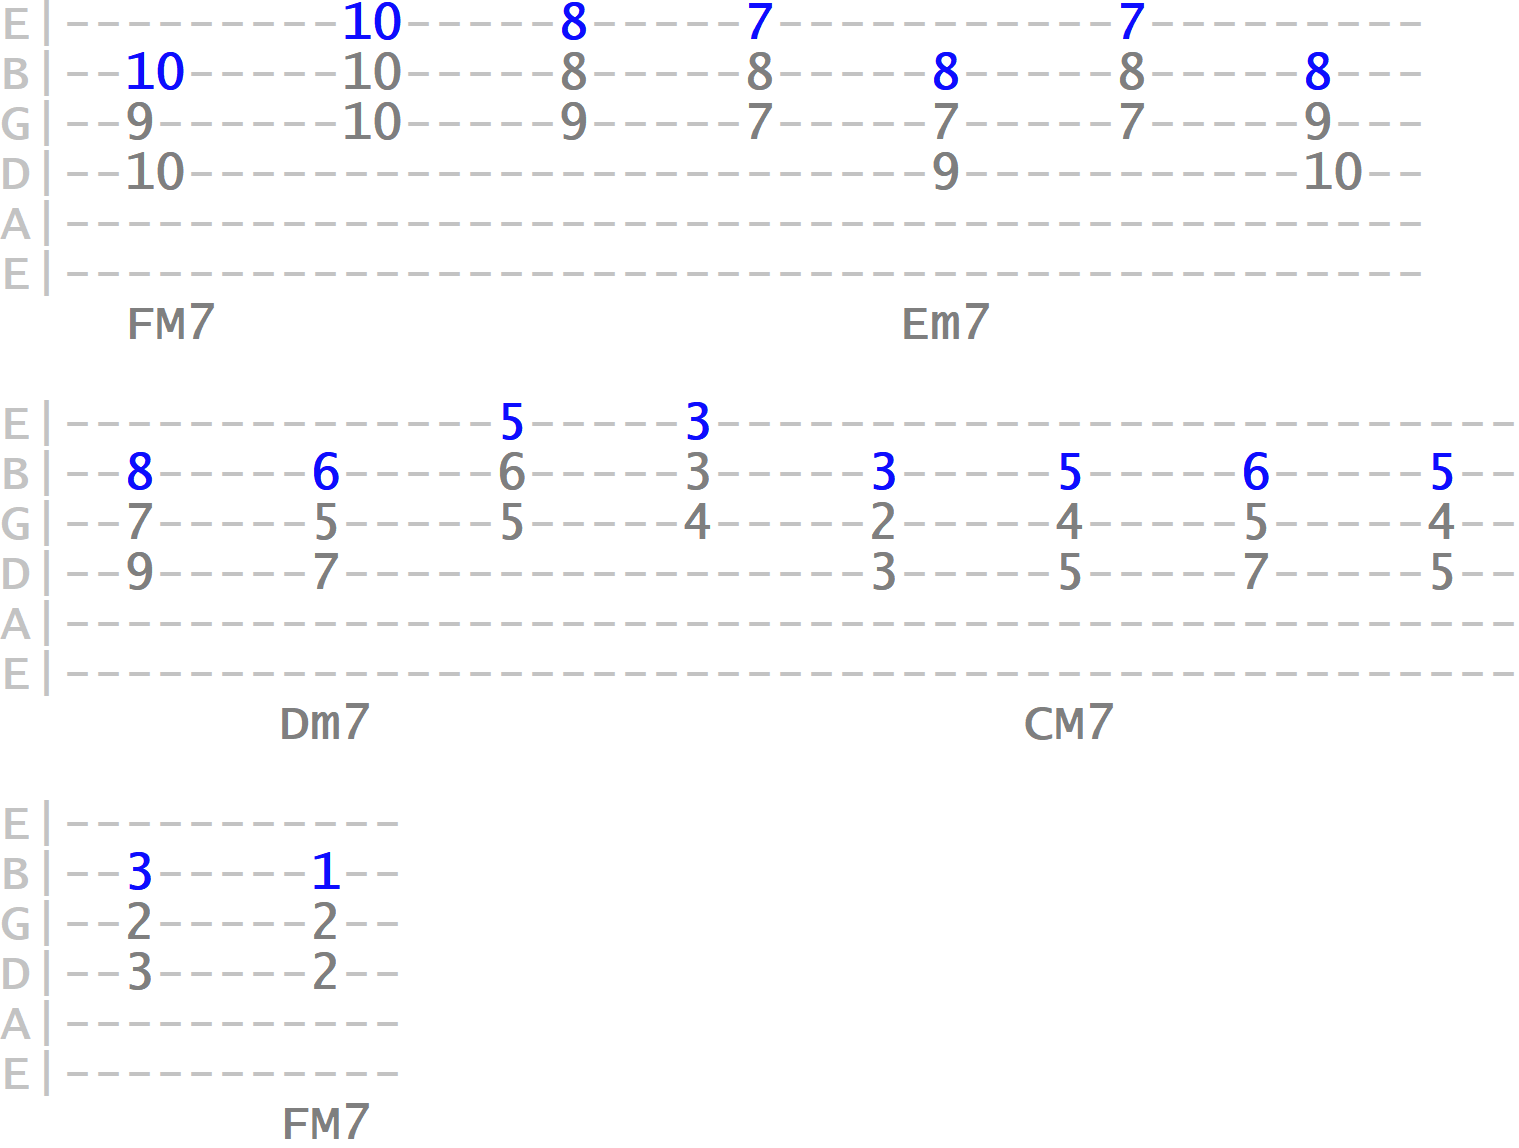
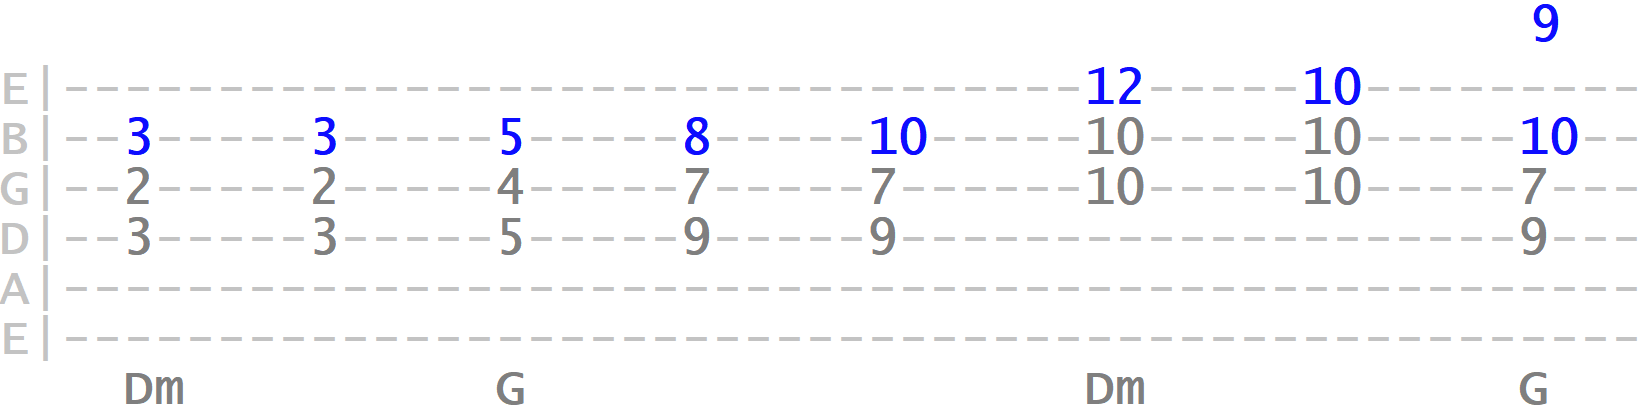
Moving to the ii chord, Dm, forming new shapes around its natural colour tones...
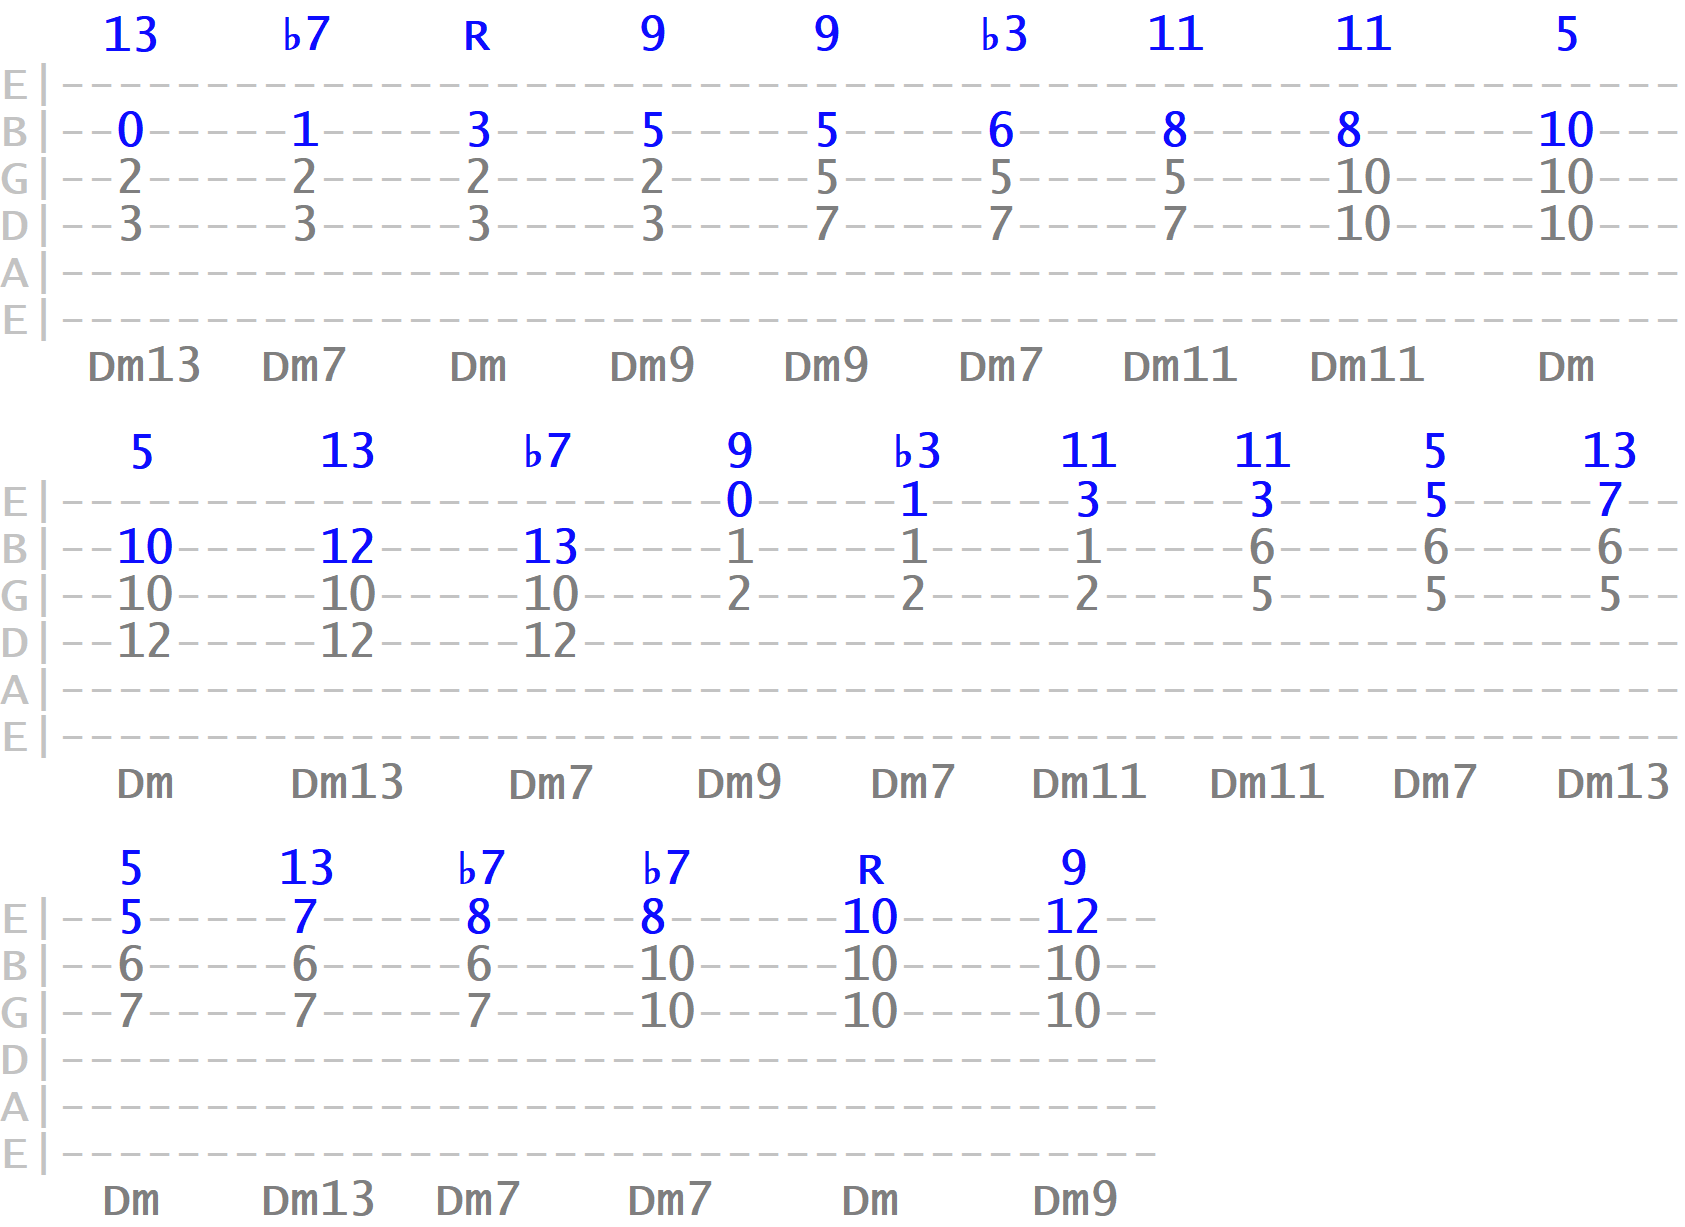
Try the same "scaling out" process with the other related target shapes of the key. We'll be specifically exploring these kinds of colour shapes in more depth in another part.
So why did we do this? Because sometimes the melody will come to rest on a chord tone other than the root, 3rd, 5th or 7th. So knowing how you can change that top tone of the target shape (e.g. using the scale of the key) will give you access to these natural colour tones when needed. This is as much an ear training skill as it is a spatial awareness of colour tones across the neck.
For example, here we come to rest on the 9th of C major...
On the 9th of G major...
On the 11th of D minor..

Final Notes...
We've now potentially given ourselves harmonic destinations for all the melodic notes that might occur over any chord in a diatonic key, major, minor and the modes. Try applying the same process to different keys, using the triad shapes of the related scale as your initial reference positions. Use a simple backing track creator like ChordChord to give you some accompaniment, if it helps.
While this is still just one piece of the complete picture, it is the solid groundwork we need for accessibly combining melody and harmony, and should give you a lot to play with.
And be reassured that all we've looked at so far has a much broader application than just chord melody. So you'll be able to use this knowledge in many different intuitive ways, for aiding your improvisation and songwriting, or even just expanding your chord vocabulary. The gradual piecing together of this rather complex topic will continue...
