


Home
> Scales
> Pentatonic
Patterns

Now we're going to expand out of these boxed pentatonic scale patterns that we initially learned to free up our soloing for more fretboard coverage.
The easiest way to learn any scale across the entire fretboard is to break it up into patterns built around each degree of that scale, known as scale positions.
In other words, each note/degree of the scale marks the first note of a new pattern, and once you've learned the patterns at each degree you can link them together to create one large scale pattern.
Now, as there are both minor and major pentatonic scales, we're going to cover both in this lesson. First, minor pentatonic...
1 is our root note, and wherever that note lies is the key of the scale. So if the 1st note was G, the scale would be built on that note and it would become G minor pentatonic.
Remember, although we're going to build a large G minor pentatonic scale below, the final pattern will be movable, meaning you can change its key simply by moving the root note to a new position. The rest of the scale is relative to that root note position and moves with it accordingly.
As we're in G for this example, let's first layout the scale's intervals across the low E string. These positions will become our marker points for building 5 patterns, one on each degree...
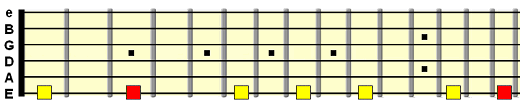
Tip: When learning scales, learn how their intervals appear across single strings like above.
So, let's start with the first position, building a box pattern you should already be familiar with...
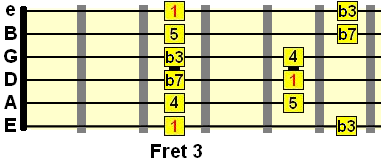
Then to the 2nd position of minor pentatonic, built on its minor 3rd degree. Take note of where the root notes lie as these are your reference points for finding the right key no matter where you might be on the neck...
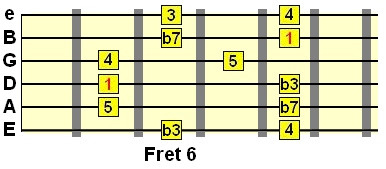
The 3rd position...
The 4th position...
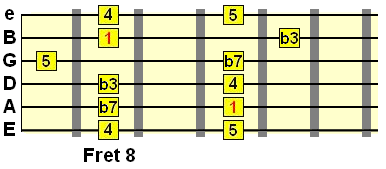
And finally the 5th position build on its b7 tone...
I've also marked it at the 1st fret because the 13th fret is of course the octave position of the 1st fret. This means that the D and G strings would be played open in this 1st fret position.
And then we're back to the 1st/root pattern at its octave. We can now merge these boxed degree patterns into one large G minor pentatonic pattern...
Remember, once we get to the octave, the pattern repeats with the same 5 pentatonic scale positions mapped out. So it doesn't matter what key you're in or where you are on the fretboard - the 5th pattern will always follow the 4th and precede the 1st. The 3rd pattern will always follow the 2nd and precede the 4th etc.
The intervals for this scale are: 1 (root), 2 (major 2nd), 3 (major 3rd), 5 (perfect 5th) and 6 (major 6th).
Again, start with laying out the intervals of the scale across the low E string...
Now let's build the boxed patterns at each degree. Starting with the 1st position which we already know...
The 2nd...
The 3rd...

The 4th...
And finally the 5th degree which is built on the major 6th tone of major pentatonic...
Below is what we've created...
It really is as simple as that. Obviously, you'll have to spend time memorising these visual patterns, so here are some tips for seeing the "big pentatonic picture":
Be aware that learning scales across the entire fretboard like this will take time, but I cannot stress enough how rewarding this knowledge will be once you crack it.
Study (and play) hard, but please take your time!
Related
Guitar Scale Patterns
Return to Guitar Scales
Pentatonic Scale Patterns - Play Pentatonics Across The Neck
This lesson is intended to accompany the pentatonic scale lessons (minor pentatonic and major pentatonic) so make sure you've learned the basics there first.Now we're going to expand out of these boxed pentatonic scale patterns that we initially learned to free up our soloing for more fretboard coverage.
 Free scale
pattern cheat sheet Free scale
pattern cheat sheetEssential scale patterns that every guitarist must know... Click here to start now |
The easiest way to learn any scale across the entire fretboard is to break it up into patterns built around each degree of that scale, known as scale positions.
In other words, each note/degree of the scale marks the first note of a new pattern, and once you've learned the patterns at each degree you can link them together to create one large scale pattern.
Now, as there are both minor and major pentatonic scales, we're going to cover both in this lesson. First, minor pentatonic...
Minor pentatonic scale patterns - the 5 positions
As we learned in the minor pentatonic scale lesson, this scale has just 5 tones - 1 (root), b3 (minor 3rd), 4 (perfect 4th), 5 (perfect 5th) and b7 (minor 7th).1 is our root note, and wherever that note lies is the key of the scale. So if the 1st note was G, the scale would be built on that note and it would become G minor pentatonic.
Remember, although we're going to build a large G minor pentatonic scale below, the final pattern will be movable, meaning you can change its key simply by moving the root note to a new position. The rest of the scale is relative to that root note position and moves with it accordingly.
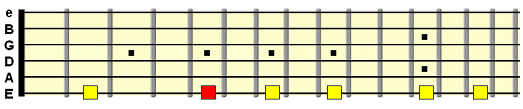
As we're in G for this example, let's first layout the scale's intervals across the low E string. These positions will become our marker points for building 5 patterns, one on each degree...
Tip: When learning scales, learn how their intervals appear across single strings like above.
So, let's start with the first position, building a box pattern you should already be familiar with...
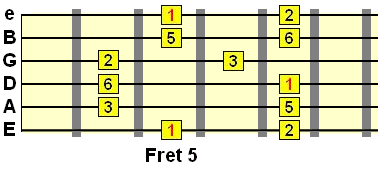
Then to the 2nd position of minor pentatonic, built on its minor 3rd degree. Take note of where the root notes lie as these are your reference points for finding the right key no matter where you might be on the neck...
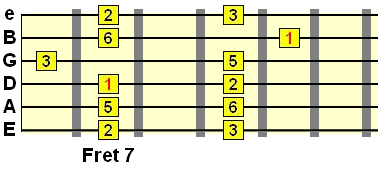
The 3rd position...
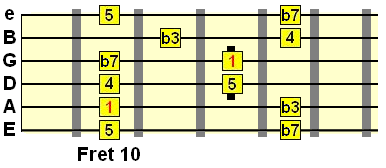
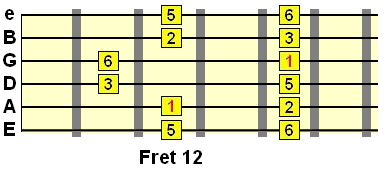
The 4th position...
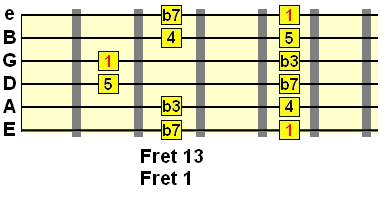
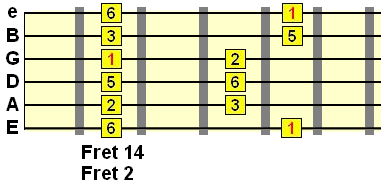
And finally the 5th position build on its b7 tone...
I've also marked it at the 1st fret because the 13th fret is of course the octave position of the 1st fret. This means that the D and G strings would be played open in this 1st fret position.
And then we're back to the 1st/root pattern at its octave. We can now merge these boxed degree patterns into one large G minor pentatonic pattern...
Remember, once we get to the octave, the pattern repeats with the same 5 pentatonic scale positions mapped out. So it doesn't matter what key you're in or where you are on the fretboard - the 5th pattern will always follow the 4th and precede the 1st. The 3rd pattern will always follow the 2nd and precede the 4th etc.
| Once you're confident with connecting these patterns together, you can then work on using more of the fretboard to create fluid, musical solos. |
Major pentatonic scale patterns
So, using exactly the same technique as above, let's build up a large major pentatonic scale pattern. This time I'm using a root of A.The intervals for this scale are: 1 (root), 2 (major 2nd), 3 (major 3rd), 5 (perfect 5th) and 6 (major 6th).
Again, start with laying out the intervals of the scale across the low E string...
Now let's build the boxed patterns at each degree. Starting with the 1st position which we already know...
The 2nd...
The 3rd...
The 4th...
And finally the 5th degree which is built on the major 6th tone of major pentatonic...
Below is what we've created...
It really is as simple as that. Obviously, you'll have to spend time memorising these visual patterns, so here are some tips for seeing the "big pentatonic picture":
- Learn two consecutive patterns at a time and build phrases that move inbetween them. Then try moving between 3 patterns. Then 4, etc.
- Once you're confident with moving between all 5 patterns, try and single out 3 specific intervals (e.g. 1, 3, 5) and move between them right across the large pattern. Test yourself.
- Apply the large scale pattern in sharp (#) and flat (b) keys (e.g. F#, Bb, C# etc.). This will help you really engrain that pattern into your mind.
- Apply the pentatonic scale patterns beyond their octaves.
Be aware that learning scales across the entire fretboard like this will take time, but I cannot stress enough how rewarding this knowledge will be once you crack it.
Study (and play) hard, but please take your time!
| |
Tweet |
Stay updated and learn more
Sign up to the newsletter for updates and grab your free Uncommon Chords book
Sign up to the newsletter for updates and grab your free Uncommon Chords book
Related
Guitar Scale Patterns
Return to Guitar Scales


