


Guitar Strumming Lessons
This series of guitar strumming lessons will take you from the basics (literally, how to strum the guitar) right through to more advanced strumming patterns and techniques.

|
There'll be video, audio and clear diagrams to help you, plus some backing tracks you can strum along to.
Strumming is a staple rhythm guitar technique that all guitarists should be confident with. It underpins many songs, as one way of providing the underlying, rhythmic chord progression or melody.
In genres like funk, it plays a more prominant role in shaping rhythm and timing.
Work your way through the course step by step. The first lesson is very basic, so if you can already strum simple patterns, you can probably skip it without missing anything.
| 1)
Beginner
guitar strumming - strumming basics. 2) Strumming technique - essential strumming technique. 3) Strumming patterns - more complex patterns and muted strumming. 4) Strumming timing - timing your strumming through chord changes. |
Guitar strumming basics and tips
This course applies to both acoustic and electric guitar playing, as the strumming action is the same for both. Even the positioning of your strumming path falls around the same area. See below...
Acoustic - standard strumming path over the sound hole: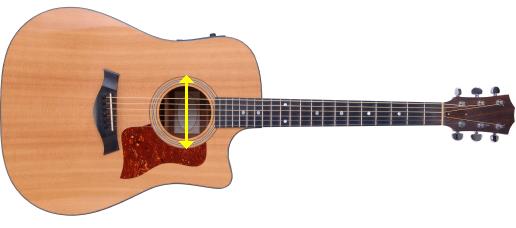
Electric - standard strumming path around the first pickup:
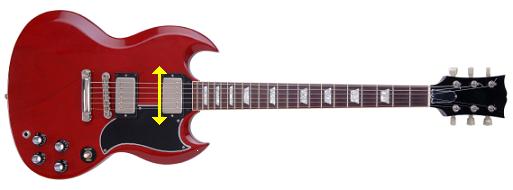
You aren't, of course, tied to those paths, as different positions create different sounds (for example, strumming and picking close to the bridge gives you a sharper, crisper tone), but most of the time you'll be using this standard position for a well balanced tone.
Some key points to remember before we get started...
Relax!
Sounds obvious, but it's easy to tense up when you feel you need more control when strumming more complex patterns. Try and keep your arm and wrist relaxed. Let the plectrum brush over the strings rather than jab at them. Even if you're strumming aggressively, keeping relaxed is still the most important thing.
Keep both your wrist and forearm flexible
Although you will need to move your forearm, your wrist should also be quite loose and free-flowing. Keeping your wrist stiff, and relying on your forearm alone will obstruct your strumming path. Some strumming techniques require very little movement from the forearm, so get into the habit now of using that wrist joint as the secondary pivot point, with your forearm as primary, for support and driving power (when you need it).
Think about avoiding unwanted strings
Many chords don't require the use of the low E string, or even A string, so obviously you'll want to try and avoid these when down strumming. Through regular practise, you will learn to target your downward strumming attack to start on the correct string, most often the lowest string in the chord you're playing.
If it's just the low E string you need to avoid, you can use the following muting technique (if your hands can accomodate it):
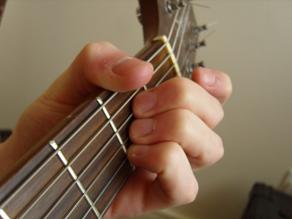
Let's take a closer look...
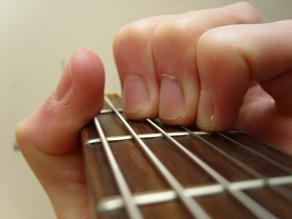
My thumb curls over the top of the guitar neck just enough to touch the low E string, which mutes it. To compensate, you'll need to pull your wrist up slightly from it's regular position.
Now, I understand this is a bit more difficult for those of us with smaller hands, but if you can't physically use this method, keep practicing avoiding those unwanted strings, simply by not picking/strumming them and you'll be fine.| |
Tweet |

More Rhythm Guitar Lessons


