


Essential Guitar Strumming Technique
Firstly, if you need help on basic/beginner guitar strumming technique, I suggest you first take the beginner strumming lessons. Otherwise, welcome to the next level!In that beginner lesson, we laid the foundations for our strumming technique.
By building on that basic down-up, alternate strumming action, we can create more intricate and dynamic rhythms.
However, for the most part, that fundamental action should not change, rather you'll be applying it in different ways.
The below video is a great intro to the techniques
we're about to learn...
The 'skipped beat' guitar strumming technique
This particular technique will stay with you right through your guitar playing life, because it's the most essential modification of that basic down-up strumming pattern.
Whereas before, we were simply hitting the strings on every downward/upward stroke...

We can skip a beat to create a jump in the rhythm and give it a more interesting movement...

It's simply a case of missing the strings on the skipped beat, but the action will still be there, to get you in position for the next stroke and keep a constant momentum.
Watch the video clip below to see it in action...
So you can see that to miss the strings, I move my hand out in a very slight circular motion, arching over the strings ready for the next stroke.
You can create countless strumming patterns from this technique. See below for a slightly different modification of that foundation down-up strumming...

So, fewer missed beats and a more dispersed rhythm.
Hear a slow example...
Let's try this strumming technique over a bass and drum backing track.Below is a jam track in the key of A major, which means you can play several A major chords (e.g. A major, A7, Amaj7 etc.). Chords are covered in a different section, so if you haven't been through the basic chord lessons yet, I recommened just using A7, using that rhythm from above...
") |
Play/download the A major backing track |
The great thing about playing these types of patterns is that you naturally start to focus on your strumming attack, which is to do with how hard you hit the strings and also to do with muting (which we'll look at in a later lesson).
The idea is to get rid of the constant drone and inject life into your strumming rhythms and chord playing.
Let's try another example using the skipping technique.

Hear a slow example...
Take a look at the tutorial video for a detailed breakdown of this pattern.
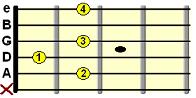
Open
E minor (Em)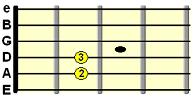 |
Open
A minor 7 (Am7) |
Open B7
Hear an example...
Download/play the backing track...
Layered strumming and string targeting
Whilst the above guitar strumming technique is used commonly in rock and pop, there are techniques that work more intricately with the bass and treble strings of the chords you're playing.
These strumming patterns require far more string accuracy, as you'll be targeting specific strings in the chord on your down and up strokes.
Let's start with a basic example using the bass and treble strings of our guitar.
This rhythm uses down strumming and is best counted out as - 1 2, 1 2, 1 2, 1 2 etc.It's simply a case of hitting the bass strings of the chord you're playing with the first down strum (1), and the treble strings with the second down strum (2).
Take a listen...
So remember, all down strums, but you're targeting the low and high strings in a specific beat. Think of it like how a drummer would hit the bass drum followed by the snare (treble) drum to create a beat. When the example above gets going, it has a very punchy, kinetic energy because of the attack of the down strums.Let's now look at a more complex way of using this technique. First, let's get the basic strumming rhythm nailed:

Slow example...
In the example audio/video above you should be able to hear/see the separation of the bass, mid and treble strings in the open G major chord.
We start with a down strum on the bass notes of the chord (low E, A strings), followed by a down strum in the mid section of the chord (A, D and G strings), and 3 strokes of the treble section (G, B and high e strings). The mid and treble strings may overlap, but that's not really an issue.
The key thing is to get some kind of defined separation between these chord tones from low to high (bass to treble). What this does is two things:
1. Layer your chord playing, making it more nuanced and textured (if, of course, you're bothered about those things! Not so important in punk rock, for example).
2. Give your rhythm more energy. Just like a drummer would use the bass and snare drum in certain positions to create a beat, so too can a guitarist position the bass and treble accordingly.
In the later lessons in this series, we'll expand on this strumming technique and see how it complements different types of rhythm (especially funk inspired rhythms).
Try using the above technique over the backing track below. This time, we're going to change between G major and a variation of the open C major chord (Cadd9 to be exact).
Open
G major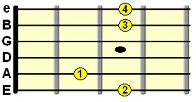 |
Open
Cadd9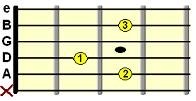 |
Listen to the example below to get your bearings first. As the jam track is a set speed (one that would be realistic for a song), you should start slow with a metronome first and gradually build up your speed.
Hear an example...
Backing track...
Keep practicing...I want you to experiment with the guitar strumming techniques we've learned here and apply them to your own music. Keep an open mind, but also remember the foundation elements that help keep your timing and attack sharp.
Was this lesson useful? Please let others know, cheers...
| |
Tweet |
Where Next?
More Guitar Strumming TechniqueGuitar Strumming Lessons Contents
Other Rhythm Guitar Lessons


