


Open String Chord Ideas
If you've been through the other guitar chord lessons on this site, you'll be aware that there are two main types of chord - open chords (which use a combination of open and fretted strings), and barre/movable chords (which use all fretted strings). Free chord
cheat sheet Free chord
cheat sheetLearn how guitar chords work together in any key... Click here to start now |
In this section, we're looking more at open chords and how you can "float" chord shapes right up the guitar neck, still utilising open strings. If you've never looked at this technique before, you'll be amazed at the kind of chords you can create simply by messing around with mixing open strings with movable chord shapes.
Take a look at the video below for a great introduction to open string chords...

I'll be showing you some more key examples, but the emphasis will become more and more on your willingness to experiment with different chord shapes and variations on your own, based on what you've already learned.
So, let's get started!
Using open strings in your guitar chords
Using open strings in chords gives them a kind of depth and vibrancy that can't be attained with regular, fixed-form chords.
The simplest way to create such chords is to take an existing open shape, major or minor, and just move it around.
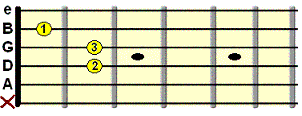
For example, the open A minor shape uses 3 fretted strings. We can move this up to the B minor position, but leave the open A string as the root note and the open high E string as part of the chord...
Click the diagrams and tabs in this lesson to hear.
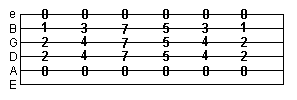
We can also do the same with the A major open shape. So you should be able to create a nice little chord progression from just those simple movements. For an example, here's one I prepared earlier:
You can also float chords using the top 2 strings (e and B) open and move the root note of the chord with the rest of the shape. We have to ensure that the corresponding notes, E and B, are compatible with the chord we're floating.
Let's start with a basic E shape major barre chord. Playing it at the 5th fret creates the A major chord.
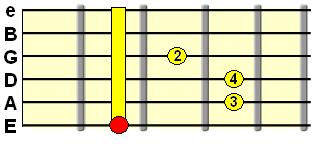
Now, we know from the A major open position chord that the high E string is played open. However, playing the B string open, giving us a B note, is also compatible with A major. This means we can remove our fingers from the e and B strings in the A major barre chord above and get something like this:
So rather than barre across all 6 strings, we lift the index finger so it frets only the E string root note (red dot). The other fingers remain unchanged, leaving those top 2 strings to ring open. Click the diagram to take a listen.
A nice, fuller alteration of the E form barre
chord. It's actually Aadd9
in full, but we'll focus on the theory behind that some other time. At
the moment, I just want us to focus on the new sounds we can create by
altering these fixed-form chords to include open strings!
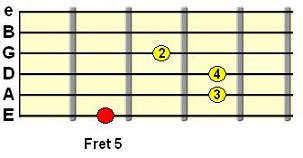
Now, try moving that same altered shape 3 frets down...
We get another unique sounding chord. Because
we're now at fret 2, it's an alteration of the
F# barre chord (F#7sus4).
In fact, this open E-shape chord technique works well at the following
positions...

So, from the 1st fret F major alteration, hear them in sequence here
Remember, we're treating each chord individually. They could all be used together in a chord progression, or they could be used with other chords. It's ultimately up to you when/if and how you use them.
Once we get to the 12th fret, we're back at the standard E major position, but because the top 2 strings are still being played open, it gives it a rather different sound.
So, that's the basic idea. Use open strings with
partial chord forms
to create a new sequence of notes and, therefore, a new variation of
that chord.
Floating other chords up the guitar neck
The idea is to draw from those familiar chord
shapes we've learned in past lessons,
cut them down, and float them up the fretboard with open strings to see
what you can create.
For example, the E shape major 7th (maj7) chord...
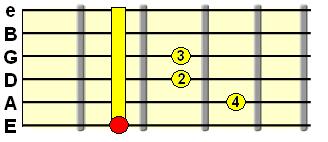
Floating this shape at fret 5 (making it an Amaj7 variation) sounds good (in my opinion!), with the top 2 strings left open again.
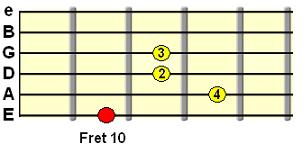
One of the positions it sounds good is up at the Dmaj7 position at fret 10:
...it also works at fret 3 (Gmaj7) and fret 7
(Bmaj7). Unfortunately
I can't map out every possible position these chords work in!
You should have fun discovering that for yourself. For example,
try using a partial dominant 7th shape (from the
earlier open chord lessons) and floating that with the top 2 strings
open.
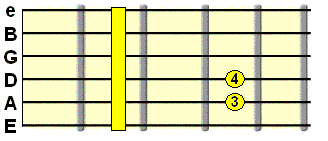
Cut down minor E-shape chords
Just as with the major chords we've cut down to allow those open strings to be included, we can apply the same technique to minor chords. However, with minor chords, to make the fingering more accessible, we can cut out the low E-string root note. Here's a regular E-shape minor chord being cut down to size ready for floating...
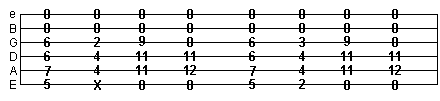
Again, it's just a case of experimenting and knowing where that floating shape is compatible with the top 2 open strings. Try these positions to start with...

Hear them in sequence, starting with the F#m alteration here
Each one has a unique sound. So rather than, for
example, using a regular A minor chord shape, you could use that
cut-down
minor shape from above (in the A minor position - f5th fret) for a more
interesting voicing.
Now, we can also float these chords with the low
E
string as one of the open strings! Logic has it that if the high E
string has been compatible, then so will the low E string, as it's the
same note. It does however give a very different feel to the
chord, as you're essentially providing an E bass note. Try playing the
sequence of "compatible" floating positions above, but this time
including the open low E string.
You can also try this technique with the major shapes from earlier
in this lesson. The open low E string acts as an
underlying bass note for any floating sequence you want to create using
those positions. To finish with, I'm going to play a sequence of
floating major and minor chords using that open low E string technique
mixed with other forms we've learned in this lesson.
Click the tab to hear.
I hope this lesson has provided a solid introduction to the concept of open string chords. Now you can experiment and "mess around" with your own ideas and create chords you never could using the standard fixed-form shapes. Enjoy it.
If you want the complete guide to this type of chord, including many
other ways we can involve open strings with chord shapes, you can
download my Alternate Open Chords book on Patreon here.
| |
Tweet |
Sign up to the newsletter for updates and grab your free Uncommon Chords book
Related
More Open Chord Ideas in Part 2


