


Home
>
Rhythm
> Phrasing

The types of phrasing we'll be looking at are considered rhythm techniques by many guitarists, because they still underpin any lead harmony that might come in the form of a solo. It's typically used as part of the overall chord progression, helping to link the chords together more fluidly.
In the first part, we'll be looking at using hammer-ons, pull-offs and single string phrases within chord shapes. See the below video for a good introduction to using simple phrases in your chord playing...
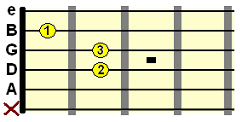
Take the open A minor chord form which I'm sure you're familiar with...
 We
could simply strum/pick this chord as it is, but to make it more
interesting we could pick a string and create a simple movement using
two or three notes.
We
could simply strum/pick this chord as it is, but to make it more
interesting we could pick a string and create a simple movement using
two or three notes.
In the below example, I'm using the B string, alternating between its normal A minor position (1st fret) and its open (unfretted) position, creating a harmony line around that A minor chord shape...

All I'm doing is lifting and refretting that 1st finger on the B string.
Click to hear example
I could also add in another movement on the B string to the 3rd fret...

I'm using my available 4th finger to help shape the harmony line.
Click to hear example
And of course we can add other strings to the pattern, still keeping conveniently around that A minor chord shape...

Click to hear example
This is a really fun and simple way to experiment with chord phrasing around open position chords. There are no rules, if it sounds good, go with it. Remember, you can strum or pick these phrases, but picking may help separate the harmony line from the rest of the chord more effectively.
Below is a phrase built around the open C major chord. As shown in the video below, I'm simply hammering on the open D, B and high E strings to create some movement in the chord...
Click to hear faster example
Now try adding in some pull-offs to the phrasing...
Click to hear faster example
And just like with the lead/solo technique, we can use quick successions of hammer-pulls for more of a legato effect in our chord phrases...
Click to hear faster example
Again, experiment with this technique with other open chord shapes you know and see how you can spice up those basic chords.
Take the below barre chord shape. The index finger remains firmly in place as our other fingers are free to dance around and create various phrases...
Try and get all your fingers involved in the action. The more you play around with this technique, the more the muscle memory will develop and the more natural it will become as part of your playing and songwriting.
Click to hear example
In theory, all we're doing here is pulling tones from the chord's associated scale in the same position. The only difference between a chord and a lead harmony is that a chord uses several notes from a scale at a time, whereas a lead harmony tends to only use on or two notes at a time. Phrasing is about mixing them together - building lead harmonies around a chord/scale position!
In the next part we'll look at chord phrases that involve using more than one string at a time.
Related
Chord Phrasing Part 2
More Rhythm Guitar Lessons
Guitar Chord Phrasing
Chord phrasing is about adding movement and more defined harmony to chords and chord progressions. This can be in the form of lead techniques such as hammer-ons and pull-offs within a chord shape or extending and moving around a given chord shape.The types of phrasing we'll be looking at are considered rhythm techniques by many guitarists, because they still underpin any lead harmony that might come in the form of a solo. It's typically used as part of the overall chord progression, helping to link the chords together more fluidly.
In the first part, we'll be looking at using hammer-ons, pull-offs and single string phrases within chord shapes. See the below video for a good introduction to using simple phrases in your chord playing...
Guitar chord phrasing basics
The easiest way to get a feel for chord phrasing is to start really simple using open chords.Take the open A minor chord form which I'm sure you're familiar with...
We
could simply strum/pick this chord as it is, but to make it more
interesting we could pick a string and create a simple movement using
two or three notes.In the below example, I'm using the B string, alternating between its normal A minor position (1st fret) and its open (unfretted) position, creating a harmony line around that A minor chord shape...
All I'm doing is lifting and refretting that 1st finger on the B string.
Click to hear example
I could also add in another movement on the B string to the 3rd fret...
I'm using my available 4th finger to help shape the harmony line.
Click to hear example
And of course we can add other strings to the pattern, still keeping conveniently around that A minor chord shape...
Click to hear example
This is a really fun and simple way to experiment with chord phrasing around open position chords. There are no rules, if it sounds good, go with it. Remember, you can strum or pick these phrases, but picking may help separate the harmony line from the rest of the chord more effectively.
Using hammer-ons and pull-offs in chord phrases
The hammer on and pull off lessons in the lead section on this site showed us the basic technique. This time we're going to use them in a similar way to how we built the phrases above, around a fixed chord form using one string at a time.Below is a phrase built around the open C major chord. As shown in the video below, I'm simply hammering on the open D, B and high E strings to create some movement in the chord...
Click to hear faster example
Now try adding in some pull-offs to the phrasing...
Click to hear faster example
And just like with the lead/solo technique, we can use quick successions of hammer-pulls for more of a legato effect in our chord phrases...
Click to hear faster example
Again, experiment with this technique with other open chord shapes you know and see how you can spice up those basic chords.
Barre chord phrases
Barre chords typically use your index finger as the base (effectively a nut or capo), and you can use this to "catch" any pull-offs you make with your other fingers within the chord shape. This allows you to create phrases similar to those in open position.Take the below barre chord shape. The index finger remains firmly in place as our other fingers are free to dance around and create various phrases...
Try and get all your fingers involved in the action. The more you play around with this technique, the more the muscle memory will develop and the more natural it will become as part of your playing and songwriting.
Click to hear example
In theory, all we're doing here is pulling tones from the chord's associated scale in the same position. The only difference between a chord and a lead harmony is that a chord uses several notes from a scale at a time, whereas a lead harmony tends to only use on or two notes at a time. Phrasing is about mixing them together - building lead harmonies around a chord/scale position!
In the next part we'll look at chord phrases that involve using more than one string at a time.
| |
Tweet |
Stay updated and learn more
Sign up to the newsletter for updates and grab your free Uncommon Chords book
Sign up to the newsletter for updates and grab your free Uncommon Chords book
Related
Chord Phrasing Part 2
More Rhythm Guitar Lessons


