


Home > Chords
/ Theory
>
Inversion Positions

This lesson will expand on what we learned and get you playing inversions right across the fretboard by visualising inversion positions. Think of this part as a more practical way to apply the theory in part 1. The end result will be that you're no longer restricted to those same old open position and barre chord forms you learn as a beginner.
In other words, this is about giving you more creative freedom with your chord playing.
Video Lesson
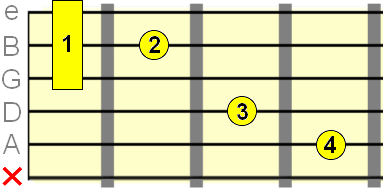
I'm going to start with E major as an example, with its root on the open E string. The most familiar root position of E major is the open chord form we all know, as follows...
Now, if we just focus on that low E bass string, we can form a 1 3 5 major arpeggio on that string as follows...

Essentially what we have here is an E major arpeggio across the E string.
These will become the bass notes for our first set of E major inversions.
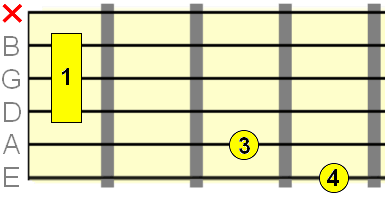
So, the open E string was the bass in our root position E major chord. Moving to the next position, at the 4th fret, we have a major 3rd bass note...
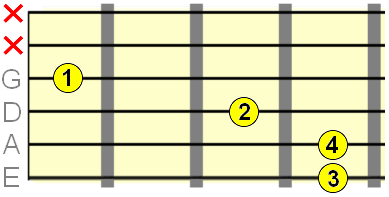
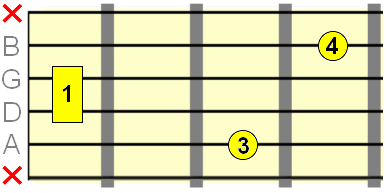
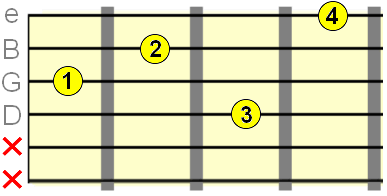
On this major 3rd bass we can build our 1st inversion shape as follows...
However, for easier fingering, players tend to cut this down to the following strings...
Tip: Mute the A string by collapsing your 2nd finger back to touch the string.
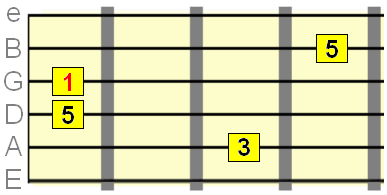
Next, we move up to the 5th bass note (7th fret) on that same bass string for our 2nd inversion E major shapes...
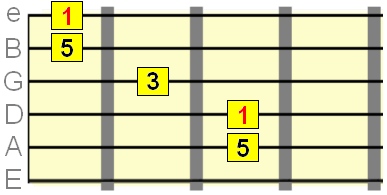
Finally, to the octave root position (12th fret E note) where we can build higher voiced root position shapes as follows (note the barred index finger in the first form if you want to include the G and B strings as well).
Once you have these chord shapes commited to memory, the next task is for you to be able to visualise their positions for any chord. We used E major in our example there, but here's how it would look for F# major, for example. See if you can spot the above chord shapes (some positions will overlap)...

So exactly the same process applies - build the chord's arpeggio (1 3 5 in this case) on the bass string and then build the related inversion shapes on those positions. This is only for testing your knowledge! Once it's fully internalised, by seeing how the above forms are interrelated, you won't need to go through the entire process.
We can also visualise inversion positions using other bass strings and open up even more of the fretboard for our chord playing.

That's our root position. Just like with the E string, let's build the major arpeggio on that bass A string.

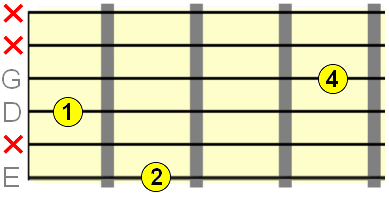
So, to the major 3rd position (1st inversion, 4th fret). Again, out with the barre for the fullest voicing...
5th position (2nd inversion, 7th fret)...
And the octave root position (12th fret). This is the standard C shape barre chord you might recognise...
Tip: You don't have to play the full shape. For example, in the above shape you could just play the top three strings.

1st inversion shape on the major 3rd position (4th fret). Note that you don't need to include that high e string 5th but it fills out the chord a bit...
2nd inversion on the 5th position (7th fret)...
And finally the octave root position (12th fret)...
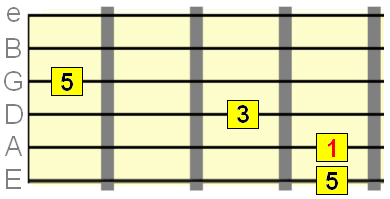
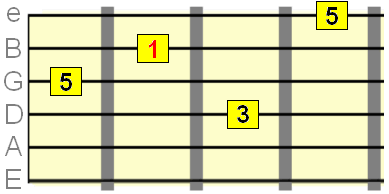
The easiest way to do this is to first visualise these triad intervals in relation to their root (1) notes on different strings. Observe and internalise!
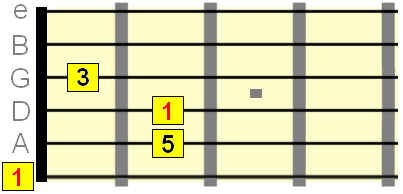
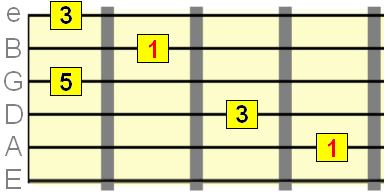
Low E string root
Example: if we wanted to play inversions of C major, we'd find the root note of C in the 1 position and be able to see its relative 3rd and 5th bass positions for building the shapes we've looked at.
Tip (sort of): if you've studied major arpeggios or the major scale, you'll already know these patterns!
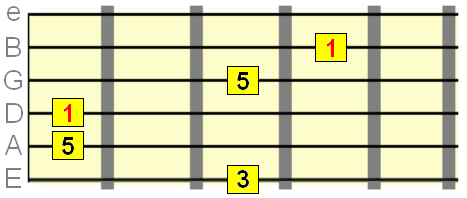
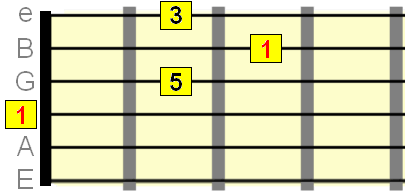
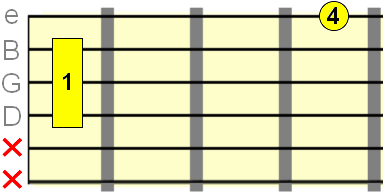
A string root
Don't just look at the positions above the root, look at how they appear below it. For example, if you find the root of the chord on the A string, you could play a 5th position shape on the low E string directly below it.
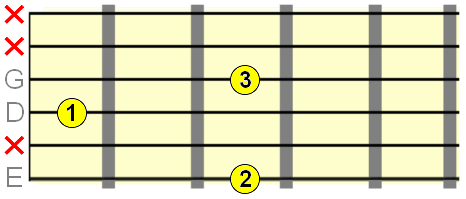
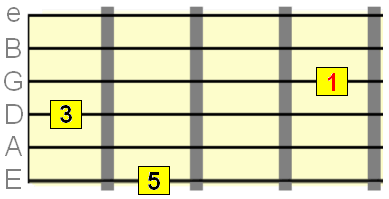
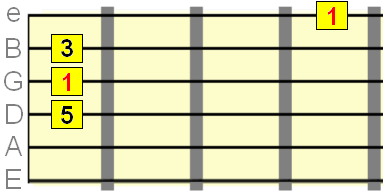
D string root
So, whatever chord you're playing, first find the root note for that chord (you'll know by now that the root of the chord is always the letter in the chord symbol), either on the E, A or D string, and then visualise its related inversion shapes based on those positions.
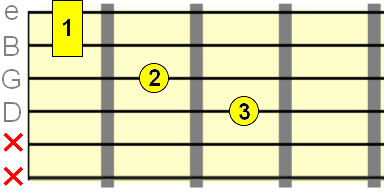
Some examples (test your knowledge of the inversion shapes/fingerings we learned in this lesson).
C# major

F major

Ab major

Spend a little time a day on this stuff if you can. It really is beneficial to learn, even though it might not seem that way right now. It's all part of the bigger picture that you're piecing together as you connect your knowledge of scales, chords and other theory into a roadmap for navigating the fretboard.
Time for a beer I think.
More Guitar Theory Lessons
Chord Inversion Positions Across the Entire Fretboard
In the first guitar chord inversions lesson, we learned what inversions are and how they can provide you with several different voicings of (ways to play) the same chord.This lesson will expand on what we learned and get you playing inversions right across the fretboard by visualising inversion positions. Think of this part as a more practical way to apply the theory in part 1. The end result will be that you're no longer restricted to those same old open position and barre chord forms you learn as a beginner.
In other words, this is about giving you more creative freedom with your chord playing.
Video Lesson
Chord inversion positions string by string
You won't believe how many voicings and positions of the same chord we can play, simply by breaking it down in the way I'm about to show you.Major chord inversions across the low E string
Starting with major triads, which we should know by now consist of the root (1), major 3rd (3) and 5th (5), we can play different combinations of these three notes in different positions on the neck.I'm going to start with E major as an example, with its root on the open E string. The most familiar root position of E major is the open chord form we all know, as follows...
Now, if we just focus on that low E bass string, we can form a 1 3 5 major arpeggio on that string as follows...
Essentially what we have here is an E major arpeggio across the E string.
These will become the bass notes for our first set of E major inversions.
So, the open E string was the bass in our root position E major chord. Moving to the next position, at the 4th fret, we have a major 3rd bass note...
On this major 3rd bass we can build our 1st inversion shape as follows...
However, for easier fingering, players tend to cut this down to the following strings...
Tip: Mute the A string by collapsing your 2nd finger back to touch the string.
Next, we move up to the 5th bass note (7th fret) on that same bass string for our 2nd inversion E major shapes...
Finally, to the octave root position (12th fret E note) where we can build higher voiced root position shapes as follows (note the barred index finger in the first form if you want to include the G and B strings as well).
Once you have these chord shapes commited to memory, the next task is for you to be able to visualise their positions for any chord. We used E major in our example there, but here's how it would look for F# major, for example. See if you can spot the above chord shapes (some positions will overlap)...
So exactly the same process applies - build the chord's arpeggio (1 3 5 in this case) on the bass string and then build the related inversion shapes on those positions. This is only for testing your knowledge! Once it's fully internalised, by seeing how the above forms are interrelated, you won't need to go through the entire process.
| Feeling
overwhelmed? A
lot of the stuff covered in this lesson is ten times easier to grasp
with a comprehensive knowledge of the fretboard. I recommend this
interactive software to make learning chords, scales and
arpeggios more fun and engaging. |
We can also visualise inversion positions using other bass strings and open up even more of the fretboard for our chord playing.
Major chord inversions on the A string
Starting with the open A major form we should all be familiar with...That's our root position. Just like with the E string, let's build the major arpeggio on that bass A string.
So, to the major 3rd position (1st inversion, 4th fret). Again, out with the barre for the fullest voicing...
5th position (2nd inversion, 7th fret)...
And the octave root position (12th fret). This is the standard C shape barre chord you might recognise...
Tip: You don't have to play the full shape. For example, in the above shape you could just play the top three strings.
Major chord inversions on the D string
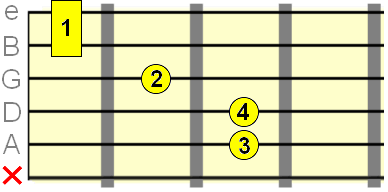
Finally, starting with the open D major shape, we can build 3 more inversion shapes on D string bass positions.1st inversion shape on the major 3rd position (4th fret). Note that you don't need to include that high e string 5th but it fills out the chord a bit...
2nd inversion on the 5th position (7th fret)...
And finally the octave root position (12th fret)...
Stringing it all together
In the examples above, we've been playing a different chord for each string (E major, A major and D major). But to really test your knowledge of these inversion positions, we need to pick one chord and be confident with finding its inversions across all three bass strings. This will really help you dominate the fretboard with any chord thrown at you. This also opens the door to chord improvisation and can help with "getting into position" for a solo.The easiest way to do this is to first visualise these triad intervals in relation to their root (1) notes on different strings. Observe and internalise!
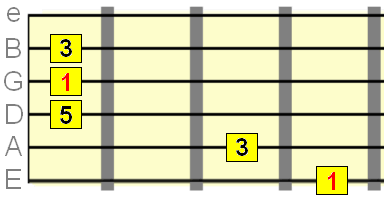
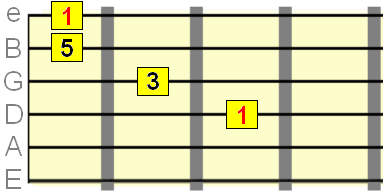
Low E string root
Example: if we wanted to play inversions of C major, we'd find the root note of C in the 1 position and be able to see its relative 3rd and 5th bass positions for building the shapes we've looked at.
Tip (sort of): if you've studied major arpeggios or the major scale, you'll already know these patterns!
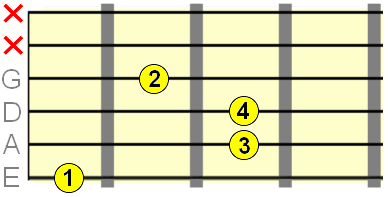
A string root
Don't just look at the positions above the root, look at how they appear below it. For example, if you find the root of the chord on the A string, you could play a 5th position shape on the low E string directly below it.
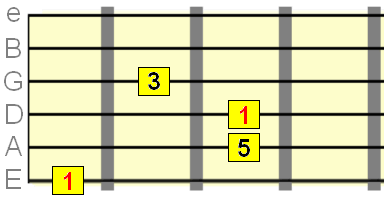
D string root
So, whatever chord you're playing, first find the root note for that chord (you'll know by now that the root of the chord is always the letter in the chord symbol), either on the E, A or D string, and then visualise its related inversion shapes based on those positions.
Some examples (test your knowledge of the inversion shapes/fingerings we learned in this lesson).
C# major
F major
Ab major
Spend a little time a day on this stuff if you can. It really is beneficial to learn, even though it might not seem that way right now. It's all part of the bigger picture that you're piecing together as you connect your knowledge of scales, chords and other theory into a roadmap for navigating the fretboard.
Time for a beer I think.
| |
Tweet |
 Like This?
Subscribe & Learn More... Like This?
Subscribe & Learn More...Subscribe to the fretjam newsletter below for updates and extras, plus grab your free copy of Uncommon Chords: 101 Vibrant Voicings You Won't Find on a Typical Chord Chart. |
Related Lessons
More Guitar Chord LessonsMore Guitar Theory Lessons


