


Home
> Help
If you want to download them, just right click on the sound link and click "save target as" or "save as".
Typically, you'll find sites and books using diagrams that represent a "head on" view of the guitar fretboard, as if you're looking at someone else playing the guitar...
You also typically find chord charts using wire frame diagrams that position the guitar neck vertically, with the nut at the top...
Both these positions, I feel, can be difficult to translate because they do not represent your perspective, how you see the fretboard when you're playing the guitar.
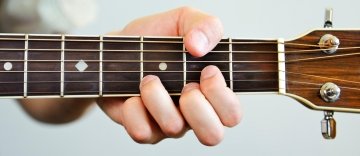
Holding your guitar, this is what you'll typically see looking over the fretboard...
This is how you will see your fingers on the fretboard, so you will visualise chord shapes and scale patterns based on this perspective. This visualisation is important for memorising finger positions.
As your fingers move up the fretboard, your view will become more and more "side on".
So all my diagrams are positioned based closely on that perspective - lowest/thickest string at the bottom (capitalised "E"), highest/skinniest string at the top (lower case "e"). See how the below diagram faithfully represents the chord shape you see in the photo above...
I hope that clarifies why I use this positioning for my diagrams. I want them to help you visualise chord shapes and note patterns closer to your perspective so you can translate them directly to the fretboard, without to much twisting and turning in your head!
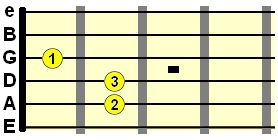
Also look out for fret numbers beneath the diagrams that specify at which fret the strings should be pressed. For example, this diagram...
Fret 3
...means you play that root (1) note on the low E string at the 3rd fret, with the other notes in the scale positioned relative to that (e.g. the 2nd note is at fret 5, the 3rd on the A string at fret 2, 4th on the A string at fret 3 etc.). Incidentally, that's a G major scale pattern because the root note is positioned on... G. More on that in the lessons!
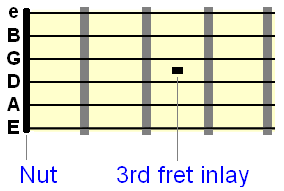
If the diagram includes a thick black bar in the nut position (the bit where the head joins the neck of the guitar), you'll know we're down at those first few frets...
If there is no fret number beneath the diagram and no nut, that means I'm not referring to a specific fret position. This is when the scale pattern or chord shape is movable, meaning you can position it anywhere up the fretboard depending on what key you're playing in.
Therefore, if I'm just showing you the pattern or shape, the fret number isn't really important, because you'll position it at the appropriate fret when you start to use it in your music.
Fingering and intervals
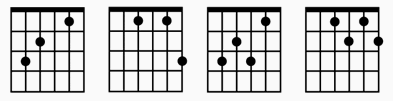
There are two main types of diagrams on my site.
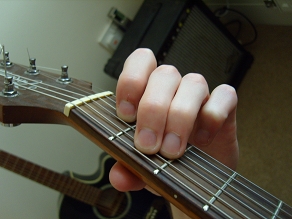
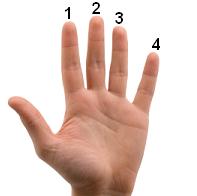
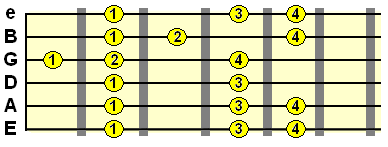
1) Fingering diagrams that use dots with numbers 1 - 4 representing your 4 fingers (1 = index/1st finger, 4 = pinky/4th finger). This simply shows you which fingers to press on which strings for a given chord form or scale pattern...
The above E major chord was a good example of the chord fingering diagrams, but there are also scale pattern fingerings...
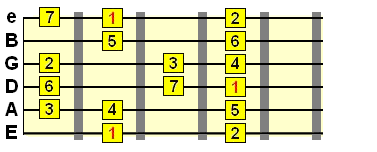
2) Interval diagrams that use squares labelled with the intervals/tones that make up a chord or scale. As you progress through the lessons, you'll learn exactly what these intervals/tones mean (for example, what a #4 is).
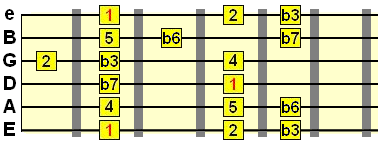
Learning chords and scales based on their intervals means you can apply them in any key or position. It's all about being able to understand relative pitch, rather than simply learning the notes of each and every scale and chord position/key.
For example, you might learn the notes of a C major chord are C, E and G, but what does that tell you about G major or C# major? You'd have to learn the notes for every single chord and scale! Time consuming and unnecessary.
Instead, if you simply learn that the intervals of ALL major chords are 1, 3 and 5, and learn how these intervals appear on the fretboard (which I show you), you will be able to move that relationship to any position and key, based on a visual relationship of intervals. Knowing the specific notes (letters) of the chord is secondary and, arguably, not necessary when you develop a good understanding of intervals.
What I do encourage students to learn are what I call the "root note reference strings" - the low E A and D strings, as the bass root notes for the most common chord forms and scale patterns are on these strings. They provide a quick, visual reference for first finding the root note of a chord or scale you want to play. You'll then naturally progress beyond these visual references.
Granted, it's not easy to explain, and I may have just confused you (sorry!) but I promise you will soon understand what I mean when you start working through the lessons.
Trust me, it works, and that's supported by countless positive comments. There is no reason why it shouldn't work for you too. If you have any problems interpreting the diagrams on this site, just fire me an email and I'll help you out.
Back to Guitar Lessons Home
Guitar Lessons Help
This page will go through some of the functions and diagrams you'll come across in lesson on the site.Sound Files
All mp3 sound files on this site will either open in your web browser or your computer's default media player (e.g. Windows Media Player, Real Player).If you want to download them, just right click on the sound link and click "save target as" or "save as".
Diagrams
The guitar lessons on this site use diagrams that, at first glance, may appear confusing or "the wrong way around".Typically, you'll find sites and books using diagrams that represent a "head on" view of the guitar fretboard, as if you're looking at someone else playing the guitar...
You also typically find chord charts using wire frame diagrams that position the guitar neck vertically, with the nut at the top...
Both these positions, I feel, can be difficult to translate because they do not represent your perspective, how you see the fretboard when you're playing the guitar.
Holding your guitar, this is what you'll typically see looking over the fretboard...
This is how you will see your fingers on the fretboard, so you will visualise chord shapes and scale patterns based on this perspective. This visualisation is important for memorising finger positions.
As your fingers move up the fretboard, your view will become more and more "side on".
So all my diagrams are positioned based closely on that perspective - lowest/thickest string at the bottom (capitalised "E"), highest/skinniest string at the top (lower case "e"). See how the below diagram faithfully represents the chord shape you see in the photo above...
I hope that clarifies why I use this positioning for my diagrams. I want them to help you visualise chord shapes and note patterns closer to your perspective so you can translate them directly to the fretboard, without to much twisting and turning in your head!
Also look out for fret numbers beneath the diagrams that specify at which fret the strings should be pressed. For example, this diagram...
Fret 3
...means you play that root (1) note on the low E string at the 3rd fret, with the other notes in the scale positioned relative to that (e.g. the 2nd note is at fret 5, the 3rd on the A string at fret 2, 4th on the A string at fret 3 etc.). Incidentally, that's a G major scale pattern because the root note is positioned on... G. More on that in the lessons!
If the diagram includes a thick black bar in the nut position (the bit where the head joins the neck of the guitar), you'll know we're down at those first few frets...
If there is no fret number beneath the diagram and no nut, that means I'm not referring to a specific fret position. This is when the scale pattern or chord shape is movable, meaning you can position it anywhere up the fretboard depending on what key you're playing in.
Therefore, if I'm just showing you the pattern or shape, the fret number isn't really important, because you'll position it at the appropriate fret when you start to use it in your music.
Fingering and intervals
There are two main types of diagrams on my site.1) Fingering diagrams that use dots with numbers 1 - 4 representing your 4 fingers (1 = index/1st finger, 4 = pinky/4th finger). This simply shows you which fingers to press on which strings for a given chord form or scale pattern...
The above E major chord was a good example of the chord fingering diagrams, but there are also scale pattern fingerings...
2) Interval diagrams that use squares labelled with the intervals/tones that make up a chord or scale. As you progress through the lessons, you'll learn exactly what these intervals/tones mean (for example, what a #4 is).
Learning chords and scales based on their intervals means you can apply them in any key or position. It's all about being able to understand relative pitch, rather than simply learning the notes of each and every scale and chord position/key.
For example, you might learn the notes of a C major chord are C, E and G, but what does that tell you about G major or C# major? You'd have to learn the notes for every single chord and scale! Time consuming and unnecessary.
Instead, if you simply learn that the intervals of ALL major chords are 1, 3 and 5, and learn how these intervals appear on the fretboard (which I show you), you will be able to move that relationship to any position and key, based on a visual relationship of intervals. Knowing the specific notes (letters) of the chord is secondary and, arguably, not necessary when you develop a good understanding of intervals.
What I do encourage students to learn are what I call the "root note reference strings" - the low E A and D strings, as the bass root notes for the most common chord forms and scale patterns are on these strings. They provide a quick, visual reference for first finding the root note of a chord or scale you want to play. You'll then naturally progress beyond these visual references.
Granted, it's not easy to explain, and I may have just confused you (sorry!) but I promise you will soon understand what I mean when you start working through the lessons.
Trust me, it works, and that's supported by countless positive comments. There is no reason why it shouldn't work for you too. If you have any problems interpreting the diagrams on this site, just fire me an email and I'll help you out.
Back to Guitar Lessons Home


