Home › Chord Progression Generator
Chord Progression Generator - Jam Tracks in Minutes
Just so you know... I use affiliate links on this page. That means I get a commission if you purchase through those links (though there is no additional cost to you). I only recommend products I personally use and find valuable myself. I use this particular program to generate backing for many of the example tracks you'll hear on this site and in my videos. I really appreciate your support!
Whether you're looking for ideas for the foundations of a song, custom backing tracks to test and develop your improvisation skills, or even instrumental and MIDI tracks you can download to add to your DAW project, a chord progression generator is a valuable, multi-purpose tool for any musician.
One of my favourite tools of late is ChordChord, which uses AI suggestions (optional) along with an intuitive interface that allows you to create fully editable chord progressions, in any key, with a rich choice of instruments and (if desired) rhythm tracks.
As it's an online program (accessed from your web browser), it can be used on any device with an internet connection.
It also avoids the complexities and learning curve of more advanced programs that involve additional, perhaps extraneous features (for most of us), beyond quickly generating chord progressions. There's a relative simplicity to ChordChord that keeps things focused, accessible and time efficient for the task at hand.
Let's take a look at the key features...
The Blank Slate

A fresh project. From the top left, you have the main project menu, which drops down to reveal several options...
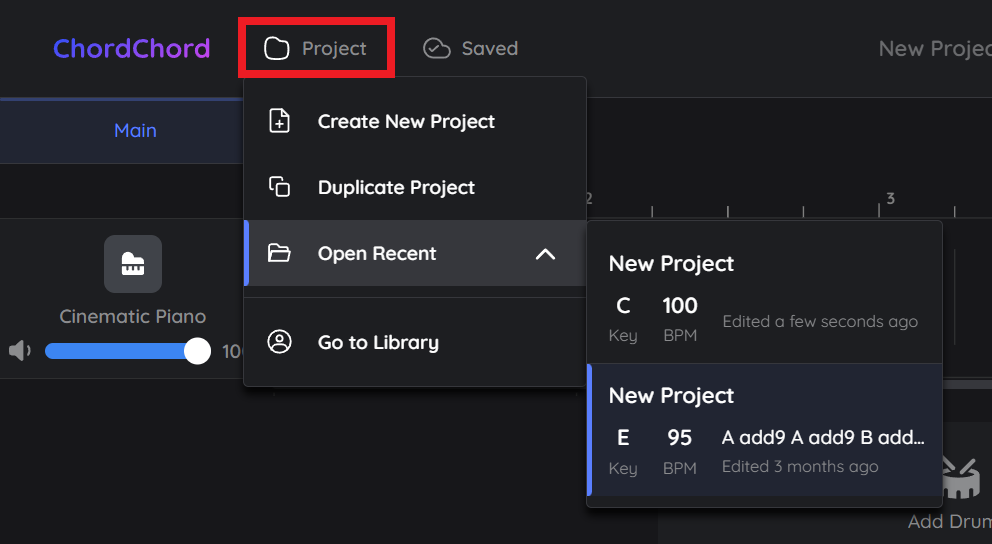
Create New Project - self explanatory! Creates a blank slate to start something from scratch.
Duplicate Project - opens any existing creation in a new tab for separate editing.
Open Recent - lists your most recent creations that have been saved.
Go to Library - a complete list of your saved projects can be accessed on a separate screen.
As long as you're logged in, any generating/editing you do will be auto-saved as soon as you add a new element (e.g. a new chord), so you won't lose anything. Just make sure you name the project at the center of the top bar to give it a unique reference.
Creating a Progression
Let's move on to the main event. Hit Create New Project from the top menu to be presented with a few options.

Here you can define the part of the song you want to create first. If you just want to create a basic, looping progression without any particular structure, just keep it on "main".
AI Starter - this will take you to an additional "bootstrap" menu where you can select Genre, and whether or not you want drums, to create the foundations of a randomised track you can then edit.
Create Empty - this will take you back to the timeline to select your own chords (any note and chord quality) and other elements from scratch.
A note about AI Remember that this is primarily a learning tool. However you choose to use the AI functionality (if at all), keep in mind that your creativity is number one. The tool won't create entire songs for you. But it will give you the foundations of a backing track that you can use to develop your accompanying skills and grow as a musician.
1. Choose Your Chords

After hitting Create Empty, you're given a blank timeline and two blank boxes for adding the chords (top) and the beat/rhythm (bottom - we'll come to that later).
At any time, you can hit the circular arrows to randomise a chord and/or drum track. However, we're going to create our own from scratch for this example.
So let's select our first chord by hitting the + symbol on the top (chord) box.

C becomes the first default chord. You can make it longer or shorter by dragging it from the tab at the bottom right of the box.
If you select that chord box and then hit the edit button in its top left corner, you can choose a new chord in its place (this goes for any chord you might build on the timeline).
This brings up a drop-down menu...

From the drop-down menu you have a choice of auto-generating a progression with "AI Suggestions". But let's instead focus on the other two options, starting with Diatonic Chords.
Diatonic Chord Suggestions

Here you're presented with three rows of potential chords that reside in the same diatonic key (C by default). Don't worry about the default selections as you can specify which chord type you want made available.
First, select a key from the bottom of the screen...

Here I've selected E as my key. This now means the three rows of chord suggestions have changed to the seven diatonic chords of E major.
However, you now need to select what chord type (triad, 7th, 9th etc.) you want displayed on each row...

To the right of the screen you'll see a "Major" button. This is where you can select either a major or minor diatonic key, which will determine our chord suggestions.
The button next to it (with the dots) lets us choose which chord type is displayed on each row...

The Chord Palette lets us choose between virtually any chord type for each row. Here I've selected triads for the first row, 7ths for the second and 9ths for the third.
These are just different ways of harmonising the chosen diatonic key on its seven degrees.

You can now re-select the first chord and add any additional chords to the timeline by selecting the + in the empty box. So this is the foundations of creating a diatonic chord progression that will work with major or minor scales.
Add as many chords as you like. You can hear them being played at the selected tempo by hitting the play button at the bottom. You can also choose to loop/repeat the sequence or have it played once.
Custom Chords
Let's go back to the chord menu from earlier. This time we're selecting All Chords, which allows you to select any chord, even non-diatonic (chords outside the major or minor scale of the key). So a little freer and more experimental.

Note that there are more chord options than displayed in the image (it was cropped!). So you can change the existing selected chord to any root and quality and then add new chords to the timeline in the same way.
2. Choose Your Instrument(s)

At the bottom of the screen, you'll see five boxes.
Select Instruments and you'll see a pop up where you can select between many instruments...

Here you can choose between a range of Keys, Guitars, Synths, Pads, Strings and Others.
Plus, a cool feature is Playing Style, which allows you to arpeggiate the chords in different rhythmic ways if you wish.
There's even an option called "Simple Bass" which only plays the bass note of each chord.

From there, you can add up to four instruments and styles, essentially overlaying them into a single track.
This is useful if you want multiple harmonic textures in your track, for example flowing strings or synths with more intricate piano. Really brings the track to life!
3. Choose Your Voicings

Here you can change how the selected chord is voiced. This includes changing the octave (the collective pitch of the voicing) and the ordering of the chord's tones (inversion).
You can potentially choose from eight different voicings, each one given a (rather unusually) unique name as an identifier.
The Velocity bar increases or decreases how hard that individual chord is struck (volume basically!).
4. Add Drums (if wanted)

Selecting + below the first chord block in the timeline will bring up the drum editor.
Like with the chord track, you have the choice of letting AI create a drum track (simply hit the refresh button to cycle through ideas), or you can manually edit where the kick, snare and other elements are positioned.
There are two main feature editors for the drums. One is the Instrument in the top left (the drum sound). The other is the Drum Preset Library along to the right (the beat pattern).
Once you find a pattern you like, you can always edit its elements, from kick to hi-hat placement and then save it as a Preset.
Other Features

You can bring up an interactive piano, which will show you the notes being played as the chord/track plays.
You can also play individual notes by selecting the key, which could have its uses (e.g. finding a melodic note that works with the chord).

You can even bring up guitar chord charts for a selected chord. When playing through the entire track you've created, the charts will change to match the chord and will most of the time give you two or more shape options.
Export & Share

Once you're happy with your creation, there are several options for exporting. Though you can just save it as a project within the app itself.
MIDI - allows you to export the track(s) as a MIDI file for use in your favourite DAW, where you can change the instruments using your own plugins.
WAV - Exports the track(s) as they sound, as a stand alone audio file. You're given the option of how many times you want the progression to loop.
MP3 - A more compressed version of the above. Smaller file size, basically.
PDF - Transcript of the chords used, including how to play them on piano.
Share - Gives you a link that takes you (or anyone you send it to) to a page where you can play the track you created.
Here are a couple of examples that were created in a matter of minutes...
Take a listen to how a simple four chord track I generated in ChordChord developed into something more elaborate...
Free Trial & Pricing Options
There are two subscription options - Platinum and Multi-Platinum. Both offer an initial seven day free trial.
See how they compare & learn more here
Sample the Chord Generator here - the free version has limited features and usage. But you can get a good idea of what the full version offers.
I hope you enjoy using this tool as much as I do!