


Home
> Progressions
>
Subdominant (4 chord)

The 4 chord works in relation to other chords in the scale, for example I IV V is the staple of blues progressions.
Over the next two lessons we'll look at the basic theory behind the subdominant and its function in major key chord progressions.
As always, you don't have to use it in your songwriting, but knowing about it will give you the option and help train your ear to hearing its relationship with other chords (for example, when transcribing songs you hear).
To understand why the subdominant is numbered as the 4 chord, it's helpful to take a quick look at the major scale...
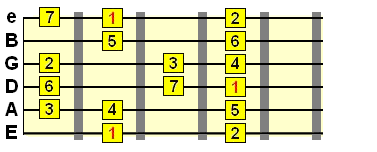
So, we learned in earlier parts that we can build a chord on each degree/note of the major scale (and it doesn't have to be layed out like in the boxed pattern above - that's just for quick reference). The tonic (I) chord is built on the 1st degree, which is why it determines the key of a progression. The dominant (V) is built on the 5th degree. The subdominant (IV) is built on the 4th degree.
Look at where the 4th note lies in relation to the 5th. It lies one whole step (W) down from the 5th. One whole step is the equivalent of two fret spaces.
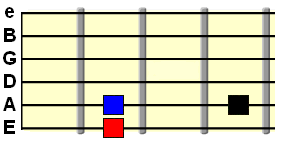
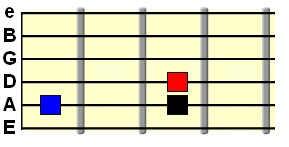
Therefore, using your knowledge of the tonic-dominant root note relationships at different fret positions from the first part, you should know where the subdominant (blue square) would fit into that...
Tonic root note on low E string...
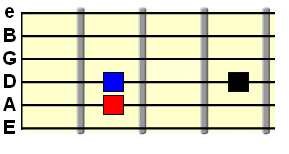
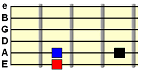
Tonic root note on A string...
Tonic root note on A string (but this time with lower octave dominant)...
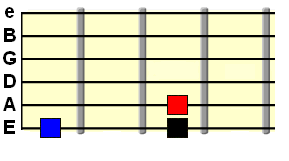
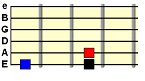
Tonic root note on D string...
As we learned before, we can build chords on these root/bass note positions to add to the chord scale. We now have a 3rd root note upon which to build the subdominant chord, in relation to the others. Remember, these relationships are movable. They keep their formation as you move them up or down the fretboard - just like a scale pattern when changing key.
When the tonic chord changes key, the other chords in the scale move in relation to it. This is why you can play the exact same song in several keys. It's why we use numerals to represent these chords - they specify the relationship between chords in a progression in ANY key.
Take a listen below to a very simple I - IV movement that showcases the musical relaxation of moving to the subdominant...
Click to hear
So even though I hung around on that subdominant chord for longer than the time I spent on the tonic, it still had that resolved feeling when I returned back to the tonic. However, there was far less unresolved tension than there would be if we tried the same with the dominant.
This is reflected in the fact that, in many songs you hear, the subdominant resolves back to the tonic far less commonly than the dominant does.
I - IV - V (...simply repeat)
This commonly used progression highlights the role of the subdominant used directly before the more tense dominant chord. It acts as a natural lead-up to the unresolved dominant chord.
I - V - IV
Another commonly used progression, and just an IV - V switch around of the above. The subdominant now becomes the unresolved chord, yet still with less tension than when the dominant is used in that position.
I - IV - I - V
This progression alternates from the tonic between the sub-dominant and dominant. From this, we can hear the distinction between the dominant as a tension chord and the subdominant as more of a "relaxed" point away from the tonic "home" chord.
You could also switch it around to I - V - I - IV for a similar relax - tension alternation.
...and remember, you don't always have to start on the tonic chord. For example...
V - I - IV - click to hear
IV - V - I - click to hear
It's amazing how many songs in the rock, pop and even classical genres use just these 3 chords, in different combinations, with different rhythms and tempos, chord extensions etc.
As far as rhythm and timing goes... it's really up to you how long you spend on a particular chord within a progression. Don't just count 4 beats for each chord - mix it up, experiment and see if you can enhance the relationship.
As we progress further through the section, we'll build up an entire scale (and beyond...) in which you can integrate this I IV V relationship. In other words, it can either work as a chord progression on its own, or it can be part of a larger musical expression.
Next lesson, just as we did with the dominant chord, we'll see how we can enhance the subdominant chord using its natural chord extensions.
Subdominant Variation
Main Guitar Chord Progressions Section
Subdominant IV Chord in Chord Progressions
The subdominant chord is just another chord relationship that occurs in many progressions. It is often referred ot as the "4 chord" (represented by the numeral IV) as it is built upon the 4th degree of the major scale.The 4 chord works in relation to other chords in the scale, for example I IV V is the staple of blues progressions.
Over the next two lessons we'll look at the basic theory behind the subdominant and its function in major key chord progressions.
As always, you don't have to use it in your songwriting, but knowing about it will give you the option and help train your ear to hearing its relationship with other chords (for example, when transcribing songs you hear).
Subdominant IV chord theory
So, just like other chords we've looked at in the main section, the subdominant chord, represented by an IV (4) numeral, is part of this major key chord scale we're building. This chord, like the tonic and dominant of major key chord progressions, is a major chord. We'll look at what types of major chord are compatible with this position later.To understand why the subdominant is numbered as the 4 chord, it's helpful to take a quick look at the major scale...
1
W
2
W 3
H
4
W
5
W
6
W 7
H
1
So, we learned in earlier parts that we can build a chord on each degree/note of the major scale (and it doesn't have to be layed out like in the boxed pattern above - that's just for quick reference). The tonic (I) chord is built on the 1st degree, which is why it determines the key of a progression. The dominant (V) is built on the 5th degree. The subdominant (IV) is built on the 4th degree.
Look at where the 4th note lies in relation to the 5th. It lies one whole step (W) down from the 5th. One whole step is the equivalent of two fret spaces.
Therefore, using your knowledge of the tonic-dominant root note relationships at different fret positions from the first part, you should know where the subdominant (blue square) would fit into that...
Tonic root note on low E string...
Tonic root note on A string...
Tonic root note on A string (but this time with lower octave dominant)...
Tonic root note on D string...
As we learned before, we can build chords on these root/bass note positions to add to the chord scale. We now have a 3rd root note upon which to build the subdominant chord, in relation to the others. Remember, these relationships are movable. They keep their formation as you move them up or down the fretboard - just like a scale pattern when changing key.
When the tonic chord changes key, the other chords in the scale move in relation to it. This is why you can play the exact same song in several keys. It's why we use numerals to represent these chords - they specify the relationship between chords in a progression in ANY key.
Subdominant chord function
Ignoring the dominant for now, if you play a tonic major chord followed by its related subdominant (use the root note relationships from above) you get what can best be described as a "relaxed" state. Unlike the dominant, the subdominant doesn't feel so "unresolved" or tense. As a result, musicians are able to stick around on the subdominant as a break within the progression, without the listener feeling too far "away from home".Take a listen below to a very simple I - IV movement that showcases the musical relaxation of moving to the subdominant...
Click to hear
So even though I hung around on that subdominant chord for longer than the time I spent on the tonic, it still had that resolved feeling when I returned back to the tonic. However, there was far less unresolved tension than there would be if we tried the same with the dominant.
This is reflected in the fact that, in many songs you hear, the subdominant resolves back to the tonic far less commonly than the dominant does.
Staple I IV V chord progressions
Let's play around with some typical 3 chord examples involving the 4 chord, using the root note positions from above. I'm simply building barre chords on those root notes, but if one of the root notes is on D, for example, you could play a D open chord. Same with a C root note - C open chord. Barred or open - your choice! You just need to know how to use chords in different positions on the fretboard.I - IV - V (...simply repeat)
This commonly used progression highlights the role of the subdominant used directly before the more tense dominant chord. It acts as a natural lead-up to the unresolved dominant chord.
| Position
(remember, you could use any 4 positions from above!) |
Chord example 1 | Chord example 2 |
 |
A
D
E Click to hear |
F
Bb
C Click to hear |
 |
D
G
A Click to hear |
C#
F#
G# Click to hear |
I - V - IV
Another commonly used progression, and just an IV - V switch around of the above. The subdominant now becomes the unresolved chord, yet still with less tension than when the dominant is used in that position.
| Position (remember, you could use any 4 positions from above!) |
Chord example 1 | Chord example 2 |
|
G
D
C Click to hear |
F
C
Bb Click to hear |
|
E
B
A Click to hear |
B
F#
E |
I - IV - I - V
This progression alternates from the tonic between the sub-dominant and dominant. From this, we can hear the distinction between the dominant as a tension chord and the subdominant as more of a "relaxed" point away from the tonic "home" chord.
You could also switch it around to I - V - I - IV for a similar relax - tension alternation.
| Position | Chord example 1 | Chord example 2 |
|
G
C
G
D Click to hear |
F#
B
F#
C# |
|
C
F
C
G Click to hear |
Eb
Ab
Eb
Bb |
...and remember, you don't always have to start on the tonic chord. For example...
V - I - IV - click to hear
IV - V - I - click to hear
It's amazing how many songs in the rock, pop and even classical genres use just these 3 chords, in different combinations, with different rhythms and tempos, chord extensions etc.
As far as rhythm and timing goes... it's really up to you how long you spend on a particular chord within a progression. Don't just count 4 beats for each chord - mix it up, experiment and see if you can enhance the relationship.
As we progress further through the section, we'll build up an entire scale (and beyond...) in which you can integrate this I IV V relationship. In other words, it can either work as a chord progression on its own, or it can be part of a larger musical expression.
Next lesson, just as we did with the dominant chord, we'll see how we can enhance the subdominant chord using its natural chord extensions.
| |
Tweet |
Stay updated and learn more
Sign up to the newsletter for updates and grab your free Uncommon Chords book
Sign up to the newsletter for updates and grab your free Uncommon Chords book
Related
Subdominant Variation
Main Guitar Chord Progressions Section


