


Guitar String Bending - The Basics
As a lead guitarist, string bending is an essential technique you need to learn. Using bends adds colour, emotion and "feel" to your guitar solos, and actually gives you a lot more physical freedom when playing scales.
Instead of
picking the next note, you can bend to it! You should at least
have that option.
I'm sure you know the basic
principle behind bending (you...uh...bend the string), but this lesson
will show you how to execute it with ease and get
you physically used to the action.
Note:
When
using an acoustic guitar, you'll find the
strings have a lot more tension in them (partly because you tend to use
higher gauge strings on acoustic), so bending will be slightly
more
difficult. I'll show you some finger exercises later on to help build
strength in your fingers.
String bending with ease on the guitar neck
A lot of beginner guitarists struggle with physically bending strings. The idea is to get as much finger power behind the string as possible. Think of it like lifting furniture - if there are 2, even 3 people, the job gets done much easier. Same with bending - to begin with, try using 3 fingers to bend the string more easily...
So whatever fret you're on, and you know you're going to bend at that fret, use your ring finger to fret the string and place your middle and index fingers behind to support it. You'll find this makes bending physically easier. Eventually, you probably won't need this support.
Now, obviously to use this technique, you'll have to know how to use your scales to actually get in the position where your ring finger lands on the fret you're bending at. We'll look at this another lesson - one step at a time!
Your fingers may be strong
enough as they are to
bend without the aid of 1 or 2 other fingers - the above method just
makes
bending less of a strain, especially on acoustic guitar.
Half step & whole step string bending
When you bend, you're essentially raising the pitch of the note being played, and you need accuracy with your fingers and with your ears to bend to the pitch you want. The new pitch after the bend is, in most cases, going to be part of the scale/key you're in for that particular song. That's where your judgement and knowledge of note selection comes in (yep, another lesson/section!).
Let's first look at bending a half step, which is the equivalent of moving up one fret in pitch.
1) Fret the G string at any fret with your index/1st finger (for this example we'll use the G string at fret 7, which is the note D)
2) Find your target note on the fretboard so you've got a pitch reference. This is the note you want to bend to and is important at first when training your ears. We said we'd be bending a half step, so the pitch we're bending to is the equivalent of one fret up from the original note.
3) Try bending to that new pitch from the original note...
Click the diagrams in this lesson to hear examples.
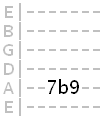
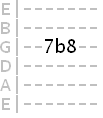 This
is how a string bend would typically appear in a
tab. In this example, we're bending from the 7th fret to the equivalent note of
the 8th fret. This
is how a string bend would typically appear in a
tab. In this example, we're bending from the 7th fret to the equivalent note of
the 8th fret.I have also seen people tab bends using the ^ symbol. For example 7^8 or 7^(8). |
Try different bending speeds. Sometimes you'll want a slow, lazy bend, other times you might want a quick, knee jerk bend (especially if following it with a pull off - more on this another time!).
You'll notice with a half step bend we don't actually have to bend the string that much.
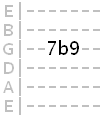
Now let's try a slightly larger bend - a whole step bend, which is the equivalent of moving up two frets in pitch.
Follow the same procedure as before, but this time find the new pitch a whole step up from our original note.
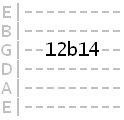
Bending degrees of one and a half steps (equivalent of 4 frets), and even larger intervals are no uncommon and occasionally used as a "climax" in a solo.
Don't forget the higher strings. These are slightly easier on the fingers!
Bending the bottom two strings
You'll have probably realised by now that when bending in the direction towards your head (pushing the string rather than pulling it), the A and low E strings are restricted by the edge of the fretboard. If you bend the A string more than half a step, in slips off the edge, and the low E string probably can't even make a half step bend.
Simple solution to this - just bend downwards, pulling the string down to the floor.
Let's try bending the low E string at the 7th fret. Try bending it a whole step (remember - that's the tonal equivalent of moving up two frets) by pulling the string downwards...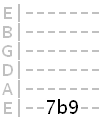
And finally the A string at the same fret, using the same downward motion...
You'll find that as you bend, especially if your guitar has a thin neck, you'll come into contact with adjacent strings. Simply go with the flow as if you're pushing them out the way as you bend, but without fretting them (unless it sounds good of course!).
Other simple string bending exercises
Let's put the basic bend technique to more practical use. Below are two common types of bend and some video demonstrations.The first sequence is best described as "pick - bend - pick - release". This is where you pick the note, bend it, then pick again at the peak of the bend and finally release the bend.
Take a look...
So remember - we pick again at the top of the bend so it can resonate while we release the bend. Speeded up, and mixed with hammer-ons and pull-offs, this technique will no doubt become a staple part of your lead playing.
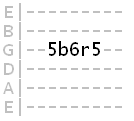
Another common technique is simply "pick - bend - release". So we only pick the note before and after the bend, not whilst in the bend position like in the technique before...
These types of bends are great for a sharp, "knee-jerk" effect.
Here's how such a bend would be tabbed out, with the "r" symbolising the release (5th fret - bend to 6th fret pitch - release back to 5th):
This video looks at how you can use simple bends to convey emotion in your guitar solos...

We'll look at some more techniques in the next part!
Quick string bending tips
- When bending you might notice your strings go out of tune easily. This is most likely because they haven't had such tension applied till now. In fact, bending is a great way to settle new strings in by stretching them out.
- The lighter your string gauge, the easier it'll be to bend. So with acoustic guitars the strings are naturally a heavier gauge which means more tension and more physical effort needed for bending.
- If you bend and hold the new pitch for more than a second and the note dies, apply another pick stroke and keep doing so until you move on from that note.
- Do you know
any scales? A lot of
guitarists get
used to bending using minor pentatonic because of the convenient
fingering, but try bending in different scales and modes (there are
backing track lessons for scales in the guitar
scales section).
Well, that's our introduction to guitar string bending... something new to play with when soloing.
In part 2, we'll look at more advanced bending techniques.
Of course, string bending can sound far more interesting when combined with other techniques covered in the lead guitar section. When you have more than one technique under your fingers, try combining them in your licks.
| |
Tweet |
Sign up to the newsletter for updates and grab your free Uncommon Chords book
Related Lessons
String Bending Part 2Bending in Scales
More Lead Guitar Lessons


