


Beginner Guitar Tapping Lesson
This lesson will look specifically at beginner guitar tapping and introduce you to the basic finger tapping technique. I've tried to make this as step-by-step and practical as possible, so you actually come away with a new soloing skill you can really use!First, the obvious question has to be answered...
What is guitar finger tapping?
Tapping involves using the tips of the fingers from your picking hand to hammer on and pull off strings in the same way you would using your fret hand.
The below video shows you tapping in action with an "over the shoulder" camera angle...
Once you get around to hammering using three fingers on your fret hand, and tapping using 1 or more fingers on your pick hand all in the same soloing phrase, you can create a very dynamic arpeggio effect which would otherwise be impossible to achieve with just the fret hand doing all the fretting work.
So now we know what tapping is and what it can achieve, where do we start?Beginner guitar tapping basics
We're gonna start simple. Work through this at your own pace.
|
Before
we
begin... Tapping is most commonly used under high gain/distortion. Acoustic/clean players do sometimes tap, but just be aware that guitar tapping without gain or distortion requires much more physical work on your hammer-ons and especially pull-offs. |
Which finger to tap?
Most guitarists tap using their middle (2nd) finger (like in the video earlier), because if you're picking using a plectrum and need to quickly switch to a tapping phrase, your middle finger will be instantly available and you can still hold the plectrum (between index finger and thumb) for when you go back to picking as normal.Play through the pain!
If you've not tapped before, you'll need to build up callouses (tough skin) on your tapping fingers in the same way you did on your fret hand fingers when learning chords as a beginner. So it may hurt at first, but play through it! The more you practice, the sooner you'll grow that tough skin.
Your first tapping exercise
We'll just stick to the physical side of guitar tapping for now, rather than learning how to tap within a key or scale effectively. That'll come later.
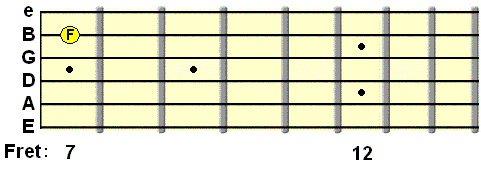
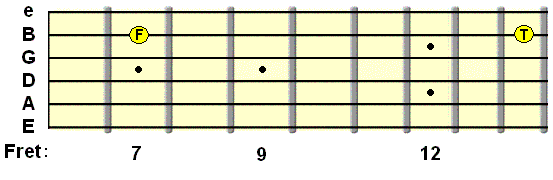
Try the exercise below. Fret the string of choice using your natural fret hand. Now you can tap at a particular fret using your chosen pick hand finger.
Try to tap in the same fret space position as the dot in the diagram - just before the fret wire, exactly where you'd fret normally! Remember, it's no different than when you're fretting using your normal fret hand.
F = fret hand finger T = tapping finger
At first, if you're using a lot of distortion/gain, you might hear unwanted strings/notes ring out because of the force of the tapping causing the fretboard to vibrate. Unfortunately, unwanted noise is the biggest problem most guitarists have to deal with. The idea is, though, you'll be playing over other instruments when soloing, and that definitely helps in masking those unwanted noises you simply cannot block out.
Try your best to keep your taps dead on target. If using high gain, the loudest and most prominant notes (i.e. the notes you're tapping) will dominate.
Start slow, speed up gradually! You need to try and keep that tapping rhythm constant - don't just tap as fast as you can without any thought for timing!
What does it sound like to you?
If your taps sound a little dead and lifeless, i.e. they don't resonate enough, try pulling off the string slightly, in a downwards plucking motion as soon as you've tapped down onto it. Use exactly the same technique as you would with a standard pull off.
With slower guitar tapping rhythms, you want to slightly pluck the string with your tapping finger so it'll resonate as you pull away, but you don't want to pull off too harshly or it'll sound like a bend!
As you start to tap quicker, the pulling off action becomes less important, as you'll only be holding on each note for literally a fraction of a second.
Remember, you can use a metronome to gradually build up your speed and confidence with guitar tapping.More beginner guitar tapping exercises
So now we know how to physically tap, albeit with a stationary couple of notes.
Now let's try the same thing but with movement in our fret hand fingers. This is one way of creating a guitar tapping melody - your tapping finger taps the same note (known as a pedal note) whilst your fret hand does the change work.
Try the simple exercise below and, like I said before, speed up gradually but don't lose that timing!
Now, it's up to you whether you decide to change fret/note using more
than one finger, or just slide the one finger around. Each has a
different effect.
If we use hammer ons and pull
offs using our fret hand fingers as well
as the tapping with our picking finger(s) we can double the effect it
has on the sound and timing!
All we have to do is come up with a sequence of hammer ons and pull offs and arrange them into the order that gets us the sound we want. A lot of this is down to experimentation, trial and error.
Take a look below at the sequence of pull offs and hammer ons I've built on gradually:
Let's start with our fret hand and create a simple hammer on - pull off 2 note phrase...
(Click the diagram to hear)

Try and keep to that timing for this exercise.
Now we can add the taps into the existing sequence however we wish...

The idea is to not lose that initial timing we established with our fret hand fingers. As soon as another note is added, you must add it without interrupting that initial timing.
So now we have a three note tapping phrase.
We can still add more! Let's try alternately tapping a different note, still keeping the same timing. This requires quite a bit more concentration as you need to pinpoint the correct change of fret for your taps, and of course, the faster you go, the more concentration is needed!

Like I said before (and you probably noticed in the clip above!) it's difficult to block out all unwanted noise when finger tapping, but when accompanied with rhythm guitar (which tapping 99% of the time is) it can disguise most of the noise ;)
Click to hear with rhythm guitar
We still don't have to stop
there! We can add a 3rd, 4th, 5th extra tapping note
as part of the sequence if we want. This is where your knowledge of
scales comes in handy, or if you're unsure, just try adding a note and listen
to see if it sounds good as part of that phrase. Trust your ears!
Beyond beginner guitar tapping
Hopefully this lesson should have introduced you to the physical basics of finger tapping which will add a little spice to your lead guitar. I say a "little" because guitar tapping shouldn't be used just for the sake of showing off. Eddie Van Halen was renowned for using tapping in a virtuoso manner, but also in a unique way that made it his signature style - find your style!In part 2, we'll be expanding on these basic guitar tapping techniques to create more complex and dynamic phrases. We've still got some essential physical elements to tackle.
For now, don't be afraid to experiment with what you know. For a head start, take another look at the tapping video from earlier (including the supplemental content provided), working one string at a time.
| |
Tweet |
Sign up to the newsletter for updates and grab your free Uncommon Chords book
Related
More Lead Guitar Lessons


