


Essential Finger Tapping Technique
In part 1, we were introduced to the basic physical aspects of guitar finger tapping (if you haven't taken that lesson, do so before you take this one!).This lesson will still be a very physical based lesson, because there's still some essential tapping technique we need to be comfortable with before we start getting our heads around the theoretical aspects, such as being able to tap in a given scale, or tapping arpeggios.
Ok, let's get to it...Getting comfortable with regular lead-tap changes
As a lead guitarist, you'll need to be confident with switching from regular pick playing (e.g. alternate picking) to tapping phrases, sometimes very quickly and seamlessly, depending on the style of music.
This is more difficult than it sounds. Firstly you have to move your picking hand from the guitar's bridge position, where you ordinarily pick, and place it accurately on that first tapped fret. It can be a large movement, so your hand-eye co-ordination needs to be top notch. It just takes... yep... practice!
Here's a little exercise to help you out...
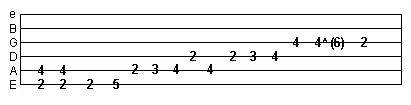
Play the below basic lead riff:
Click the diagram to hear
Now we're going to spice it up
a bit with a tapping phrase. What I've done in the example below is
have a little tap on the G string
from where the tab above ends. So our index finger should be in place,
ready on the G string at the 2nd fret, then we can add any extra
"layers"
into the tapping phrase we wish (part 1 covered these basics)...
You'll need to be quick and accurate when moving that tapping finger down to the appropriate fret, however, some guitarists prepare for this switch by actually picking down nearer the fretboard as you get close to the tapping moment, rather than wait for it at the usual position near the bridge.
Start off slow using a metronome and speed up gradually with your experimentations!Adding more pull-offs and hammer-ons to the fretting hand
Great tapping phrases can be made using two notes on the fret hand and a single tapped note. However, you can obviously add more notes to the sequence and "say" a lot more.
Again, you need to have at least taken the lesson in part 1 to be confident with pull-offs in finger tapping phrases.
There are many ways to arrange the sequence of notes in the tapping phrase. One way is to use a repetitive sequence of pull-offs as follows...
You can also pull-off and hammer-on in a cyclic motion like below...

Obviously I can't over every possible combination or sequence, but when you get around to learning your scales, it's really just a case of playing out a sequence like you would normally with your fret hand fingers and adding those taps in appropriately.
When writing a tapping solo, I always start with the fret hand, sort those movements out first, then weave the taps into the sequence.
Don't just tap-tap-tap on one fret either - your tapping finger can create its own little melody while the fretting fingers focus on theirs!Using more than one string in your finger tapping phrases
To be honest, most tapping phrases I hear (mostly in heavy metal guitar solos) are only done on one string for a few seconds. However, by using more than one string, you can jump around a given scale more easily. Just like if you were picking normally, you can play a fuller expression of the scale, and span more octaves if you play it across all 6 strings.
So if you want your tapping to sweep through a scale, you'll need to get comfortable switching strings smoothly, in rhythm and in sync with your tapping finger.
Take a look at the exercise below (F = fret hand finger, T = tapping finger)...
(Click the diagram to hear example)
That's a simple minor scale phrase across 4 strings. What you do with your tapping finger is up to you - either keep it in a fixed spot for each string, or move it around a bit which will require more concentration.
Also, play around with those fret hand intervals. Either use a repetitive, descending sequence like we looked at above, or "see-saw" between them. Come up with your own way to weave them into the tapping sequence.You don't always need to tap more than one string!
In some cases, you may find the backing music you're playing over allows you to simply slide a particular phrase or interval movement up and down the fretboard on a single string. So it's not the actual fret position that's fixed, it's just the interval used on your fret hand fingers that gets shifted up and down the fretboard.
Take a look and listen below to see what I mean. Notice how the interval on the fret hand fingers remains the same, it just descends as one block down the fretboard. In the example, I "see-saw" between those two fretted notes on the left using the hammer-on and pull-off techniques we've looked at before (I use my index and pinky finger).
You can keep the tapping finger on the same fret throughout, as the fretting interval descends, or try, like I do in the audio clip, to descend it following the fretted phrase...
Try your own patterns using this fixed-interval technique.
This lesson, along with part 1, should have helped you to get physically confident with the basic finger tapping technique. You're now ready to merge your knowledge of scales and create your own tapping phrases, based on this physical foundation. More help on this soon...
| |
Tweet |
Sign up to the newsletter for updates and grab your free Uncommon Chords book


