


Home
> Beginners
/ Rhythm
> Beginner
Strumming

There are two directions to strumming - down and up! Let's start with getting our down strumming in time with a simple rhythm. We'll add in up strokes later. That's the most effective way to do it - add layers to your strumming patterns and build it up in complexity.

...and just keep repeating that pattern in your head when playing. You'll see why this is useful later.
The important thing at this stage is to make sure you're in time. You can use a metronome to help with this (start slow!) and all the strumming exercises on this page. When using the metronome, down strum once per click.
When you feel confident with that, try strumming along to the backing track below which uses a drum beat in that same 4/4 timing. We're still just down strumming the E major chord for this backing track.
 Hear an example first
(notice how I double the timing in the second half)
Hear an example first
(notice how I double the timing in the second half)
Play the backing track here (right
click, "save as" to download)
Tip: Even though the bass is on E, you could try changing chord between E major and A major, as they are both compatible with that E bassline. More on changing chord later.
Keep practicing. It's so important to get that basic down stroke rhythm nailed to begin with. It's the foundation for what's to come.
To simplify it, the down strums will be your bass strum, hitting the bass strings with the most energy, and your up strums will hit the treble strings with the most energy, giving us a well balanced sound.
Keeping that 4/4 timing above, let's add in the up strokes...

In your head, think of the up strums as "...and...". Let's take a look at a video demonstration of the down and up strums in action together.
So, again, keep your wrist relaxed and flexible so it can glide over those strings without obstruction.
Again, make sure you initially use a metronome with all these beginner guitar strumming exercises. This time we're struming the up stroke evenly in between each click/beat.
When you're up to speed, try up and down strumming in time to the backing track below (E major again). Remember before I advised you to down strum every two clicks? Well, now we simply add in the up stroke on the click between each down strum.
Hear an example first
Play the backing track here (right
click, "save as" to download)
Although we now have up and down strokes to work with, the rhythm above can be modified to create a more intricate strumming pattern, which is what we'll do in the next lesson of this series. Before that, let's just have a brief look at changing chord using the basic 4/4 timing we've been using.
For this strumming exercise, I'll provide a fresh backing track to follow the chord changes.
Here's how we'll map out the chord changes:
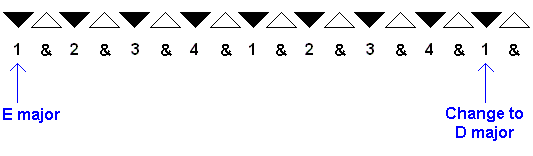
So we have two counts of 4 for E major before changing to D major, then the same two counts of 4 before changing back to E major, etc.
Listen to the example here
The tricky thing at first is keeping that up and down strum timing constant while your fret hand negotiates the chord changes. That's why we've done all this in stages. Don't let the chord changes interrupt your strum-hand momentum. Keep that strumming hand/arm in relentless, rhythmic motion!
Tip: It's often impossible to change chord within that tiny space of time between the last "and" and the next "1" beat, as you have to physically lift off the chord you're on to move to another chord. Unless you're superhuman, there's no way you'll be able to instantly move your fingers into position like that, especially if the chords are frets apart.
What many guitarists do, therefore, is use that final "and" (up strum in this case) before the chord change as the window to lift off the chord and change position ready for the new chord on "1"...
During the very small space of time on that "and", before the chord change, just strum the up stroke as normal. Don't worry that your fingers have lifted off the chord, because it's such a small fraction of a second that it will just blend in to the rhythm! As long as your fingers are back down on the new chord ready for the "1" down strum immediately after, it'll sound fine.
So, use the backing track below to change between E major and D major, using the up/down strumming pattern we've learned.
Play the backing track here (right
click,
"save as" to download)
Now we have the basics covered, we can move on to more challenging exercises. Make sure you're confident with everything covered in this beginner guitar strumming lesson before you move on...
More
Guitar Strumming Technique
Beginner Guitar Strumming - Basic Timing
This is the first lesson in the beginner guitar strumming series, so we're going to be starting with the absolute basics.There are two directions to strumming - down and up! Let's start with getting our down strumming in time with a simple rhythm. We'll add in up strokes later. That's the most effective way to do it - add layers to your strumming patterns and build it up in complexity.
Down strumming
Down strumming, as the name suggests, is where you strum down towards the floor. Naturally, then, down strums tend to provide the punch and drive of the rhythm, with the bass strings of your guitar receiving most of the energy from that downward strum.Action
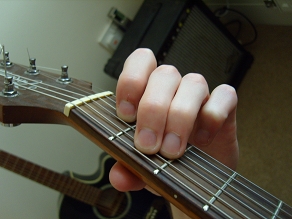
Watch the video below to see the down strumming action using the open E major chord, which uses all 6 strings of the guitar.
When you strum, from low E string to high E
string, make sure all
the strings in the chord are ringing out evenly. Stroke the
plectrum across them smoothly. Keep your arm and wrist joints relaxed. Just let
gravity do the work and let your plectrum fall over the strings.
Timing
It's easiest, at this stage, to group your down strums into 4 regular beats:...and just keep repeating that pattern in your head when playing. You'll see why this is useful later.
The important thing at this stage is to make sure you're in time. You can use a metronome to help with this (start slow!) and all the strumming exercises on this page. When using the metronome, down strum once per click.
When you feel confident with that, try strumming along to the backing track below which uses a drum beat in that same 4/4 timing. We're still just down strumming the E major chord for this backing track.
Hear an example first
(notice how I double the timing in the second half) Play the backing track here (right
click, "save as" to download)Tip: Even though the bass is on E, you could try changing chord between E major and A major, as they are both compatible with that E bassline. More on changing chord later.
Keep practicing. It's so important to get that basic down stroke rhythm nailed to begin with. It's the foundation for what's to come.
Beginner guitar strumming - adding up strokes
So, we have our foundations laid with the down strumming pattern above. Now it's time to get physically comfortable with strumming in an upward direction.To simplify it, the down strums will be your bass strum, hitting the bass strings with the most energy, and your up strums will hit the treble strings with the most energy, giving us a well balanced sound.
Keeping that 4/4 timing above, let's add in the up strokes...
In your head, think of the up strums as "...and...". Let's take a look at a video demonstration of the down and up strums in action together.
So, again, keep your wrist relaxed and flexible so it can glide over those strings without obstruction.
Again, make sure you initially use a metronome with all these beginner guitar strumming exercises. This time we're struming the up stroke evenly in between each click/beat.
When you're up to speed, try up and down strumming in time to the backing track below (E major again). Remember before I advised you to down strum every two clicks? Well, now we simply add in the up stroke on the click between each down strum.
Hear an example first Play the backing track here (right
click, "save as" to download)Although we now have up and down strokes to work with, the rhythm above can be modified to create a more intricate strumming pattern, which is what we'll do in the next lesson of this series. Before that, let's just have a brief look at changing chord using the basic 4/4 timing we've been using.
Changing chord when strumming
Back on the basic guitar chords page, we learned 5 essential open position chords. We're going to change between E major (from earlier) and D major using the same 4/4 rhythm.For this strumming exercise, I'll provide a fresh backing track to follow the chord changes.
Here's how we'll map out the chord changes:
So we have two counts of 4 for E major before changing to D major, then the same two counts of 4 before changing back to E major, etc.
Listen to the example here
The tricky thing at first is keeping that up and down strum timing constant while your fret hand negotiates the chord changes. That's why we've done all this in stages. Don't let the chord changes interrupt your strum-hand momentum. Keep that strumming hand/arm in relentless, rhythmic motion!
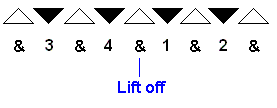
Tip: It's often impossible to change chord within that tiny space of time between the last "and" and the next "1" beat, as you have to physically lift off the chord you're on to move to another chord. Unless you're superhuman, there's no way you'll be able to instantly move your fingers into position like that, especially if the chords are frets apart.
What many guitarists do, therefore, is use that final "and" (up strum in this case) before the chord change as the window to lift off the chord and change position ready for the new chord on "1"...
During the very small space of time on that "and", before the chord change, just strum the up stroke as normal. Don't worry that your fingers have lifted off the chord, because it's such a small fraction of a second that it will just blend in to the rhythm! As long as your fingers are back down on the new chord ready for the "1" down strum immediately after, it'll sound fine.
So, use the backing track below to change between E major and D major, using the up/down strumming pattern we've learned.
Play the backing track here (right
click,
"save as" to download)Now we have the basics covered, we can move on to more challenging exercises. Make sure you're confident with everything covered in this beginner guitar strumming lesson before you move on...
Was this lesson helpful? Please let others know, cheers...
| |
Tweet |
Where Next?
More
Guitar Strumming Technique


