


Home
> Scales
> Harmonic
Minor Positions

By expanding out of the box, like with any scale, you'll have more freedom to move around intuitively, using slides, wide interval hammer-ons and pull-offs, tapping and other fluid lead guitar techniques to create fluid and musical solos. Literally - thinking outside the box!
Take your time, study hard and enjoy the rewards!
To do this, we first lay out the intervals of the scale across the low E string, giving us marker points for the 7 degree patterns we'll soon build. For this example, we're going to map out the scale's degrees based on a G root note. Therefore, we'll be playing the G harmonic minor scale...
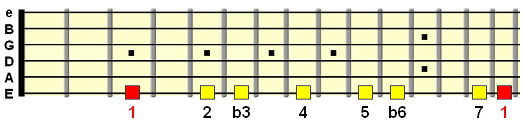
Remember, we're only in G harmonic minor for this particular example, but the pattern we're about to build will be movable, relative to the scale's root note.
Now, we already know the boxed pattern built around the root position from the scale lesson...
Now let's build a pattern from the next degree, the 2nd...
Moving on to the 3rd degree position. Obviously we'll get some overlap between the patterns, especially when the next degree is only a semitone (one fret) up from the last...
4th position. As we know the 7th is just one semitone (fret) lower than the root, we could play the 7th on the B string or G string...
5th position...
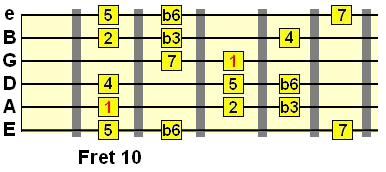
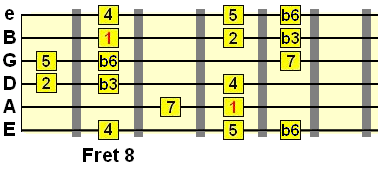
6th position (flat 6th degree)...
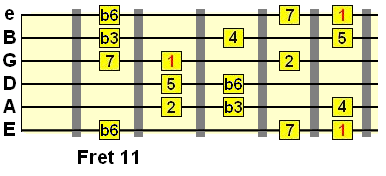
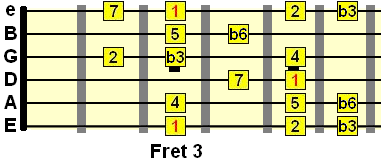
And finally the 7th position, which links us back to the root pattern...
I've also labelled it at the 2nd fret because we know that the 7th of harmonic minor is a leading tone of (a semitone lower than) its root, which in this example was G, at fret 3.
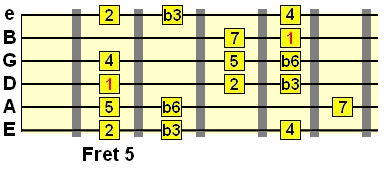
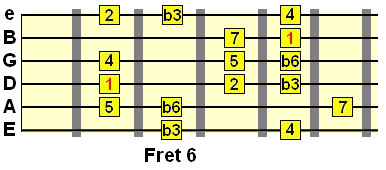
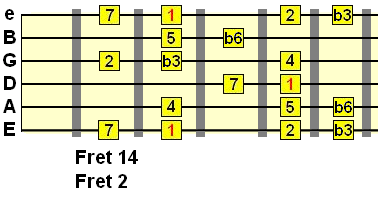
So, 7 positions for the harmonic minor scale creating one large scale pattern. Here's a simple animation of what we've created...
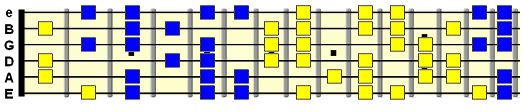
Just like a conveyor belt, it comes back around as the octaves past the 12th fret correspond to the lower frets, before our root pattern.
The task for you now is to ensure you can transpose this pattern to any key (e.g. A harmonic minor, F harmonic minor, C# harmonic minor etc.). It's all about identifying the root notes (see the fretboard lessons for more on that) and finding your bearings from that point.
By understanding interval relationships, we should know that in harmonic minor, the 7th (also known as the major 7th) is one semitone lower than the root. This is the equivalent of one fret position. You can see from the pattern above that this is the case no matter where you are on the fretboard.
Similarly, the relationship between the root and 5th, or 7th and 5th remains the same no matter where you are. The only thing that causes its appearence to change is the tuning between the G and B string, which is a different tuning interval from the E-A, A-D, D-G and B-e strings. Therefore, we accomodate this accordingly.
Thing is, because the root and 5th occur in both major and minor scales, their relationships will appear the same for many scales, so it's not like you have to go through this process with each individual scale.
By picking out groupings of 3 or 4 tones and testing your knowledge of intervals like this, you can quickly develop a more "big picture" view of scales across the fretboard.
Keep working on it, testing yourself and making notes of your progress. The rewards should be plainly evident.

Harmonic Minor Positions on Guitar
This lesson is a continuation from the harmonic minor scale lesson. We've learned the basics of the scale, now it's time to learn harmonic minor positions across the entire fretboard so we can create one, large "unboxed" pattern.By expanding out of the box, like with any scale, you'll have more freedom to move around intuitively, using slides, wide interval hammer-ons and pull-offs, tapping and other fluid lead guitar techniques to create fluid and musical solos. Literally - thinking outside the box!
Take your time, study hard and enjoy the rewards!
The 7 harmonic minor positions
We know from the harmonic minor lesson that the scale contains 7 tones. These are also known as degrees. The most practical way to learn the scale across the entire fretboard is to first build patterns around each degree, then link them together into one large pattern.To do this, we first lay out the intervals of the scale across the low E string, giving us marker points for the 7 degree patterns we'll soon build. For this example, we're going to map out the scale's degrees based on a G root note. Therefore, we'll be playing the G harmonic minor scale...
Remember, we're only in G harmonic minor for this particular example, but the pattern we're about to build will be movable, relative to the scale's root note.
Now, we already know the boxed pattern built around the root position from the scale lesson...
Now let's build a pattern from the next degree, the 2nd...
Moving on to the 3rd degree position. Obviously we'll get some overlap between the patterns, especially when the next degree is only a semitone (one fret) up from the last...
4th position. As we know the 7th is just one semitone (fret) lower than the root, we could play the 7th on the B string or G string...
5th position...
6th position (flat 6th degree)...
And finally the 7th position, which links us back to the root pattern...
I've also labelled it at the 2nd fret because we know that the 7th of harmonic minor is a leading tone of (a semitone lower than) its root, which in this example was G, at fret 3.
So, 7 positions for the harmonic minor scale creating one large scale pattern. Here's a simple animation of what we've created...
Just like a conveyor belt, it comes back around as the octaves past the 12th fret correspond to the lower frets, before our root pattern.
The task for you now is to ensure you can transpose this pattern to any key (e.g. A harmonic minor, F harmonic minor, C# harmonic minor etc.). It's all about identifying the root notes (see the fretboard lessons for more on that) and finding your bearings from that point.
Using harmonic minor positions to expand out of boxed think
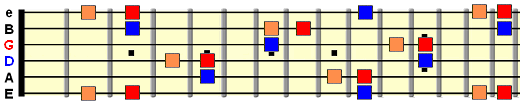
It's important to not only learn scale patterns but to understand the intervals/degrees of the scale, in relation to each other. For example, below is the above pattern with just the root, 5th and 7th tones highlighted.By understanding interval relationships, we should know that in harmonic minor, the 7th (also known as the major 7th) is one semitone lower than the root. This is the equivalent of one fret position. You can see from the pattern above that this is the case no matter where you are on the fretboard.
Similarly, the relationship between the root and 5th, or 7th and 5th remains the same no matter where you are. The only thing that causes its appearence to change is the tuning between the G and B string, which is a different tuning interval from the E-A, A-D, D-G and B-e strings. Therefore, we accomodate this accordingly.
Thing is, because the root and 5th occur in both major and minor scales, their relationships will appear the same for many scales, so it's not like you have to go through this process with each individual scale.
By picking out groupings of 3 or 4 tones and testing your knowledge of intervals like this, you can quickly develop a more "big picture" view of scales across the fretboard.
Keep working on it, testing yourself and making notes of your progress. The rewards should be plainly evident.
| |
Tweet |


