


Using Hammer Ons & Pull Offs Together
This page continues on from the individual hammer on and pull off lessons (make sure you're confident with these first). We're now going to combine these two techniques to create "slurred" lead guitar phrases, known more broadly as legato playing, requiring less use of your picking hand to do the work.When using hammer ons and pull offs together, in a rolling or slurred phrase, you need the physical strength and articulation to apply both techniques using various finger combinations.
When you're ready, we can take
our fingers to the gym once again with some exercises to combine these
two
techniques effectively!
 Basic hammer on and
pull off exercises
Basic hammer on and
pull off exercises
Just like in the introductory lessons, we're going to make use of different finger combinations so we can physically get used to the different note intervals we'll come across in the scale patterns we learn.
The most common way to apply both techniques together is to apply the hammer-on and immediately pull-off back to the starting note. You can obviously do this at various speeds.
Let's try the hammer-pull interval exercises below...
Click the diagrams in this lesson to hear examples.
Half step (one fret) interval
Let's look at the different finger combinations for this interval.
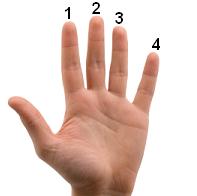
Using your index (1) finger and middle (2) finger...
Now try using your middle (2) finger and ring (3) finger.
Then try using your ring (3) finger and pinky (4) finger.

Using your index (1) finger and ring (3) finger...
Now try using your middle (2) and pinky
(4) finger for the same interval.

Using your index finger and pinky finger...
Now, all these intervals (and even larger ones, especially when higher up the fretboard) can be used when you're soloing around a scale. It's all about using your personal judgement and musical expression to pick out these intervals in the scale patterns you learn and apply hammer ons and pulls offs wherever you think sounds good.
Remember, hammer ons and pull
offs are just another lead
technique
to spice up your
solos, so only use them when they complement the music you're trying to
create!
Hammer on and pull off trills
Another common use of the two finger hammer-pull technique is known as a trill. A trill is a fast alternating movement between two notes. Therefore, we can simply extend the hammer-pull sequences from above as follows: pick-hammer-pull-hammer-pull-hammer-pull-hammer-pull-etc.
So, try this technique across all strings using the intervals from earlier. Also try different finger pairings (trill between index and middle, index and ring, index and pinky).
The trill is a nice effect to add occasionally to your solos!
Larger legato phrases
This is where it gets slightly more difficult physically. Only when you're comfortable with the above intervals should you move onto larger, more complex phrases involving three fingers.
The most important thing in larger runs is to know when to pick in between the hammers and pulls. This essentially keeps the rhythm and timing constant (as picking has a firmer sound to hammering on/pulling off).
Try the below (again, across all strings) as physical exercises for your fingers that you'll later apply to various scale patterns as you learn them (the theory side of lead guitar).
The red fingering marks the position you should pick the string to begin the sequence. The rest of the sequence is hammer-ons and pull-offs - one pick per cycle.
Index, ring and pinky combo

Index, middle and pinky combo

Index, middle and ring combo - wider pattern
For hammer-pull phrases spanning 5 frets/2 whole tones. Good for use higher up the fretboard where the fret spacings are narrower.

Index, ring and pinky combo - wider pattern
For hammer-pull phrases spanning 6 (or more) frets
You don't have to just use cyclic hammer-pull sequences either. Try the below technique (known as pedal point) on the finger combinations from above...

There are of course more possible
hammer-pull intervals/combos, especially when you're playing higher up
the
fretboard, so try and come up with some yourself!
Trills and open string hammer on/pull off exercises
In the video below, Neal Walter shows you a couple more staple hammer-pull techniques. Take a look...

Inserting legato phrases into your solos effectively
After following the exercises in all three hammer-on / pull-off lessons (more exercises here), you should be physically confident to experiment with these techniques in your solos. You should now have the freedom to use any finger combination for the interval and sound you're trying to achieve.However, it doesn't end here, because there are timing elements to think about when inserting hammers and pulls into your scale phrases. Randomly throwing them in won't accomplish much, so I will be covering how to insert them seamlessly into your solos in a later lesson.
Like I keep saying, this is only the physical side of things covered - you need to know your scale patterns in order to know which hammer on / pull off intervals can be used... and how to get in the right position for them. This is the physical/theory split in your learning you need to think about.
So, still lots more to learn, but we've made excellent progress here! Thanks for your time.
| |
Tweet |
 Like This?
Subscribe & Learn More... Like This?
Subscribe & Learn More...Subscribe to the fretjam newsletter below for updates and extras, plus grab your free copy of Uncommon Chords: 101 Vibrant Voicings You Won't Find on a Typical Chord Chart. |


