


Guitar Chord Picking & Flatpicking Technique
Welcome to the guitar chord picking series! Over the coming lessons, we'll be learning about one way of playing chords on your guitar, an alternative to strumming but still using the guitar pick.What does chord picking involve?
Rather than play all the strings/notes of a chord at once, as with strumming, you instead separate the strings/notes out, one by one, using different picking rhythms and patterns. When using a plectrum/pick to pluck the strings, the general name for this kind of playing is flatpicking, the other main picking style being fingerpicking.Now, if you entered a "flatpicking contest", you would most likely find yourself in competition with bluegrass guitarists, as the flatpicking term has become most associated with bluegrass playing styles. However, in general terms, flatpicking is simply about picking using a plectrum, in a non-lead guitar context, making it predominantly a rhythm guitar technique.
When the notes of a chord are separated out one by one like this, it is known as an arpeggiated chord, and creates a very different effect to strumming.
Chord picking can get very complex, and it's ultimately down to you to experiment with different rhythms, tempos and patterns. But this series will lay the foundations you need to develop naturally. There'll be video, audio, tab/diagram exercises and backing tracks to help you become physically confident with flatpicking.
If you're a beginner, watch the video below for a great intro to picking...

Chord Picking Basics
The first thing we need to be clear on is hand positioning. Many guitarists find it helpful, for stability, to rest their pinky/little finger on the pick guard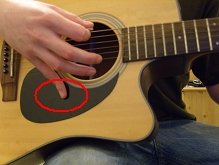 (or
around that area if you don't have a pick
guard).
(or
around that area if you don't have a pick
guard).This helps to maintain a set distance between your picking hand and the strings, and therefore keeps your action consistant, meaning better control for rhythm and timing. Strike the strings in exactly the same place you would if you were strumming (this was covered in the strumming series).
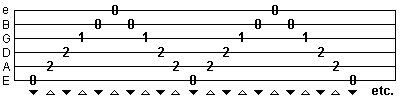
Let's start by picking the notes/strings of the open E major chord, as this will get us physically used to playing across all 6 strings. Using the positioning from above, we're going to pick from low E string to high E string, then back again.
This is where alternate picking comes in...
You start with a down pick, followed by up, down, up, down, up etc. - one pick per string.
Take a look using the down and up pick arrows in the tab below...
If you're unsure, watch this video closely and observe the picking action:
You'll obviously need to start off slow.
Make sure every pick, up or down, is clean and strikes just the one
string at a time. It's important to maintain a constant tempo, and
the best way to become disciplined with this is with a metronome.
Use the metronome to gradually speed up, but don't jump in at the deep
end. Only speed up when you can play cleanly and accurately at your
current speed!
So that's our basic chord picking action - the foundations we'll be
building on throughout this series.
Now,
you won't always be picking across all 6 strings like that and you
won't always want to simply travel up and down the chord. For example,
still using the E major chord and alternate picking, you could start at
the low E string root note and play up to the G string, before starting
the sequence again on the low E string...
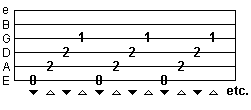
This requires you to "skip" from the G string back down to the low E,
and is a good initial exercise to work on with a metronome,
before we move on to more complex string skipping. Take a look at the
video to see this in action:
Try these simple patterns with other chords you
know.
When
you're confident with the above (and you could spend up to a week on
just that if you want to get it perfect!), onwards and upwards...
Picking Through Chord Changes
OK, this is where things get a little more complicated, and where you're going to have to have a little more patience! It will frustrate you at times, you may even feel as if it's "impossible" at times. But all this takes is time and persistence... like so many challenges in life.Changing chord means you most often have to interrupt your picking rhythm and change your starting string/note. The idea is that chord changes should help to form the picking rhythm.
Take a look at the below exercise. Two chords, two picking patterns.
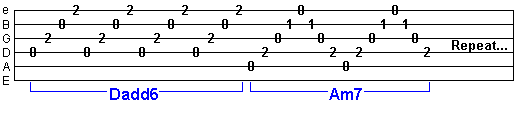
Same applies - use alternate picking and use a metronome to start slow and build up your confidence gradually.
What about changing between 3 chords? Little more to think about. See below:
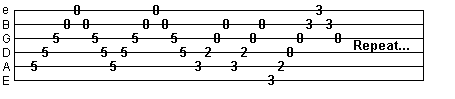
That one may take some time to accomplish at faster speeds, but try working on your own similar exercises, using chords you know and mixing different patterns with the chord changes. At this stage, just stick to the "straight up" or "straight up and down" patterns we've looked at, as we'll be developing these in future lessons.
| |
Tweet |
 Like This?
Subscribe & Learn More... Like This?
Subscribe & Learn More...Subscribe to the fretjam newsletter below for updates and extras, plus grab your free copy of Uncommon Chords: 101 Vibrant Voicings You Won't Find on a Typical Chord Chart. |
Where Next?


